If you want to grow your business faster, then you should create these TOP 7 Social Media content types:
Story posts
Value and knowledge
Poll Questions
Freebies
Images
Videos
Funny posts
What are the TOP seven types of Social Media content?
1.) Story posts
Story posts do very well in any business or niche. That’s because your audience will get to know, like, and trust you.
Trust is the key point of successful sales. Without it, your audience won’t buy from you.
PRO tips:
Share your stories more often,
Make sure your stories evoke emotions,
They shouldn’t be boring,
The stories have to be relevant to your product,
Share a structured story.
2.) Value and knowledge
You will first have to give value to your audience before they even consider buying from you. If you want to stand out from the crowd, make sure you are not sharing mediocre knowledge.
PRO tips:
Find trending topics in your niche and share top tips,
Analyze your competitor’s content, see what’s missing, and share an improved version,
Always under-promise and over-deliver,
If you can, include great visuals.
3.) Poll Questions
From my experience, poll questions are the best for boosting engagement on Social Media. It is easy for people to click on one of the options you give them. That’s why so many are interacting with it.
PRO tips:
Another advantage of poll questions is that you can get to know your audience better.
Ask them what they struggle with or what they want to learn next,
Then give them a couple of options they can choose from,
That’s how you will know what topics they are interested in,
Then create more content around those topics
4.) Freebies
A freebie should help your audience with a specific problem. Something they are struggling with.
You don’t need to solve all of their obstacles, but you should share enough knowledge to give them some results.
PRO tips:
Do your research and figure out what your audience is struggling with most,
You can create a mini e-book, mini e-course, a checklist, guide, etc.,
Make sure you collect the emails (grow your email list),
Don’t forget to nurture your subscribers even after they receive a freebie (provide more value in the future)
5.) Images
Images are an essential part of every Social Media platform. So make sure you put more effort into creating amazing visuals that will attract people. Experiment with different fonts, colors, photos, elements, etc.
PRO tips:
Bright colors usually work best (test it out to see how your audience reacts),
Make sure your fonts aren’t hard to read
Only use photos that are of excellent quality
6.) Videos
Video marketing will have a significant impact on your business. The more people hear and see you, the more they will trust you. And as you know by now, building trust is crucial for your success.
PRO tips:
Use good lighting and microphone,
Look into the camera (your audience has to feel you’re talking with them),
Before you create a video, map out what you are going to talk about
Ask your viewers questions
Thank them for watching the video
7.) Funny posts
Sometimes it’s good to lighten up the mood. Create a humorous post (GIF, video, image, etc.) related to your business or life.
You will be blown away by how many people will relate to you. Not only will you get more engagement, but your audience will like you more.
PRO tips:
Don’t joke around about sensitive topics (you might hurt someone’s feelings, and that can damage your business & brand),
Include visuals (images, videos, GIFs) to make your post more interesting.
Conclusion
You’ve got a lot of opportunities with these 7 types of social media content. They can boost your business’s growth, so let’s recap:
Story Posts: They’re your secret ingredient for building trust. Remember, sharing is caring, especially your journey.
Value and Knowledge: Stand out by being the go-to expert in your niche. Your audience craves insights, not just mediocre information.
Poll Questions: This is your two-way street for engagement. Ask, learn, and tailor your content to fit their needs.
Freebies: Who doesn’t love a good freebie? You’ll hook more potential leads and they’ll have a taste of your value, which builds trust.
Images & Videos: Visuals are your best friends for catching attention. Keep them original and vibrant.
Funny Posts: Lighten the mood, make them smile, and they’ll remember you for all the right reasons.
But remember to be genuinely you. Each type lets you show your brand and personality. Dive in, experiment, and see which types resonate most with your audience.
And before you go, please share this article with fellow digital marketers to help them get more engagement and reach on social media.
As you create more and more videos, you’ll likely find yourself choosing to use visual elements with common characteristics. It could be something subtle, like a color palette or font that represents you or your brand. Or something more obvious, like a motion graphic or a transition effect between shots. If used consistently, these elements will become familiar touchstones for your audience. Over time, your unique creative decisions will start to establish themselves as hallmarks of your signature visual aesthetic. And that will help your audience connect more deeply with your videos.
Defining and refining a unique visual aesthetic for your videos is super important for cementing your channel or brand in audiences’ minds. But did you know it also helps you create content more efficiently?
Tip 1: Visual aesthetics and efficiency go hand-in-hand
You have endless creative and stylistic choices when it comes to making videos. Different combinations of lighting, effects, and camera movements can all result in a completely different finished product. It’s easy to get overwhelmed by so many options. To combat this, Chrys suggests focusing on the things you like, and allowing your unique style to emerge organically.
Identifying the visual elements you’re naturally drawn to is your first step on the path to establishing your signature visual aesthetic. Then, using those elements consistently across your videos is a surefire way to ensure your unique style will shine through. But that’s not the only benefit. Favoring certain aesthetic choices can also streamline your production process.
If you find yourself using specific lenses, lighting setups, or camera angles, take note of them for next time. This will reduce the number of production decisions you need to make every time. And that makes it a lot easier (and faster) to plan how and where you’ll set up your equipment.
Keep your lighting consistent for a recognizable visual aesthetic
Pay attention to how every shot is lit in your videos. This includes lighting color, intensity, and warmth. Different types of videos tend to favor different lighting setups, and each will create a distinct ambiance that the viewer will feel.
Softer light, for instance, bathes the subject in a gentler, more flattering glow. You might use this more diffused lighting style if you make interview or testimonial videos with a lot of “talking head” shots. Hard light, on the other hand, is meant to stand out. It’s generally reserved for scenes where you want to heighten the mood, such as a harsh, concentrated ray of sunlight beaming through a window. Whatever kind of lighting you use, be sure it looks the same throughout your videos.
A pro tip on how to use natural light: Windows are great, free light sources. You can easily alter the light from windows with sheer, textured, or patterned curtains to create different lighting effects.
Use the same camera and lens combinations throughout
You can use various cameras and lenses to give your videos dramatically different looks. Narrowing down your go-to camera/lens combos will not only give your videos a more recognizable aesthetic, it can also streamline your production process.
When you go into a shoot knowing which angles, equipment, and lighting sources you’ll use, it reduces the number of production decisions you’ll have to make on the spot. That can save you precious time and mental energy (as well as some weight in your camera bag).
Tip 2: Watch your assets
Creating videos requires a ton of decision-making, particularly around which assets to use. This can include everything from fonts and lower thirds to motion graphics and transition overlays. Chrys says it’s important to avoid getting bogged down by the avalanche of choices you have.
We likes to keep his visual aesthetic simple. He only uses a single font and a handful of motion graphics and transition overlays in his videos. Some people incorrectly consider this a lazy approach. The truth is, these touches help make his videos stand out to his audience. That’s because they’ve come to recognize the consistent style cues he uses and has identified a bespoke combination of assets, angles, lighting, and gear that give his videos a signature look while streamlining his entire process.
Tip 3: Use color to your advantage when creating a visual aesthetic
The colors you choose to highlight in your videos can be a powerful visual differentiator, but selecting them can be time-consuming. Having a color palette in mind before you start shooting will drastically reduce the amount of time it takes to make your videos. One specific thing you’ll want to pay attention to is color temperature, which measures the “warmth” or “coolness” of your light sources.
Soft, warm lighting is what you might want to capture if you’re shooting in restful settings like homes, restaurants, and hotels. For places like doctor’s offices, warehouses, and sports stadiums, harder, cooler lighting will usually help express the visual vibe you’re going for. Different light colors can make viewers feel a range of emotions, so don’t take that power for granted.
The time of day you film is another factor that affects the color in your videos. We prefers shooting during the day because it helps him achieve the warm tone he really likes. During the editing process, he simply copies and pastes his favorite color presets from his previous videos. Those presets speed up his process immensely, and ensure consistency across different projects. Every filmmaker is different, so shoot at the time of day that makes the most sense for the visual tone you want to capture in your videos.
Using color consistently for branding and visual aesthetic
Color is a subtle but important branding signal, too. So, be sure to be consistent with color choices in your videos when considering your visual aesthetic, including any visual elements you incorporate.
As you work through your own creation process, pay attention to the colors that give your videos an aesthetic you love. Then, create your own presets so you can use them consistently from video to video. It will help solidify your signature look while also speeding up your production.
If you have a budget for paid social, you should strongly consider running Instagram ads. Why?
Ads on Instagram reach 96.6% of Instagram’s active user base every month. That’s a total of almost 2 billion potential customers! And the target group is still growing — data from Meta shows that Instagram’s ad reach has jumped by 21% in the last year, despite changes in its ad reporting.
This guide will walk you through how to advertise on Instagram, including an easy guide to creating your first Instagram ad.
What are Instagram ads?
Instagram ads are posts businesses can pay to serve to specific target groups on Instagram.
These ads appear in users’ feeds, Stories, and explore pages in the same format as organic content from other Instagram accounts.
Instagram ads can contain images, videos, carousels (multiple images), or collections (dynamic product galleries).
Instagram ads look similar to normal posts but always contain a Sponsored label to indicate that they are an ad. They also often have more features than a normal post, such as links, CTA buttons, and product tags.
How much do Instagram ads cost?
The cost of Instagram ads depends on the total budget, duration, and objectives you’ve set for your ad or campaign. You can set a daily or lifetime budget for your Instagram ads, so it’s up to you how much you want to spend. Note that there is no best practice for how much to spend, but Meta recommends starting with at least $5.00 per day.
While there is no average or benchmark price, some cost factors can include:
Your specific audience targeting
The competitiveness of your industry
The time of year (costs often go up during holiday shopping periods in Q4 such as Black Friday)
Your chosen placement (costs can differ between ads shown on Facebook vs Instagram)
Advertisers can set their maximum bids for each auction or let Instagram optimize them automatically. So, if you’re new to advertising through Instagram, it’s best to start with a low maximum bid to gain some experience.
Once you have gained more insight into the competitive landscape for your chosen industry and demographics, you can decide if raising your maximum bid is necessary.
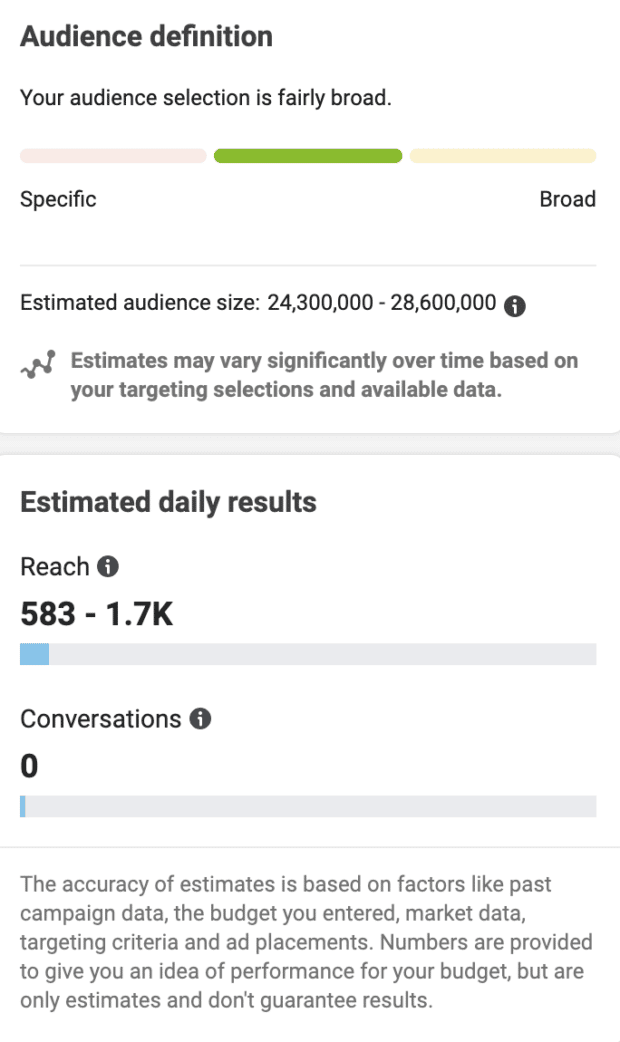
The best way to evaluate your budget is to set up a draft campaign in the Instagram Ad Manager and look for the Audience Definition and Estimated Daily Results modules, which will tell you if your budget settings will be sufficient to reach your desired audience within your desired campaign duration.
Types of Instagram ads
There are many different types of advertising formats on Instagram, including:
Image ads
Story ads
Video ads
Carousel ads
Collection ads
Explore ads
Shopping ads
Reels ads
The wide range means that you can choose the best ad type that matches your specific business goals. Instagram ads now support six simplified campaign objectives. Call-to-action options will vary based on the ad type and objective you choose, see more on that below.
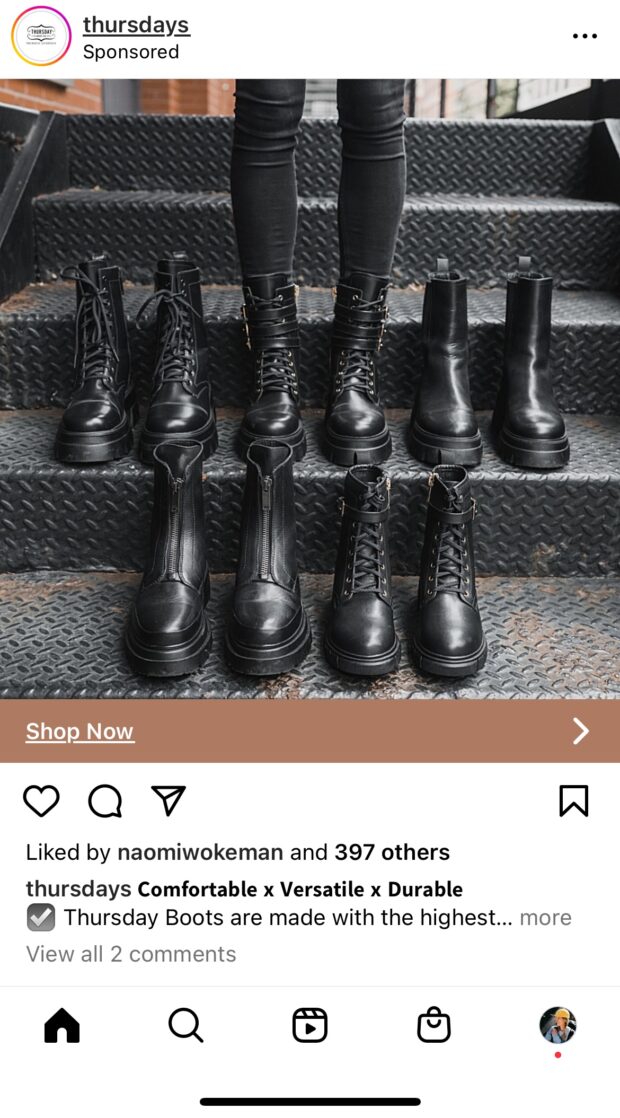
Image ads
Instagram image ads allow businesses to use single images to advertise their brand, products, and services.
Instagram image ads are best suited for campaigns with compelling visual content that can be conveyed in a single image. These images can be created from high-quality photography or design and illustration.
It’s also possible to add text to images. However, Instagram recommends limiting overlaid text as much as possible for accessibility and best results.
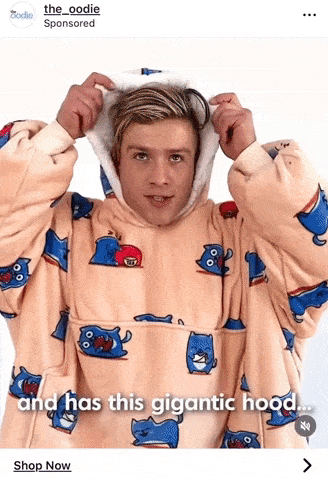
Video ads
Instagram video ads are a great way to showcase your product or service in an engaging, eye-catching way. You can use video ads to demonstrate how products work, highlight unique features, or simply tell your brand story.
In-feed video ads can be up to 60 minutes long, but shorter videos are usually more effective.
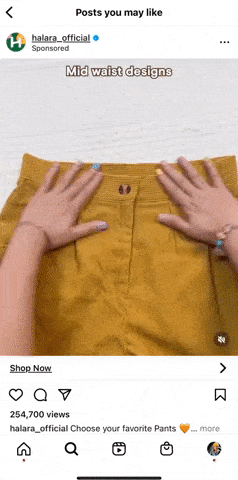
Story ads
Instagram Story Ads are full-screen image or video ads that appear between users’ Stories.
Instagram Stories are a well-used part of the app, with over 500 million Instagram users viewing Stories every day. Engagement is often higher with Stories ads, as the format covers the mobile screen and feels much more immersive than in-feed ads.
The best Instagram Stories ads look and feel like normal Stories and don’t stand out as ads. When designing Stories ads, businesses can use all organic Instagram Stories features like filters, text, GIFs, and interactive stickers.
Stories ads can use still photos, videos, and carousels. The call-to-action is presented as a swipe-up link at the bottom of the Story.
Carousel ads
Instagram carousel ads feature a series of images or videos that users can swipe through. They can appear both in-feed and within Instagram Stories, with a call-to-action button or swipe-up link that leads users directly to your website.
You can use carousel ads to:
Showcase a collection of related products
Tell a multi-part story
Share up to 10 images or videos
Collection ads
Instagram collection ads are a combination between carousel ads and shopping ads. Collection ads showcase products directly from your product catalog.
Collection ads are best suited for ecommerce brands, as they allow users to purchase products directly from the ad. When a user clicks on the ad, they’re directed to an Instagram Instant Experience Storefront where they can learn more about the product and proceed to purchase.
Explore ads
Explore ads appear within the Explore tab, an area of the platform where users discover new content and accounts that are tailored based on their Instagram usage habits.
Instagram Explore ads do not appear in the Explore grid or the topic channels, but rather are shown after someone clicks on a photo or video from Explore. As the content in users’ Explore tabs is constantly changing, Explore ads allow businesses to be shown alongside culturally relevant and trending content.
Explore ads can be both images and videos.
Pro Tip: No need to design brand new assets for Explore ads. You can simply re-use existing Instagram ad assets.
Reels ads
With the successful launch of Reels, Instagram recently announced the ability to advertise within Reels.
Ads are shown in between Reels, with similar specs to Stories ads (full-screen vertical videos), and can be up to 60 seconds. They should include sound or music to be well-integrated with organic Reels. All Instagram Reels ads will show a Sponsored mark underneath the account name.
Note that Instagram Reels ads will loop infinitely unless stopped. As well, users can like, share, comment, and save your Reels ads.
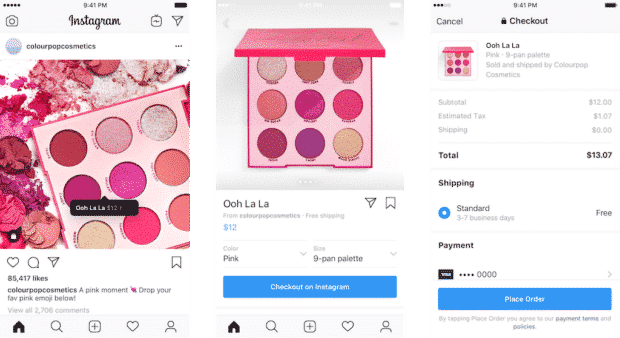
Shopping ads
With 44% of Instagram users shopping on the platform every week, it’s no wonder Instagram has been heavily improving its ecommerce features over the last 1-2 years.
With Instagram’s newest Shopping features, users can now view and purchase products without leaving the app (limited to businesses with Instagram Checkout enabled).
Instagram Shopping ads take users directly to a product description page within the Instagram app. They can then purchase through your mobile website.
To run Shopping ads, you need to set up your Instagram Shopping catalog.
Pro tip: Take advantage of Hootsuite’s integration with Shopify to access your catalog right from your Hootsuite dashboard.
How to advertise on Instagram: setting up an ad step-by-step
There are two routes for creating Instagram ads campaigns: boosting an existing post and creating a new ad in the Meta Ads Manager (f.k.a. Facebook Ads Manager). Promoting an existing post only takes a few taps and can be done right from the Instagram app, but lacks the customization options available in Instagram Ads Manager.
Below, we’ll walk you through both methods.
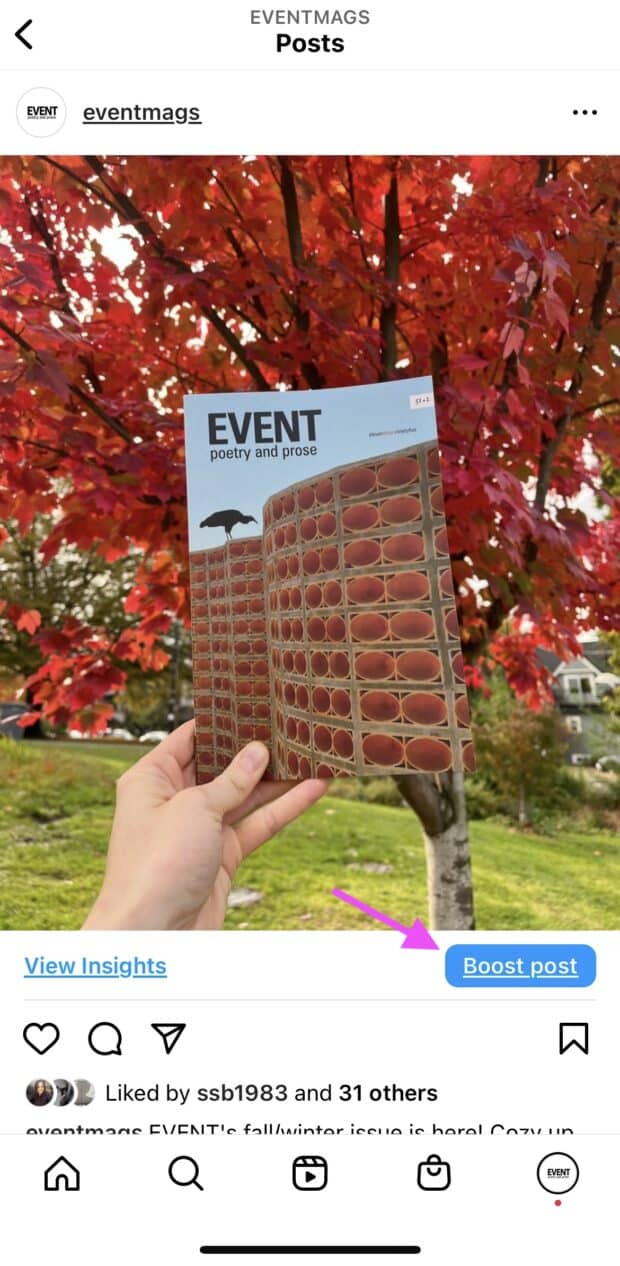
Method 1: Using Instagram Boost
The easiest way to start advertising on Instagram is to promote one of your existing posts. This is similar to Facebook’s Boost Post option.
If you have a post that is performing well in terms of engagement, promoting it within the app is a quick and easy method to scale up the post’s success—and show it to new people who aren’t following you yet.
You’ll need a business or creator account on Instagram to do this. You’ll also need to have a Facebook Business Page connected to your Instagram account .
Then, it’s as simple as clicking Boost post on the post you wish to turn into an ad.
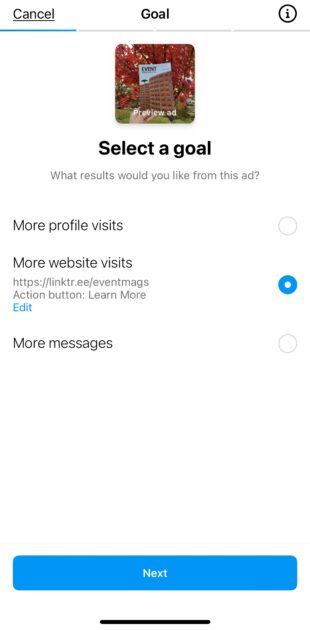
Next, choose your goal. You’ll have three options: more profile visits, more website visits, or more messages (this includes more WhatsApp messages).
Then, define your audience. You can either choose to let Instagram automatically determine your audience (based on your follower data). Or, you can create your own audience by manually entering your targeting options.
You can also choose to run the boosted post on Facebook, if you want.
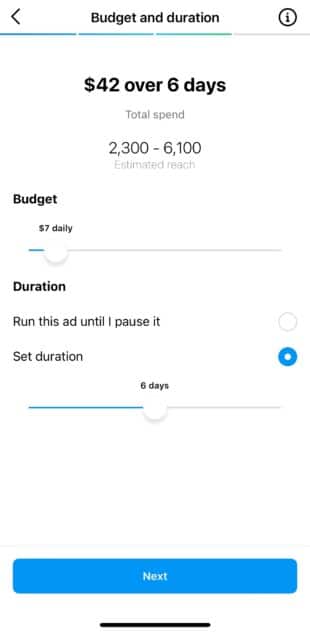
Now choose your daily budget and the duration of time you want the ad to run. You can either choose a set number of days or let it run infinitely until you manually pause it.
Finally, review your ad and click Boost post when you’re ready to go live.
That’s it! Your ad will be reviewed and approved by Facebook. Once it goes live, monitor your ad’s results in the Promotions tab of your Instagram profile.
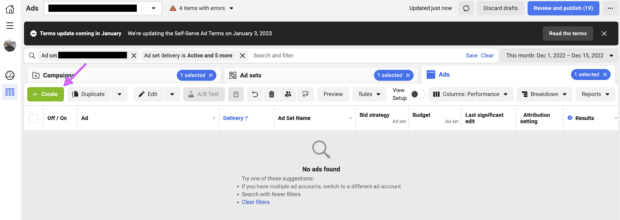
Method 2: Using Ads Manager
To get the most out of Instagram’s extensive ad targeting, creative, and reporting abilities, you can use the Meta Ads Manager to create ad campaigns (remember that Meta owns Instagram).
Although it requires a bit more work, our 8-step guide will guide you through the process.
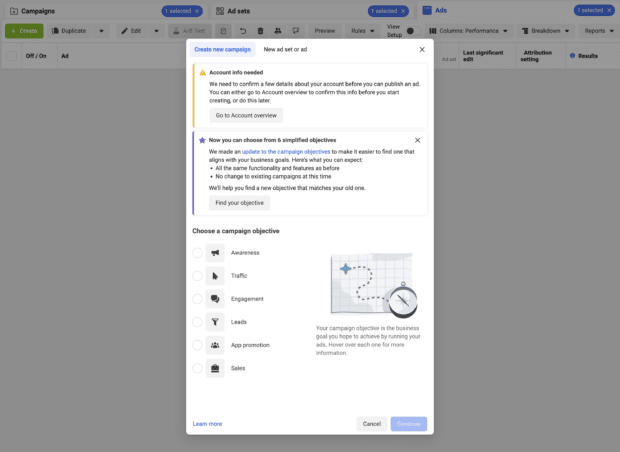
Step 1: Create a new Instagram ad campaign
To start, go to Meta Ads Manager and click +Create.
Step 2: Choose your objective
You can choose to pair your ad with an existing campaign, or start a new one from scratch. To start a new campaign, you’ll need to choose your objective first.
There are six campaign objectives available for Instagram ads. Those are:
Awareness: Reach the largest number of people who are most likely to remember your ad.
Traffic: Send people directly to your website, Instagram Shop, or app.
Engagement: Increase views, likes, comments and shares on your Instagram posts.
Leads: Collect leads for your business via Instagram ads. Or, encourage them to share information in exchange for content.
App promotion: Promote app engagement and Installs.
Sales: Find people likely to purchase your goods or services and drive more sales.
Choose the objective that best matches your goals, and click Continue.
Step 3: Name your campaign
After selecting your objective, you’ll be prompted to name your campaign.
Pro Tip: Give it a specific name based on the campaign objective to help you keep track of your campaigns.
Once you’ve chosen a name, click Next.
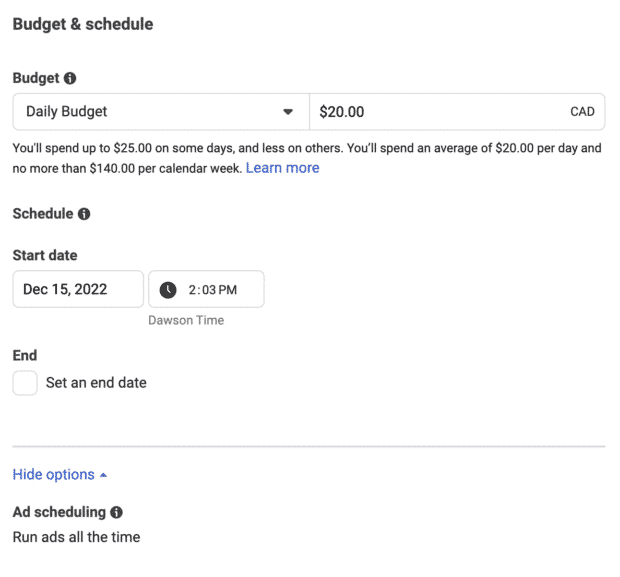
Step 4: Choose your budget and schedule
Once you know what you want your ad to look like, choose New [your ad goal here] Ad Set from the left-hand menu.
Here, you can choose how much you want to spend and how long your campaign will run.
For your budget, you’ll have two options:
Daily budget: Set a maximum daily spend, useful for always-on ads
Lifetime budget: Set a maximum spend for your whole campaign, useful for ads with a clear end date
Under Ad Scheduling you can choose to run ads continuously (most common), or only at certain times of day (for example, if you’re a food delivery company and only want to run ads in the evening when your audience is most likely to place delivery orders).
As you adjust these options, you’ll see the Audience Definition and Estimated Daily Results modules in the right-hand column, which will give you an idea of your budget’s expected reach.
Pro tip: Try to make your ad set fall in the middle of the green range.
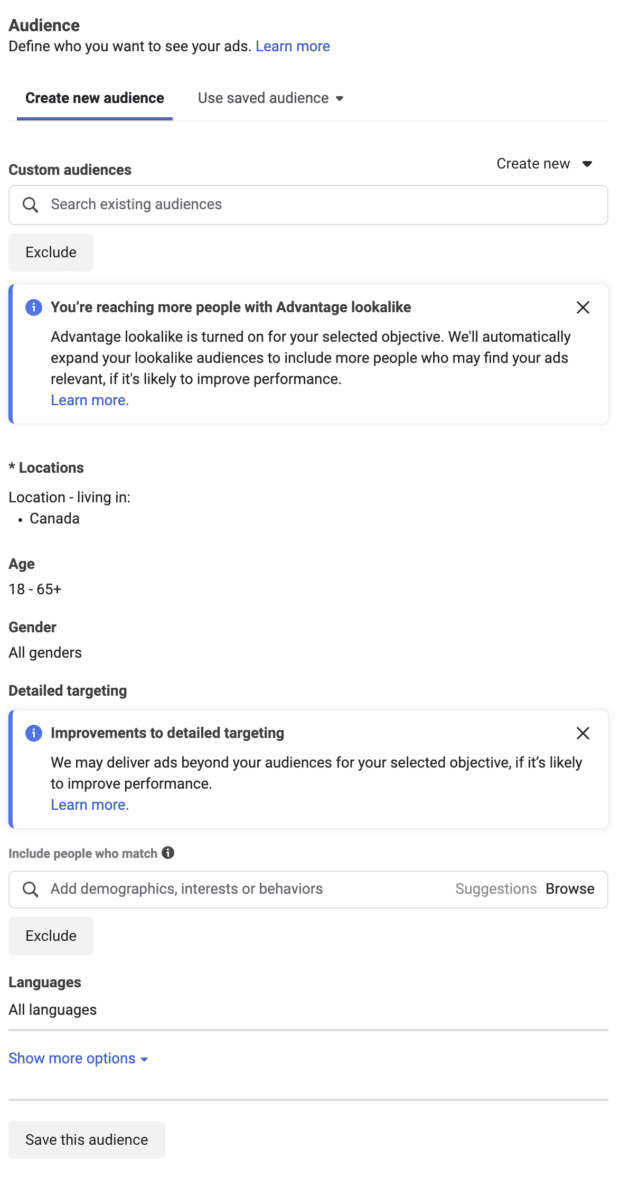
Step 5: Identify your audience
Now it’s time to choose your audience.
You can either use a previously saved audience or create a new audience.
Saved Audiences are useful if you have your own custom audience data (i.e. past website visitors) or past audiences from previous campaigns that performed well. If not, you can create a new audience based on demographics, interests, and behavioral targeting.
If you choose to create a new audience, you’ll have the option to target by location, age range, gender, demographics, interests, behaviors, and languages.
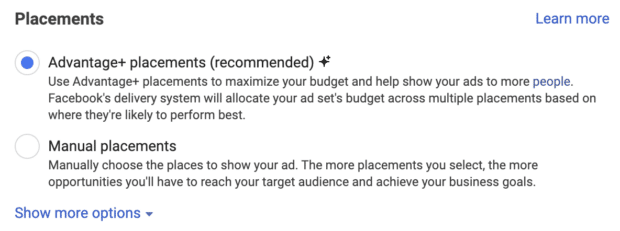
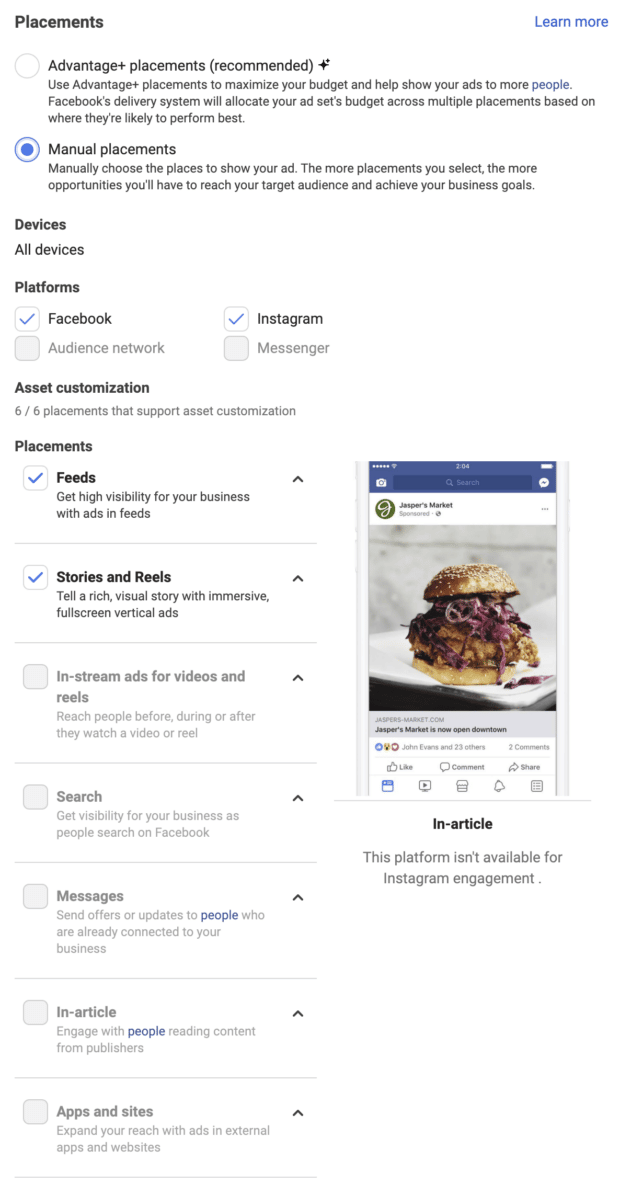
Step 6: Choose your Instagram ad placements
In the Placements section, you can decide where your ads will appear.
There are two options:
Advantage+ Placements: Ads will be shown to your audience wherever they’re likely to perform best.
Manual Placements: You can choose specifically where your ad will appear (and not appear). If you want to limit your ads to show only on Instagram (not Facebook), you can choose these using Manual Placements.
If you choose manual placements, the Ads Manager will display the technical requirements for each one. To ensure your visual assets are optimized for each format
If you’re new to Instagram advertising, we recommend going with Advantage+ placements.
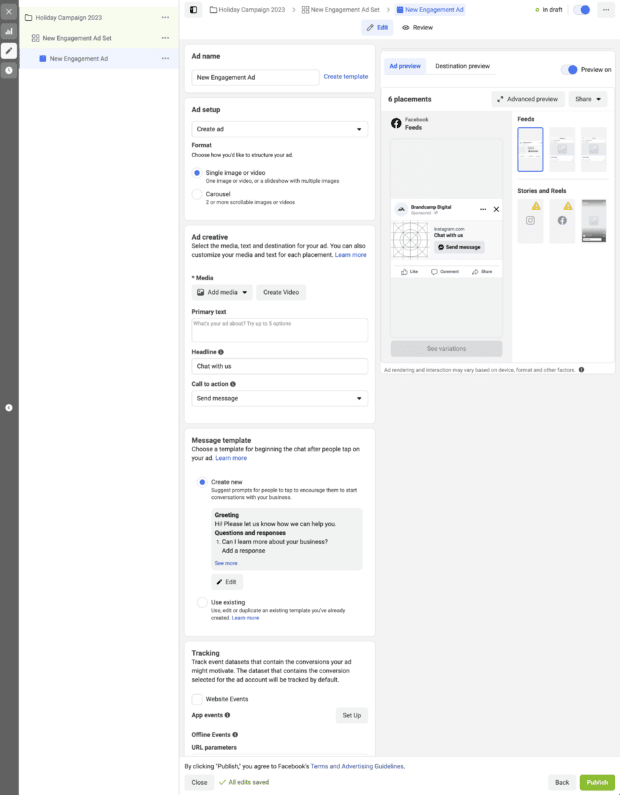
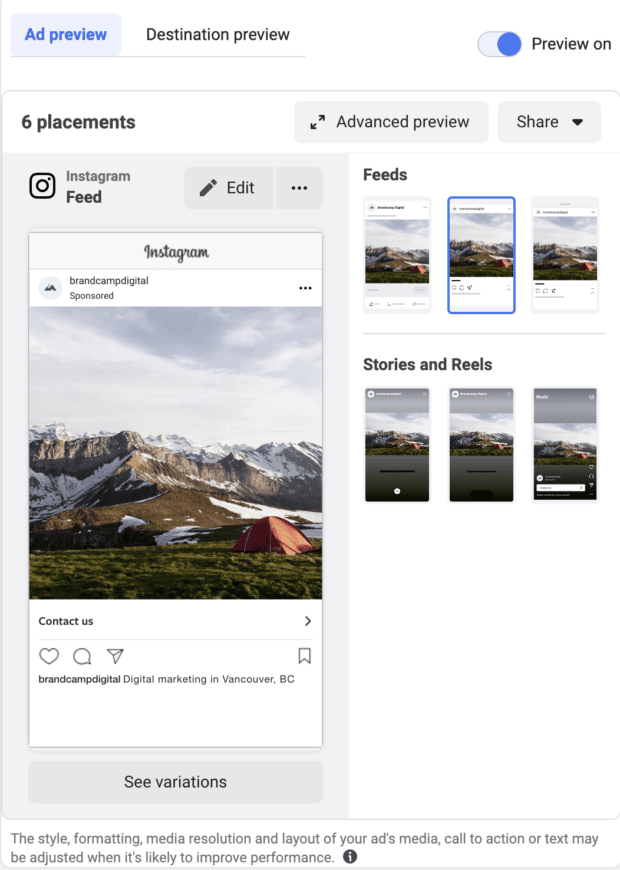
Step 7: Create a new Instagram ad
Finally, it’s time to create your new Instagram ad. Choose New [your goal here] Ad from the left-hand menu. This will open up a screen where you can customize your new Instagram ad.
Here, you can edit your ad name, choose from different Instagram ad types, and add creative elements like images, videos, headlines, and CTAs.
You can also add any copy, website links, and tracking parameters on this screen.
If you want to track conversions from your ad, it’s important to select the Facebook Pixel in the Tracking section.
Once connected to your website or app, your Facebook pixel will allow you to see insights about how your audience interacts with your business after clicking on your ad.
Step 8: Publish your Instagram ad
Once you’ve filled out all the necessary fields, click Publish in the bottom right-hand corner of your screen.
Your Instagram ads will now run on the chosen budget and timeline. Be sure to check your Instagram Analytics regularly to see how your ads perform.