Have you ever wondered what makes good content, or how to actually create content that people want to read?
The reality is that there is SO much content out there nowadays. Podcasts, YouTube videos, blogs, ebooks, courses, digital downloads, Facebook ads, and the list could literally go on and on.
So the question is: How do you make your content stand out?
How do you ensure that people are going to come to you?
There are 3 main types of content out there:
Inspirational
Education
Entertaining
You can be primarily known for one or a combination of them. But chances are, the type of content you create falls into one of those 3 categories.
When it comes to creating good content, there are 4 questions to ask yourself.
1. Is it helpful? Does it solve someone’s problem?
We’ve all done those ideal client avatar worksheets. And if you haven’t, I suggested doing one.
One common mistake people tend to make (and I’m definitely guilty of this myself) is forgetting that the content isn’t for you, it’s for your reader.
It’s to help make their lives easier – figuratively or literally.
Maybe you make their lives easier by filming your dog, which is entertainment. Truth to be told, I LOVE watching this dog on IG. Owners do a really good job of narrating her in her IG stories.
Or maybe you provide step-by-step tutorials on how to set up a blog for beginners.
Or maybe it’s something like this, where I help you with creating good content that people will want to read and share with their friends.
At the end of the day, you want to make sure you’re creating content that’s solving someone’s problems. And to do that, you first need to know who you’re helping. Because from there, you can figure out what they’re struggling with.
2. Is it detailed / valuable or just fluff? Does it have depth?
I’m sure we’ve all read those fluffy articles, where… by the end, you realized they actually haven’t helped you with anything. It’s worse when they try to sell you at the end without first providing any value.
Have you ever attended one of those webinars that showed up as a Facebook ad? Where they spend the 15 minutes talking about their story, another 15 minutes about what they’re going to talk about, maybe 10 minutes of actual information, and the last 15 minutes are about this product that they’re selling you and why it’s soooo awesome.
Yeah, don’t do that.
It’s easy to think that someone won’t buy your products if you give all your information for free, but that’s not true.
Case in point? One of my online favorite creative souls, Caroline over at MadeVibrant, wrote this absolutely incredible and in-depth post about creating your first online course.
Caroline’s article just goes to show that you can give away a lot of valuable information for free and still sell products.
Isn’t it better to first build trust with your audience?
Also, I wanted to note something that I hear Gary Vee say a lot: If you don’t do it, someone else will. When you choose to keep “all the good stuff” to yourself, remember that someone else is willing to give away what you’re not.
3. Is it organized and easily digestible? Is it easy to follow?
If you are creating a how to list or any tutorial of some kind, please make it organized.
Example:
Step 1 is…
Step 2 is…
Step 3 is…
Because what I’ve found is that most people like (and need) structure.
Think of it as creating a recipe. First, people need to know what to get at the grocery store. Well, actually, I guess the first step would be writing down a list of all the ingredients they need to get and seeing which ones they already have at home.
But you wouldn’t tell someone to add seasoning when they don’t have anything to add the seasoning to first, right?
It’s the same thing with your content. You want to prepare people and guide them through.
Take another look at Caroline’s blog post on “How To Build And Sell Your First E-Course” again. Not only does she break it down into steps with clear dividers, but she uses headings and subheadings as well.
Make it clear what step 1, step 2, step 3 is. Use formatting. Write an introduction and summary.
Also, make it easy for people to skim.
4. Is it shareable? Do people want to share it?
The best kind of marketing is word-of-mouth.
When people share your content with others because it resonated with them or made them feel some type of way.
Maybe it helped them learn a new skill (education).
Or maybe it made them laugh when they were having a bad day (entertaining).
Or maybe it made them feel motivated to do something with their lives (motivation).
Because the truth is… what’s the point of creating content if no one ever sees it, right?
You want to create content that people see and want others to see.
So to recap, when creating valuable content, make sure it’s:
Helpful – it solves someone’s problem and/or makes their day better.
Valuable – not just fluff. Provide real information that people can use and apply.
Organized – people aren’t here to go through a maze. Make your information easy to digest and read.
Shareable – word of mouth is the best marketing. Encourage them to share it with others.
Creating a flat lay photo is one of the easiest ways to take your Instagram posts from “nice” to “Are you a production designer? This looks like it was in Vogue.” Whether you want to create some sweet Facebook ads for your small business or up your personal branding game, we’ll take you through all the steps to creating the perfect flat lay photo.
What is flat lay photography?
Flat lay photos are images shot directly from above. Think bird’s eye view, with said view consisting of a beautiful arrangement of objects. Great flat lay photography tells a story through its objects, colors, and organization. It’s become immensely popular over the past few years, showing up frequently on social media. Personal brands use flat lays, company brands use flat lays…
…errrybody uses flat lays. Now let’s walk through some flat lay photography ideas to learn how to use ’em yourself.
1. Get inspired by flat lay photos
If you’re not sure where to get started, or what direction you wanna take, we suggest browsing Pinterest or Instagram with the #flatlay to get an idea of what looks you like. Or browse our Pinterest pins and other templates for inspo.
2. Assemble your props like a pro
Just like props exist in theatre to amplify the scene, props are used in flat lay photography to amp up the pic. Follow these intuitive tips to assemble your best-laid photo (pun intended).
Appropriate theme
Consider the focus of your flat lay photo. If it’s business-driven, maybe you have a beauty blog and the answer is super straightforward (cosmetics!), or maybe you’re going for something a little less concrete (like trying to capture the feeling of excitement before an impending journey). Whatever it might be, establish a theme and keep it in mind while selecting your props so you end up with a cohesive look.
Prop type
Let’s talk prop type. Props can be neutral or universal objects like plants, books, paperweights, or everyday knickknacks you’d find around the house that photograph well. You don’t want to detract attention from the main subject – only to have complementary objects that will enhance the photo.
If you’re in the health and wellness field, consider stones and crystals, or yoga-focused objects. Décor with motivational quotes is always a good idea, too. Consider what energy or vibe different objects give off as you begin to assemble them. And put yourself in your ideal audience’s shoes – how does this flat lay make you feel to observe it from the opposite perspective?
Prop volume
Don’t be shy – pick a lot of props (more than you would conceivably use) so that you can swap things in and out while you compose your shot. As you begin to shoot, you don’t want to have to go back to your in-home shopping spree. The small adjustments you make can be intuitive and result in the perfect, marketable flat lay photo.
Prop color
As you peruse your home for props, it helps to have a color palette in mind. Different colors prompt different moods and feelings in an audience, so consider color theory as you prep. How does your variety of props make you feel as they lay together? How would you like to feel? Let these decisions inform your focus.
Diverse shapes and sizes
Lastly, go for objects of varying shapes and sizes in order to prompt visual interest. What just looks good together? Trust your gut. Maybe too many bulky objects clash. Maybe alternating objects as big, small, big, small, looks too staged. Create balance in your photo by mixing smaller objects with larger objects in a subtle way and placing objects of similar colors on both sides of the image.
This is a great time to consider diversifying textures as well — whether that pertains to your background or the objects themselves. Soft, rough, hard, smooth. Just like we desire foods to have a balance of salt, sour, bitter, and sweet, the same is true here. Balance is key. As you keep finding inspiration at home and on social, you’ll get clear about what exactly feels right.
Be fluid, be creative, be flexible!
3. Grab an extra pair of hands to assemble the flat lay
Some of our favorite flat lay photos look more “candid” because they include people (or, more accurately, body parts). If you want to create a look that has a sense of movement and action, consider enlisting the help of a friend. It’ll be way easier/less impossible than trying to pose and photograph yourself.
4. Pick a flat lay friendly background
When choosing a background, it’s best to keep things simple. A plain white background works well because it won’t distract from your props, but you can also pick something neutral like a wood floor or table. If you want to use a colored background, you can get crafty by taping some matte wrapping paper on a floor or table.
Or, if you’ll be doing flat lays consistently, consider investing in some vinyl backdrops to easily create a rustic look. You can also magically erase any background you have after the photo shoot and put in a new one with our automatic background remover tool.
5. Stage your flat lay photo
Now that you have all your props and your background, it’s time to get organized. Set up next to a window and try to shoot in the morning or late afternoon when you’ll get the best light. Try not to use a flash, as this will create shadows.
When setting up your shot, leave a little bit of space between each object. This will help highlight each prop and keep your shot from looking cluttered.
If you plan on posting your photo to Instagram, a square layout looks really nice. If you’re shooting with your phone, it’s easy to set up a shot by picking the square setting in your camera.
6. Leave space for text and graphics
You might want to leave some space where you can add text or graphics in post-production. If you’re creating an ad, this is where you can add your brand name and logo. Or if you’re going for a more inspirational look, you can stick in a quote.
7. Shoot from above
Climb up on a ladder or step stool and get to shooting. Creating distance between you and the flat lay will help you fit everything into the shot. This is also one of the only ways to ensure that your photo actually looks flat.
Once you’re up there, take a few test shots and don’t be afraid to keep moving props around until it looks just right. When you have your perfect shot, it’s time to edit!
8. Work some basic editing magic
Start your flat lay design quickly with one of our designer-made templates.
You might have a great photo (we knew you could do it), but a few simple edits to your image’s colors, exposure, and clarity can seriously up the wow factor.
9. Add text and graphics
If you left space in your image for text and graphics, now’s the time to add them in.
10. Post it and bask in the glory of your social media savvy
You probably didn’t spend all this time on your flat lay photo just to let it sit. Time to share with the world!
Discover what the Meta pixel is, why it’s crucial for everyone who runs Facebook ads, and all you need to know to use it effectively.
The Meta pixel (formerly Facebook pixel) is currently being used by almost 4 million websites around the world.
Now you’re probably asking yourself – how could this little pixel become so popular?
Read further to discover what the Meta pixel is, why it is so important for everyone who runs ads on Facebook, and basically, everything you need to know in order to use it to your benefit.
What is Meta (Facebook) Pixel?
Simply put, the Meta (formerly Facebook) pixel is a Javascript code that you add to your website in order to track visitor activity.
The Meta pixel is an analytics tool that helps you measure and increase the effectiveness of your advertising campaigns.
This is done by reporting and analyzing the actions people take on your website. The pixel uses this data to assign people to different target groups you can engage with ads in the future.
In this chapter, I’ll explain what the Meta pixel actually is and will share with you a bit of its history. We’ll also go a bit into technicalities, but not too deep, so don’t worry.
The pixel “fires” when someone takes an action on your website, which is one of these you ordered it to track.
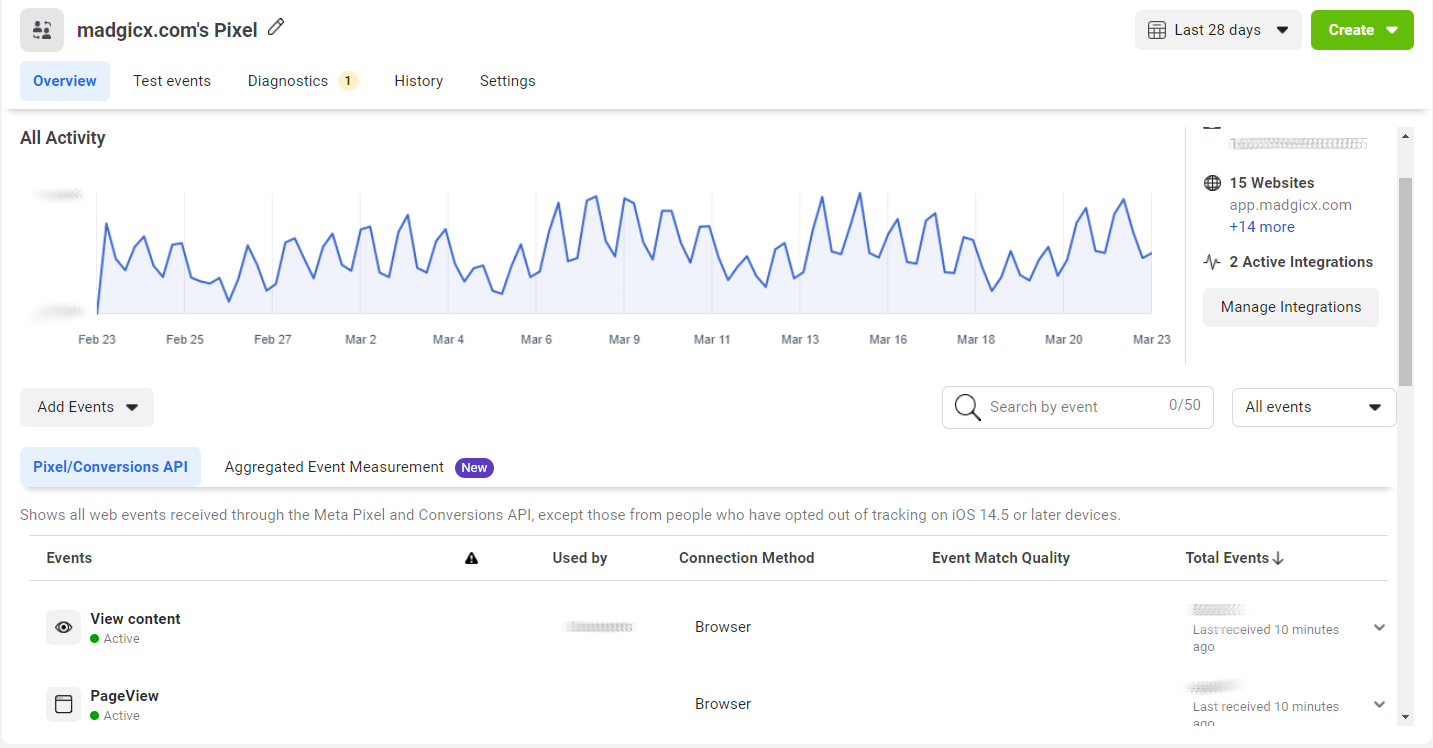
You can view all these actions on your Meta pixel page in the Events Manager. You can also use this data, later on, to advertise to people who visited your website. That’s called Retargeting.
Why is the Meta pixel called “pixel”?
The term “pixel” was not coined by Facebook. Tracking pixels and pixel advertising have already been around for quite some time.
Initially, this solution was used for email marketing and was referred to as a “web beacon“. Nowadays, it became a standard in many online advertising platforms.
A tracking pixel is a graphic with dimensions of 1×1 pixels that is loaded when a user visits a website or opens an email. It’s so small that it’s barely noticeable.
These tracking pixels were originally partly or fully designed to be transparent or camouflaged in the background color of the website so that they don’t stand out to users.
The tracking pixel URL is the memory location on the server. When the user visits a website, the image with the tag is loaded from this server.
History of the Meta (Facebook) pixel
In 2013, Facebook released two kinds of pixels:
Website Custom Audience Pixel for retargeting website visitors (AKA Facebook Retargeting Pixel or Facebook Remarketing Pixel)
Facebook Conversion Pixel for tracking website conversions (e.g. sales)
You could only create one Custom Audience Pixel per Facebook ad account, but many Conversion Pixels – one for each web page you wanted to track conversions on.
In 2015, Facebook made it all more simple and convenient by merging both kinds of pixels into a new and improved Facebook pixel.
In 2017, the Facebook pixel was updated again to include more tracking options, such as button click activity and page metadata. Facebook also discontinued the Conversion Pixel that year.
In January 2022, after turning the Facebook company into Meta, the company changed the pixel name to “Meta pixel.”
The Meta pixel code
As I already mentioned, the Meta pixel is simply a snippet of Javascript code that you embed into your website.
It relies on Facebook Cookies, which enable Facebook to match your website visitors to their respective Facebook user accounts.
How does Meta pixel work?
It loads a small library of functions that you can use whenever a website visitor takes a specific action that you want to track. These actions are called “conversions” and they are interpreted by the pixel as “events”.
These events can be Page Views, Add-to-Cart, Purchase, Scroll Depth, Time on Page, and more.
The pixel tracks URLs visited, domains visited, and devices your visitors use.
You can view all your tracked conversions in the Facebook Ads Manager and the Facebook Analytics Dashboard.
This will help you to measure the effectiveness of your Facebook ad campaigns, create custom audiences for Retargeting, set up dynamic ad campaigns, and analyze your website’s conversion funnels.
Requirements
In order to implement the Meta (Facebook) pixel on your website, you will
need:
Access to your website’s codebase.
Your Pixel’s base code or its ID.
Access to the Facebook Ads Manager.
If your business operates in the EU, you also have to comply with the General Data Protection Regulation (GDPR).
Why you should install the Meta Pixel
Frankly, without the pixel you are shooting in the dark, so why not help Meta help you?
As data becomes more and more important every day, it’s crucial to have a strong integration between your website or eCommerce shop and Meta (and any other “walled garden” ad platform).
This data can help you create better Facebook ads and improve your audience targeting.
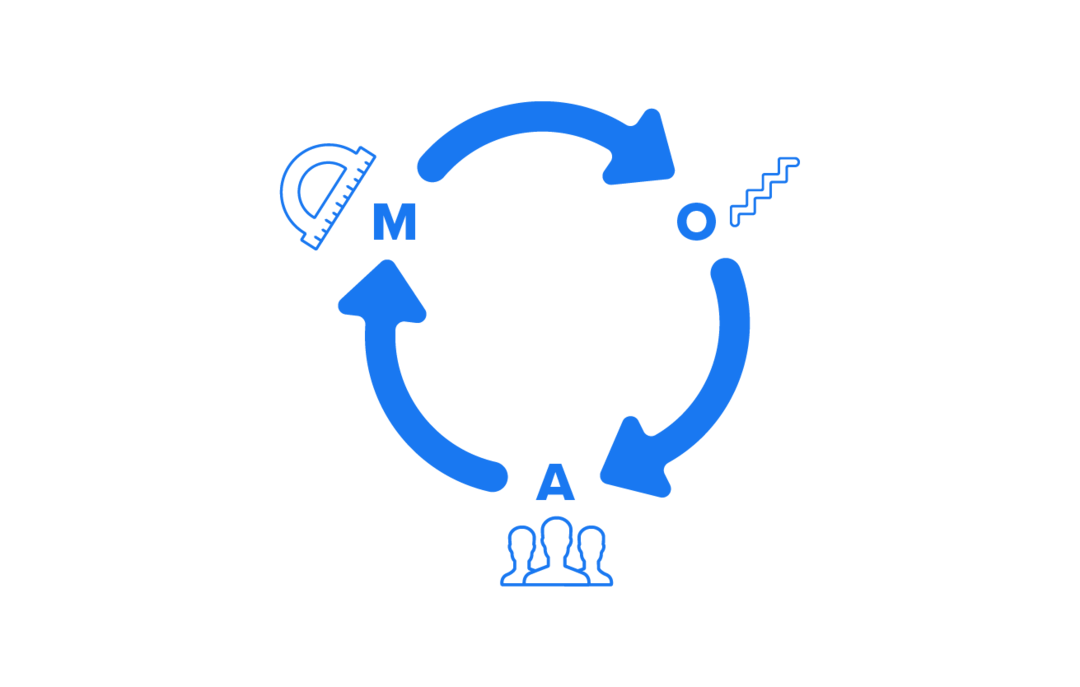
In this chapter, you will learn about the importance of the Meta pixel in 3 areas: audience creation, measurement, and optimization.
What does Meta pixel do?
Audience Creation
The pixel helps you find new customers and retarget people who have visited a specific page or taken a desired action on your website.
You can use your pixel data to create Retargeting campaigns and dynamic ads. For example, if a customer has abandoned an item in their cart or added it to their wishlist, you can show them a dynamic ad presenting the same item.
You can also create custom audiences of people who have already taken the desired action (such as a subscription) in order to exclude them from your Retargeting campaigns. This will save you money and make sure you’re not annoying people with ads asking them to take actions they already did.
Using your pixel data to create lookalike audiences, which include people who have similar characteristics to your customers and website visitors, is also crucial for expanding your customer base.
One of the biggest advantages of creating pixel-based lookalike audiences is that they update automatically, which means they remain relevant for cold traffic campaigns.
Measurement
With the Meta pixel, you can understand the impact of your ads much better by monitoring people’s reactions to them. The pixel shows you how people interact with your website after seeing your ads. It even tracks them across different devices. For example, customers might have seen your ad on mobile and made the purchase on their desktop.
To track ad attribution correctly, make sure you set up the right Meta pixel URL parameters when launching your ads. You can follow your customers’ behavior along every stage of your marketing funnel, from Acquisition through Retargeting to Retention.Your pixel data includes critical metrics such as Return on Ad Spend (ROAS), Cost per Purchase (CPP), and Cost per Lead (CPL), which you can’t track efficiently without it.
This information is crucial for refining your advertising strategy, especially in terms of full-funnel targeting and omnichannel marketing.
Optimization
The pixel allows you to set up automatic bidding to reach people who are more likely to take an action you’re interested in, such as making a purchase. Facebook has a ton of data about its users. Hence, in order for Facebook to find the people who are most likely to convert, all you have to do is ask – set up “conversions” as your campaign objective.
You can optimize for different conversions based on your business model, whether it’s purchases or sign-ups. You can also optimize your campaigns for value, which means that Facebook will show your ads to people who are more likely to make high-value purchases.
In conclusion, installing the Meta pixel will help you increase your conversion rate and your ROAS on Facebook ads.
Pro Tip: Even if you’re not running Facebook ads yet, you should install the Meta pixel on your website.
This way, the pixel will start collecting data on your website visitors right away, so you won’t have to start from scratch when launching your very first Facebook ads
How to create and install a Meta pixel
Now that you already understand what the Meta pixel is and how important it is to add it to your website, I’ll explain how you can create and install it on your site.
In this chapter, I’ll take you step-by-step through the whole process from creation to Meta pixel setup. I’ll also use a lot of screenshots to make things clear, so don’t you worry about a thing!
Before we start, there are two things you need to have:
A website for your business
Permission to update your website’s code
If you don’t have a website, that’s definitely going to be an issue.
If you have no permission to update your website’s code, either ask your administrator to grant you permission or let them do the installation for you. Once we’ve cleared these out, we can start and create your new Meta pixel. No worries, it’s a pretty simple process.
How to create a Meta pixel?
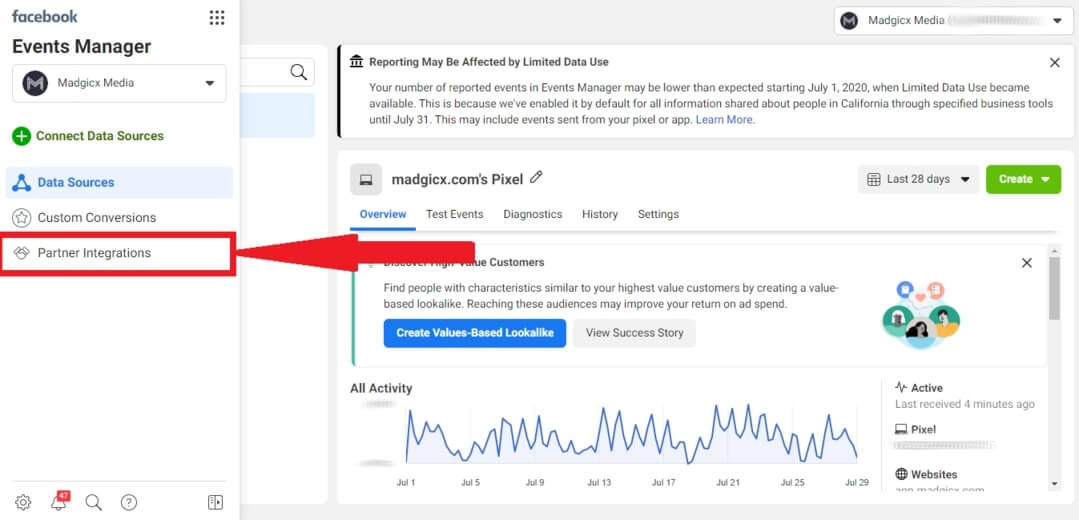
Go to your Facebook Events Manager.
On the left side menu, click “Connect Data Sources”.
Select “Web” and click “Get Started”.
Select “Facebook Pixel” and click “Connect”.
After reading how the pixel works, click “Continue”.
Give your pixel an indicative name. Try something more creative than “My Pixel”.
Enter your website URL to check for easy setup options.
Click “Continue.”
Add the Meta pixel to your website
Once your new pixel was created, it’s time for the Meta pixel setup on your website.
Go to the Facebook Events Manager.
Select your pixel.
Click “Continue Pixel Setup”.
At this stage, you have 3 possible ways to continue: manual installation, using a partner integration, or sending the instructions to your website administrator.
Manually add the Meta pixel code to your website
Select “Install Code Manually”.
Copy the pixel base code.
Find your website’s header or locate the header template in your CMS or web platform.
Paste the base code at the bottom of the header section, just above the closing head tag.
Click “Continue”.
At this stage, you can turn on “Automatic Advanced Matching” and verify the customer information you want to send. This is only optional and I’ll explain more about it later on.
Click “Continue”.
Add Events using the Events Setup Tool or by manually adding the relevant code to your website. More about Meta pixel events later.
Click “Done”.
Use a partner integration
Click “Use a Partner”.
Select the relevant partner from the list.
Follow the on-screen setup instructions.
Alternatively, you can go to the Partner Integrations page in the Facebook Events Manager, select your partner, and follow the on-screen instructions.
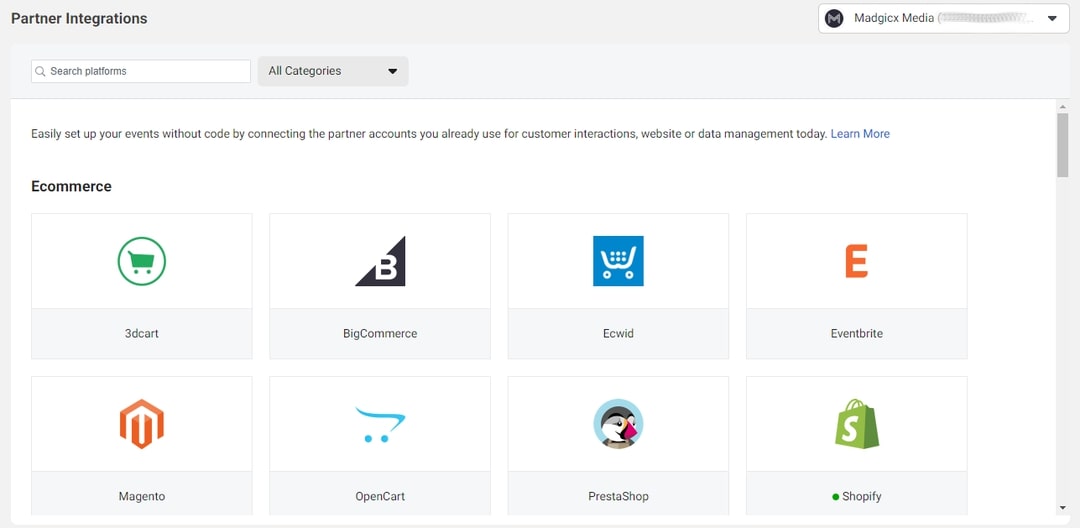
Facebook has integrations for multiple eCommerce platforms, such as:
Shopify
Magento
Woocommerce
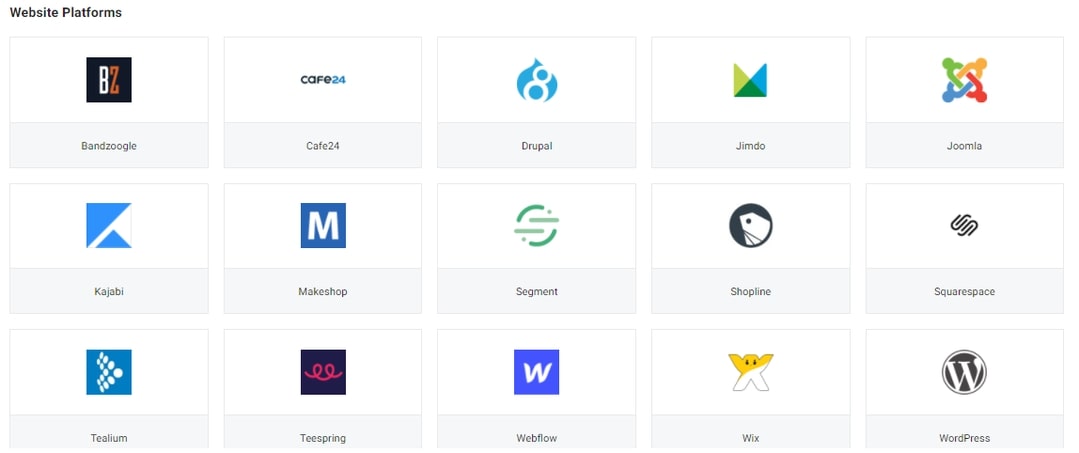
Facebook also has integrations for various website platforms, including:
WordPress
Wix
Squarespace
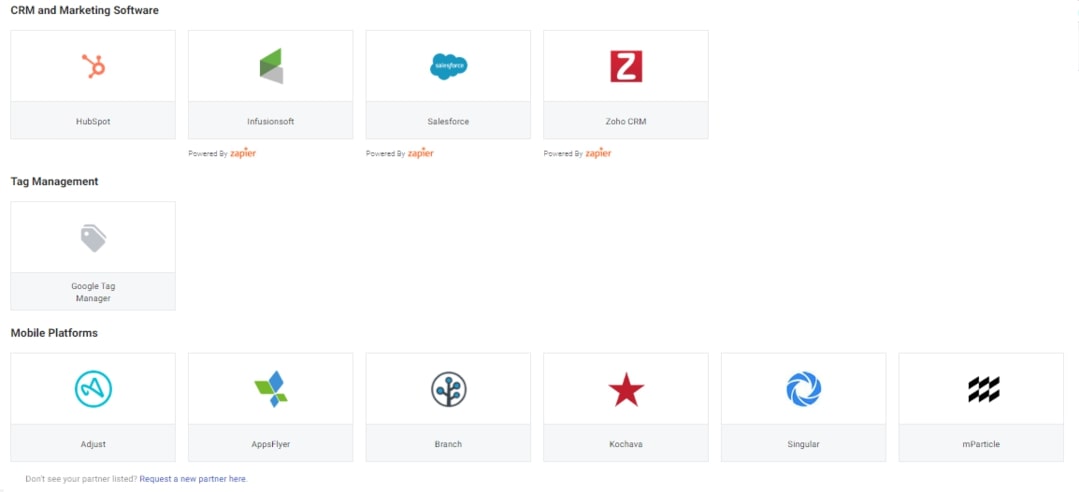
In addition, Facebook has an integration for Google Tag Manager and for many customer data platforms, data connection platforms, CRM and marketing software, and mobile platforms.
Send instructions via email
If someone else, such as your web developer, will be doing the Meta pixel setup on your website for you, you can easily send them the instructions by email.
This is how you do it:
Click “Email Instructions”.
Enter the recipient’s email address.
Click “Send” at the bottom of the page.
How to find Meta (Facebook) pixel ID?
Now that you have a Meta pixel (Hooray!), what happens if you want to connect it to another platform?
All you need is your Meta pixel ID!
You can find it in the Facebook Events Manager on the left side of the screen under your pixel’s name.
Meta pixel events
The next step, after creating and installing the Meta pixel on your website, is setting up your desired events. These events are the actions you wish to track on your website.
In this chapter, we’ll discuss standard events, custom conversions, custom events, and offline events. I’ll explain how you can set up each one of them and provide you with some tips regarding the events you should be tracking.
You can either set up Meta pixel events manually using the relevant event codes or via Facebook’s Event Setup Tool.
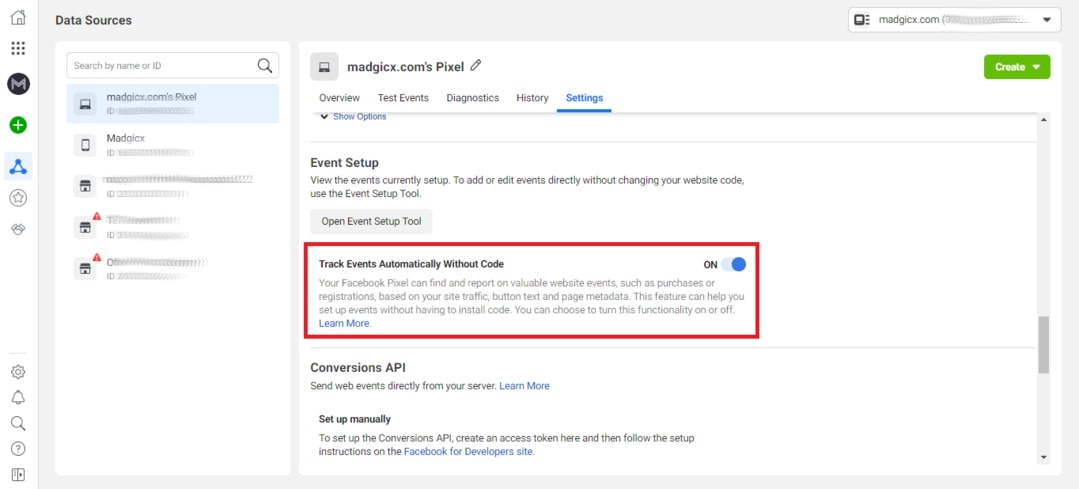
Note that you can also turn on Automatic Events, which allows your Meta pixel to automatically track valuable events, such as purchases and registrations, without having to set them up.
Automatic Events will be de-duplicated from any other events you have manually set up.
In order to enable Automatic Events, just go to the “Settings” tab in the Facebook Events Manager and toggle on “Track Events Automatically Without Code.”
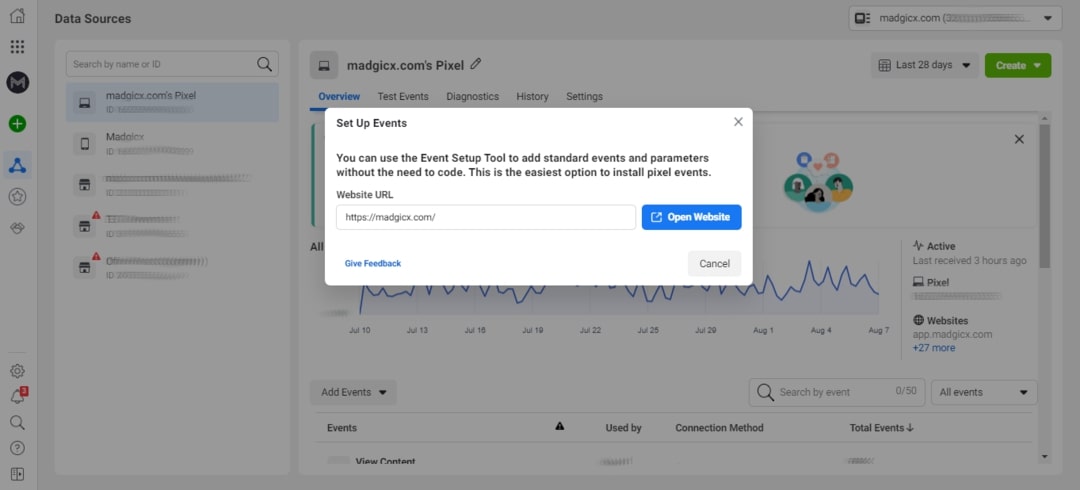
How to set up events using the Event Setup Tool
Go to the Facebook Events Manager.
Under the “Overview” tab, click “Add Events”. Alternatively, you can tap into the “Settings” tab, scroll down to “Event Setup,” and click “Open Event Setup Tool.”
Select “From the Pixel and then click “Open Event Setup Tool”.
Enter your website’s URL and click “Open Website”. Make sure you write the full URL with HTTP(s) in the beginning.
The Event Setup Tool should open up on your website. If it doesn’t, try turning off your ad blocker.
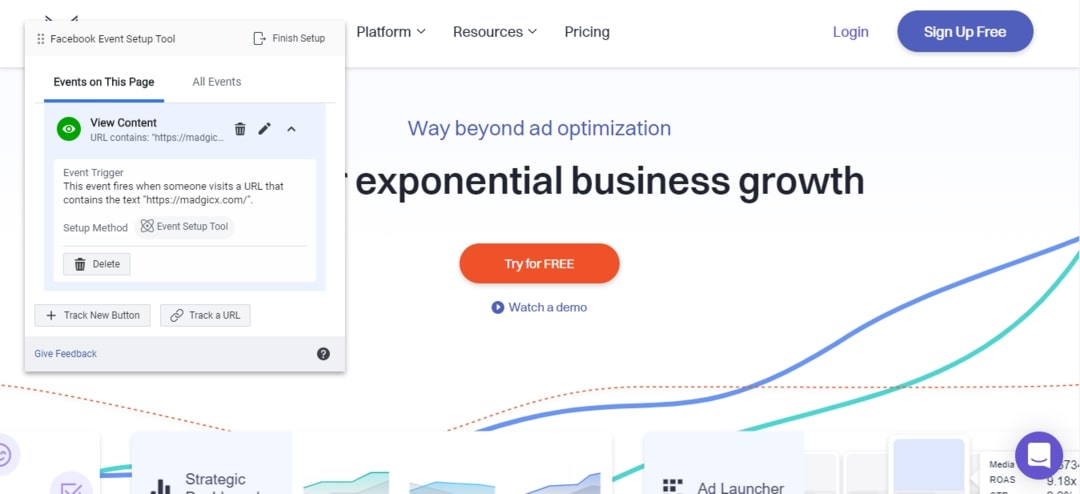
You can now go through each page on your website and add a button click or URL tracking. You can also view the details of your existing events, edit, or delete them.
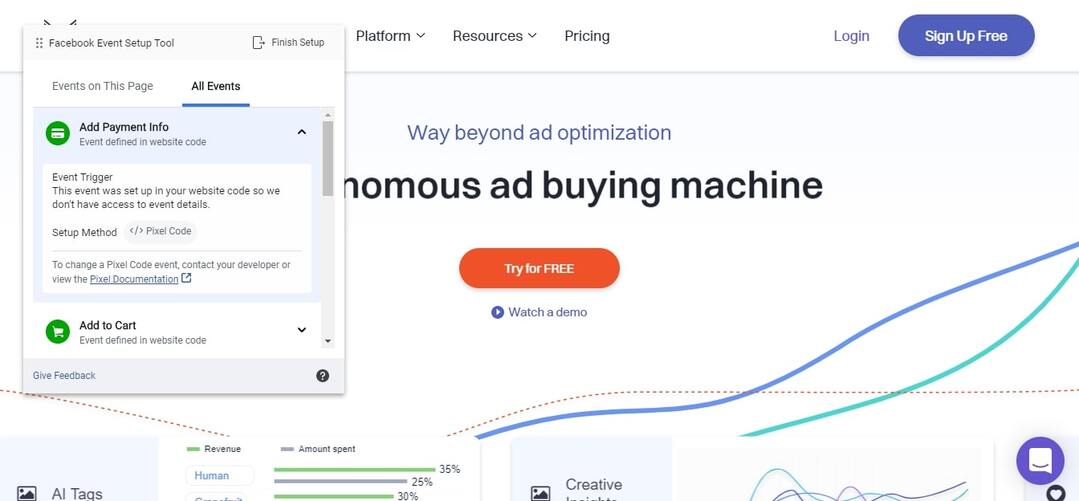
You can also tap into the “All Events” tab to view, edit, or delete events you set up on other pages on your website.
Note that if you set up an event manually in your website code, you won’t be able to view its details, edit, or delete it using the Event Setup Tool.
Once you’re finished, you can either click “Finish Setup” or go back to the Events Manager and click “Disconnect”.
Meta pixel standard events
Meta has already prepared a list of standard events that you can track:
Add Payment Info: The addition of billing information, such as a credit card, during the checkout process.
View Content: A visit to a web page that is important to you, such as a product or a landing page. This event only tells you that someone visited a specific URL, but not what they did or see on the page.
Add to Cart: The addition of an item to a shopping cart or basket.
Add to Wishlist: The addition of an item to a wishlist.
Complete Registration: A submission of information by a customer in exchange for a service provided by your business, such as signing up for your email list.
Contact: A phone call, SMS message, email, chat conversation, or any kind of contact between a customer and your business.
Customize Product: The customization of a product via any kind of configuration tool or app your business has.
Donate: A donation made to your organization or cause.
Find Location: When a person finds one of your locations with an intention to visit. For example, searching for a product on your website and finding it in one of your stores.
Initiate Checkout: The start of a checkout process.
Lead: A submission of information by a customer with the understanding that they may be contacted by your business later on. For example, signing up for a trial.
Purchase: The completion of a purchase, usually signified by receiving purchase or order confirmation, or a transaction receipt.
Schedule: The booking of an appointment to visit one of your locations.
Search: A search performed on your website, app, or other property.
Start Trial: the start of a free trial of a product or service you offer.
Submit Application: The submission of an application for a product, a service, or a program you offer, such as a credit card, an educational program, or a job.
Subscribe: The start of a paid subscription for a product or service you offer.
But when would you like the pixel to register these events?
You have two possibilities: on page load and on an inline action.
When is it better to register an event on page load?
When the event is complete once the website visitor gets to a new page.
For example, when you have a “Thank You” or confirmation page after the visitor completed the sign-up process or a purchase.
When is it better to register an event on inline action?
When the action is complete once the visitor clicks a button, such as “Add to Cart.”
You can also use this option if you don’t have a dedicated confirmation page for subscription or purchase.
Which standard Meta pixel events should I track?
That depends on your business model.
Do you have an eCommerce business? Are you a SaaS company?
You should understand your marketing funnel first, and according to that, you need to make sure you install all the relevant pixel events across the funnel.
Each step of your funnel should trigger an event. This will help you optimize your ads later on.
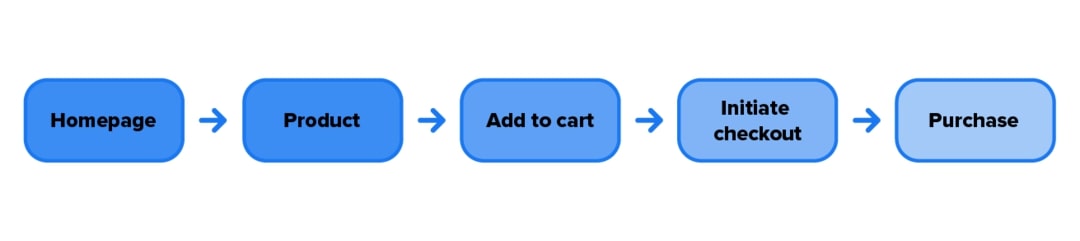
eCommerce business events
Let’s follow the most common process your customers go through on your website:
In that case, the essential events for you are:
View Content: You’d like to set your pixel to register this event when a visitor views your homepage or a product page. You’d like to set this event to fire on page load. If you have category pages, you can set this event for them as well.
Add to Cart: This event will be registered when a visitor clicks any “Add to Cart” button on your website and should fire on an inline action. If you use a wishlist on your website, you can also set up the event Add to Wishlist.
Initiate Checkout: This event should also fire on inline action when a visitor initiates checkout.
Add Payment Info: You can set up this event to fire on inline action when the customer clicks “Save” after adding their payment info, or when the next page in the purchase process loads.
Purchase: This event will fire on inline action once a visitor clicks “Complete Purchase” or on page view if you have a “Thank you”/purchase confirmation page.
Lead generation events
A lead generation funnel can look like this:
In this case, the main events you’d like to track are:
View Content: You’d like to register this event on page load on each one of your Landing Pages and on your Sign-Up Page.
Lead: You’d like this event to fire on page load if you have a “Thank You”/”Complete Sign-Up” Page, or on inline action when you don’t and the customer just clicks a Complete Sign-Up Button.
Are you wondering how to get your first sale on Etsy? Do not worry, you are not alone.
Many shop owners find it challenging to get their Etsy business off the ground. However, with a little effort and some sound advice, you can be well on your way to making money on Etsy!
In this article, you will learn all the best tips and tricks to help increase your chances of making that all-important first sale.
Please do not think you need to be a Digital Marketing Expert or a sales expert on other platforms to succeed on Etsy.
This article is designed for Etsy first-timers. So read on and get ready to learn how to get your first sale on Etsy.
Here, we will be taking a deep dive into the following tips:
1. Create A Product That Fits Search Intent
If you are wondering how to get your first sale on Etsy, look no further than fitting search intent. When creating a product for your Etsy shop, it is important to make sure that it fits the search intent of potential buyers. This means tailoring your product to what people are looking for.
You must make sure that your listings are keyword-rich and accurately reflect your product. You can use Etsy’s search bar to get an idea of what topics people are searching for, and then use those keywords in your titles, descriptions, and tags.
2. Provide Clear Product Descriptions
Your next step on how to get your first Etsy sale is to describe your product clearly so that it fits with what you are selling and matches the overall soul and style of your store. More importantly, your product descriptions will help entice your buyers to make the purchase.
Imagine going for a first date and you did the bare minimum in describing what you do and what you are like. Chances are, your date is going to run away as soon as possible and scream boring!
Here are some tips you can adopt to improve your product description:
Detailed physical description of the product since your buyers can’t touch the item, unlike at a brick and mortar store.
Use short paragraphs and bullet points as it is easy on the eye.
Check for typos. You do not want your buyers to think you can’t even handle getting your product descriptions correct.
Share the benefits and uses of the product.
Advice on how the product cannot be used or might get damaged.
Highlight the story behind creating the product. You cannot deny that personal stories sell and will increase the connection your buyer has with you.
3. Pay Attention To Search Engine Optimization (SEO)
If you want to know how to make your first sale on Etsy, it is important to pay attention to search engine optimization (SEO). By optimizing your shop and products for search engines, you can attract more buyers and boost your sales.
After doing your keyword research, you will be able to know:
What people are looking for.
What are the related keywords people are searching for.
How much search volume there is for that keyword.
How much competition there is for that keyword, meaning how easy will it be for you to appear on the first page of the search results.
Once you have your good keywords, start adding them to your shop name, title, and product description. Make sure that the keywords that you are trying to rank for are obvious and easy to spot for the buyer.
For example, if you’re selling handmade jewelry, including the keyword “jewelry” in your shop name. You can also include keywords in your title tag, which is the text that appears in the tab at the top of your browser.
However, please do not go overboard with your keyword inserts. You do not want your descriptions to sound robotic.
Ultimately, you are appealing to a human buyer and you want to make a human connection.
4. Match Title Phrases To Product Tags
If you want to know how to get sales on Etsy, you must make sure that your title phrases match your product tags.
An Etsy product title refers to the name of the product that appears above the listing image.
An Etsy product tag example is shown below under the headings, “Explore related searches” and “Explore related categories”.
It is like a category or a description of the product that you are selling.
The image above was taken from the same listing. There must be a match between the tag and titles.
That way, buyers can continue browsing until they find the product that fits exactly what they are looking for.
If a buyer stumbled upon your shop when clicking on the related searches, you would be very grateful that you ensured your product title and tags were matching.
Can you imagine if your product tag was completely unrelated to what you are selling?
For example, if you were selling handmade necklaces and in your product tag, you put it as a DIY product. It will appear as a necklace that needs to be put together by the buyer.
As such, it will be hard to rank your product unless you were intending to sell it as a DIY necklace, and not as something ready-made to be worn.
5. Analyze Your Competition
When starting an Etsy shop, you have to do your research and analyze your competition.
This will help you to understand what types of products are most popular on Etsy. It will also give you ideas for products to sell yourself and where you can improve.
Besides that, you can also use the Etsy search bar and just have a look at how your competitors are presenting themselves.
If the shops that you identified as your competitors are:
Not organizing their listings well.
Not quick to respond to customer queries.
Not having clear product descriptions but still ranking for those keywords.
Not having regular listings.
Listing products that appear to be low in quality
You can start jumping for joy. This is because you have found immediate areas you can stand out in to entice buyers to pick your product instead.
Do not worry, you will learn more about how to improve in these areas as you keep reading.
6. Adding Good Quality Photographs
When it comes to selling online, photographs are essential. This is especially true for shops on Etsy, where buyers can scroll through pages and pages of items before making a purchase.
If your photographs are not high quality, your chances of making a sale are slim to none.
Here are some easy ways you can improve your photo quality.
Use Natural Light Whenever Possible
Sunlight gives the best results, and it is free! If you can take your photographs outdoors, that’s ideal. If you must take them indoors, try to use a window as your source of light.
If that is still not possible, yellow lighting that is attached to a camera stand is another highly recommended option.
Use A Tripod
A tripod will help to keep your photographs steady and will result in sharper images. Tripods used to be a very fancy and expensive object to own in the past.
But now, most influencers and e-commerce sellers own some form of a camera stand as it does help to enhance the quality of their videos and photos.
Avoid Distractions In The Photo
Please let your product shine in your photo. Just like a photo shoot, you want the center of attention to be your product.
If you took the picture of your item on top of a fancy car or beside your cat, it could distract your buyer.
However, there are exceptions to when your product is recommended to appear with a related object or character, such as when it is in use. Please keep reading to learn more.
Show The Use Of The Product
Your chance of making your first Etsy sale will be greatly improved if your product features and uses are showcased in the photos.
For example, a picture of a handmade massage roller on its own may look nice. But pictures of the roller massaging your feet and showing your relief may sell more.
7. Doing Social Media Marketing
When it comes to promoting your Etsy shop, social media is one of the When it comes to promoting your Etsy shop, social media is one of the most effective channels out there.
Platforms like Twitter, Instagram, Pinterest, and Facebook allow you to connect with a massive audience of potential buyers.
Here is a step-by-step guide on how you can start your social media marketing.
You can start by creating a profile on these social media platforms using the same name as your Etsy Shop.
Invite family and friends to like and share your profile.
Use high-quality images of your products on your social media accounts. Make sure to showcase your products in the best light possible and use attractive hashtags to draw attention to your posts.
Write interesting and engaging captions for your photos. Do not just write a plain description of what the product is.
Social media platforms love stories and that is what makes them go viral. So do give your followers a sneak peek into what it is like to use the product or how it makes you feel.
As much as social media marketing helps, it requires plenty of effort on your part to continue promoting as it does not have much to do with SEO.
SEO on the other hand, if done correctly, generates more passive income.
8. Have Clear Policies Written In Your Store And Product Description
If you want to make money on Etsy, you MUST have clear policies written in your Etsy store and Etsy product description. This will help protect both you and your customers, and will also make your business seem more professional.
People are much more likely to buy from a shop that has clearly outlined policies, rather than one that is vague or unclear. Make sure to state things such as your return policy, shipping information, license to operate, and more.
Your return policy is one of the most important aspects of your shop. You want to be clear about what items can and cannot be returned, as well as the conditions for a refund.
If you are not clear about your policies, then you may end up with unhappy customers who are not sure if they are eligible for a refund.
This will help ensure that both you and your customers know what to expect from each other, which will lead to fewer misunderstandings down the road.
Learn from Etsy on how to set up and manage your shop policies. You can also download some free templates on Etsy Shop Policies here.
9. Get Personal!
When a customer visits an Etsy store, they want to be able to find information about the store owner. This helps build trust and credibility with the customer.
By having information about the store owner on the Etsy store information page, you can help make your shop stand out from the competition.
Some things that you may want to include on this page are:
Your name and contact information
A biography or introduction about yourself
Links to your social media profiles
A photo of yourself
Why did you set up this Etsy shop
Having all of this information readily available for customers will help them feel more connected to you and your shop, which can lead to more sales in the long run.
10. Utilize The Promoted Listings Option On Etsy
When you have a shop on Etsy, there are a few different ways that you can promote it to make sales. One of those methods is through the use of the promoted listings option which is effectively paid advertising on Etsy.
The promoted listings option is a great way to get your shop in front of more people, and it can result in more sales for your business.
The first benefit of using the promoted listings option is that it allows you to reach a larger audience. When you promote your shop, it will be shown to more people who are looking for items like yours.
This means that you will have a greater chance of making a sale than you would if you were not using the promoted listings option.
Another benefit of using the promoted listings option is that it can help you to increase your visibility on Etsy. When people search for items on Etsy, they will be more likely to see your shop if you’ve chosen to promote it.
This means that you will have a better chance of being found.
11. Reach Out To Family And Friends For Support
For most people, asking their friends and family to support their business might make them sweat. However, asking for support does not mean asking for loans, money or to buy your product.
Most times, what we need is just some nice words from them and to share to their networks about our business. You can demonstrate your product to them, and if they can see the value of it, sharing your product should definitely come easy!
If they still do not help you out, well, you and your business are better off without them.
12. Utilize Facebook Ads
If you have the cash to spare and want to make your sales quickly, you can try navigating Facebook Ads. It is a quick way to get access to a huge audience.
First, you need to create a Facebook Ads campaign. When creating your campaign, be sure to target people who live in the geographic area where you sell your products. You can also target people who have previously visited your Etsy shop or website.
Next, create a Facebook ad that promotes your product. The ad should include a photo of the product and a brief description of what it is. You should also include a link to your Etsy shop or website so that people can learn more about your products.
Finally, test different versions of the ad to see which one performs the best. You can test things like the text of the ad, the photo, and the target audience. By testing different versions of the ad, you can find out which version generates the most sales.
By using Facebook Ads to promote your Etsy shop, you can make your first sale within a few weeks. Try it out and see how successful you can be!
13. Utilize Pinterest
Pinterest is a social media platform that can be used to help promote your Etsy shop. When you create a Pinterest board for your Etsy shop, make sure to include pictures of the items you are selling, as well as pictures of the process of making the items.
You can also include pictures of people using your products. This will help potential customers see what your products look like and how they can be used.
Make sure to use keywords in your board titles and descriptions so that your pins will show up in Pinterest search results. For example, if you are selling handmade jewelry, you could use keywords like “handmade jewelry”, “unique jewelry”, and “artisan jewelry”.
Pinterest is a solid tool to use to support your Etsy business because it is a visual search engine. The more photographs or videos you have about your product, the easier it will be to direct visitors to your Etsy store from Pinterest.
Another huge advantage of using Pinterest over Facebook Ads? It is FREE.
14. Treat Your Etsy Shop As A Legitimate Business
When you’re running an Etsy shop, it is important to remember that you are running a business. Just like any other business, there are several benefits to treating your Etsy shop as a legitimate operation.
Here are a few of the most important benefits:
Increased Credibility
When you treat your Etsy shop as a business, you increase your credibility with customers and potential customers.
By acting professionally and putting in the effort to grow your business, you show that you’re serious about what you’re doing and that you care about your customers.
This can lead to more sales and more repeat customers.
Improved Customer Service
When you run your Etsy shop as a business, you also improve your customer service. This is because you are taking the time to learn about your customers and what they want.
You’re also more likely to go above and beyond for your customers to make sure that they’re happy with their purchase.
15. Organize Your Etsy Shop Professionally
When you organize your Etsy shop professionally, you can make a good impression on potential customers. They will be able to see that you are a serious business owner who takes their work seriously.
This can result in more sales and more customers. Additionally, organizing your shop can help you become more efficient and organized in your work. This can lead to more productivity and less stress.
Just like going to a grocery store, a restaurant, or a book shop. If you see that the store is neat, professionally arranged and things are easy to find and purchase, you will go there again, right?
Compared to entering a dodgy store that smells bad where nothing can be found easily. It is doubtful that they will be making sales.
16. Keep Listing New Products
When you list a new product on Etsy, you are increasing the chances that someone will find and buy your product.
Additionally, you can go back and update your product listings for your old items. Perhaps you found an area that could be enhanced such as the type of photo you uploaded, or the description you wrote.
You are simply polishing up your Etsy shop by doing this and making it more appealing to your customer.
17. Write Personalized Thank You Notes
It’s always a good idea to show your appreciation to your customers, and what better way to do that than by sending personalized thank you notes?
Thanking your customers for their purchase not only shows that you appreciate their business but also helps to build customer loyalty. Here are some ways you can write thank you notes to your customer.
It is an excellent way to get repeat business, especially when customers see that your shop provides not only quality products but also quality customer service.
Customers love getting personalized thank you notes because it shows them that their business is valued.
When sending a thank you note, be sure to personalize it as much as possible. Use the customer’s name and mention something about their order. You could also include a coupon or discount code for future purchases.
Whatever you do, make sure that your thank you notes are handwritten – this will set your shop apart.
You may wonder how you can write thank you notes to customers when you are still searching for that elusive first sale? Consider adding these thank you notes as part of your after-sales service in your product description.
18. Be Clear About Shipping Policies And Pricing
Have you felt frustrated when you placed orders for items and suddenly surprise charges appeared at the end when you are making payment? It has happened to most people.
Please DO NOT do this to your customers.
When it comes to pricing your items on Etsy, you must be clear about your shipping policies and pricing. If you want to know how to get more sales on Etsy, having clear policies is one way.
You do not want customers to be surprised by additional charges after they have made a purchase or at the checkout counter.
Make sure that the cost of shipping is included in the price of the item, and clearly state any extra fees that may apply in your product descriptions.
For example: if you are shipping outside of your country, customers should know that they may be charged extra fees by customs.
The old trick of hiding costs and slipping them in was from the previous century. Nobody will accept this now so please be upfront.
19. Be Friendly And Professional
It is important to make a good impression on potential buyers. One way to do this is by being friendly and professional in your shop descriptions, titles, and conversations with buyers.
Make sure that all of your content is well-written and error-free. Typos can make you look unprofessional, and no one wants to do business with someone who cannot even spell correctly.
Be sure to also be humble, polite, and respectful in your conversations with buyers.
As a retailer, it is important to meet customers on their preferred shopping channels and to form strategies around boosting your sales on those channels.
Since 2016, ecommerce has accounted for around 50% of all growth in retail and is projected to continue this growth in upcoming years. Perhaps what’s most important for a retailer to note is that of all the ecommerce sales each year, nearly half of those sales take place on Amazon. In 2018, 49.1% of all ecommerce sales took place on Amazon, which is more than the next nine largest e-commerce channels combined.
This means that a key focus for retailers moving forward should be figuring out how to increase sales on Amazon. The following guide provides nine simple tips for you to do just that and to put together a profit-boosting Amazon sales strategy.
1. Resource
If you want to increase your sales on Amazon, you need to differentiate your brand from competitors, boost product awareness, and attract your target customers. One way to do this is to leverage yourself and your brand as a resource.
Online consumers spend a lot of time researching before making a purchasing decision. If your brand provides consumers with the information they are looking for, you will build their trust in your brand and ultimately become a more successful Amazon retailer. Here are five steps on how to turn your website into that trusted resource:
Step 1: Think about the value you can provide to others. Think about the knowledge you have about your product and industry that customers would benefit from knowing. Next, create content that educates your customers in those areas.
Step 2: Create a place to publish and share that value. Set up a blog on your website and start sharing your knowledge with weekly blog posts. The focus of these blog posts should be around providing answers to questions your customers frequently have about your industry or product.
Step 3: Start sending traffic to the content you create. To increase the number of people who see the blog posts you create, try running Facebook ads, targeting useful keywords, and sharing your content with any other social media channels your users frequently use.
Step 4: Capture email addresses and start nurturing leads through email marketing campaigns. Create tools and incentives for people to provide their email addresses before or after reading your blog posts. This way you can generate more leads and start an email marketing campaign to move those leads further down your sales funnel.
Step 5: Include a compelling call to action in each blog post or email. Guide readers directly to your product listings and brand page on Amazon by crafting compelling messages around why they should find you on Amazon and how.
2. Influencers
When consumers research a product, they often look for reviews from trusted sources such as social media influencers, industry leaders, and even celebrities who use the product. In one study of a large group of consumers, 49% of respondents said they take recommendations and advice from influencers when deciding what products to buy. That being said, another great way to increase your sales on Amazon is to connect with and leverage the help of well-known influencers in your industry.
With over 42 million followers, LeBron James is a huge influencer in the athletic apparel industry. Nike leverages LeBron’s fame and influence to reach a larger audience than they could on their own. However, not all influencers are as famous and inaccessible as LeBron James. Any business owner can connect with relevant influencers using one of these three approaches:
Approach #1: You can work with influencers through the Amazon Associates or Amazon Influencer Programs.
Approach #2: You can handpick influencers and reach out to them manually via email and offer to pay them for creating and sharing sponsored content about your products. For advice on selecting the right influencer for your brand and collaborating with them, check out this guide.
Approach #3: You can connect with influencers on different social media channels using influencer network tools like Shoutcart, Grapevine, or FameBit.
3. Try a Sponsored Products Campaign
As with many other channels, you can find more success on Amazon if you’re willing to pay to play. Creating Sponsored Products ads on Amazon can help make your brand more visible than your competitors. Here’s how it works:
You choose the products you want to advertise, how much you’re willing to spend per click on each ad, and any keywords that you’d like to connect to your product.
Amazon will create ads that appear in high-visibility spots like the first page of a shopper’s search results or at the bottom of a product details page.
Wilson Sporting Goods, for example, paid for an advertisement to appear at the top of a search results page for anyone who searches for ‘basketball shoes.’
For more information on how to get started, check out this guide from CPC Strategy. The guide contains information about the different types of Sponsored Products campaigns you can run through Amazon as well as tips on how to ensure you get your money’s worth from them.
4. Drive More Reviews
Getting a lot of good reviews from your customers and making those reviews visible to potential buyers is a great way to build trust in your brand and by extension increase sales on Amazon. In order to accomplish this, you need a strategy for getting more customers to leave authentic and helpful reviews on your product listing pages.
If you try to influence the tone of the review too much, the reviews will come off as disingenuous. You are better off trying to get a high volume of reviews so that potential customers get a full and accurate picture of your offerings.
This review about the Amazon Echo Dot, for example, is not a full endorsement of the product, but it provides the customer with a thorough and honest review, so buyers know exactly what they are getting and can trust their purchasing decisions more. Here a few ideas on how to get customers to leave reviews:
Idea #1: Follow up with customers via email. After you have received notification that your product was delivered to its intended recipient, follow up over email and ask if they’d be willing to write a review about your product on the Amazon listing page. Make sure to let the customer know how important their review will be to your business.
Idea #2: Include a note in the package you send your products in. You can also include a handwritten note in your package that thanks customers for their business and asks them to write a review about your product on the Amazon listing page. It’s a small gesture, but you’ll find that people respond quite positively to handwritten notes.
Idea #3: Remind people on social media. Every so often, invite your social media followers to review your products on Amazon. Don’t offer any incentives, just explain why reviews matter and why you’re asking for help. Transparency is what will make this tactic successful, so just be honest and open with people.
5. Optimize for Search
Getting your products to show up closer to the top of a shopper’s search results can be a significant leg up on your competition. Figuring out how to optimize your product listings for Amazon’s search engine then is essential for increasing your sales on Amazon.
When it comes to Amazon search optimization, there is a lot to learn. The following blog posts are great places to start learning about optimizing your Amazon listings:
Once you’ve spent some time learning about Amazon search optimization, start updating some of your product listings with relevant keywords and SEO features. Make note of performance before you make any changes — you want to be able to track your progress and success along the way.
6. Create an Unmatched Buying Experience
As is the case with other selling channels, on Amazon, creating a great buying experience for your customers is a way to stand out amongst competitors. While there is no single equation for creating a winning buying experience, there are a number of things that you can do to help build your reputation and make people more likely to buy from you than from a competitor. Here are a few ideas:
Be transparent: Customers should never have to guess about the quality of your products, how they were made or manufactured, what your shipping and return policies are, etc. Help your customers feel like they know and can trust you as a brand.
Share your story: Help people understand who you are and why your business exists. Share stories about your products, your partners, the manufacturing process, your employees, etc., to build trust and excitement with your target audience.
Personalized communication: Engaging with your customers on social media, sending personalized email follow-ups, and even including handwritten thank you letters in the packages you send can go a long way toward differentiating yourself from competitors and building positive relationships with customers.
Sharing a story about your founders and/or company values helps buyers build a more personal connection with the brand they are buying from. Instead of competing with businesses on price alone, make an effort to build a personal connection with your customer at the buying stage, so your company values and culture can become a competitive advantage.
7. Write Winning Product Descriptions
If people are visiting your listing pages but not following through with a purchase, it could be because your copywriting and language are not compelling enough to get people to take action. Making small changes to your product descriptions can have a huge impact on the amount of shoppers you convert to customers and subsequently increase your sales on Amazon.
If you’re not sure how to approach product descriptions, spend some time going through these helpful resources:
A word of caution: try not to change too much at once. Start small by testing different words in your headings and body, but don’t completely rewrite your product descriptions. Doing so could actually have the opposite effect on your sales.
8. Leverage Video
In addition to reaching customers through multiple channels, it is also important to reach them through multiple mediums. Supplementing your written content with video content, for example, is a great way to increase sales on Amazon. When you use video effectively, it helps your brand stand out, builds a more personal relationship with customers, and also leads to increased sales. One study on ecommerce sellers found that using product videos increased sales for online stores by 144%.
The following types of videos are particularly useful for helping ecommerce companies optimize their listings:
1. Product Promotion Videos: Highlight a specific product and its features.
2. Production Videos: Show how your products are made.
3. Customer Story Videos: Film a customer testimonial or case study.
4. Brand Storytelling Videos: Interview the company founder or employees.
5. Educational Videos: Show customers how to use a product or how to fix a problem a lot of them have.
6. Live Videos: Let customers interact with an event in real time instead of watching retroactively.
Giving shoppers the option to read about a product or learn about it through video makes your content less likely to be skimmed over or ignored.
9. Find the Products That Sell Best, Then Double Down
Finally, the best way to boost sales on Amazon is to figure out which of your products are selling best and double down on them. If you’re struggling to gain traction, try reducing the number of items you’re selling and create a more targeted marketing strategy that you can use for just a few of your products. If you start seeing the kind of numbers you’re looking for after executing on your strategy, you can slowly introduce more items again and develop new strategies based on what you’ve learned along the way.