If you know someone’s name but don’t know their email address, there are many methods you can try to find it.
This post lists every possible method to find the email address you’re looking for.
10 ways to find an email address, ranked by efficiency
Below are 10 methods to efficiently find an email address. Try them in this order to get the best results with the least amount of time invested.
1. Use an email finder.
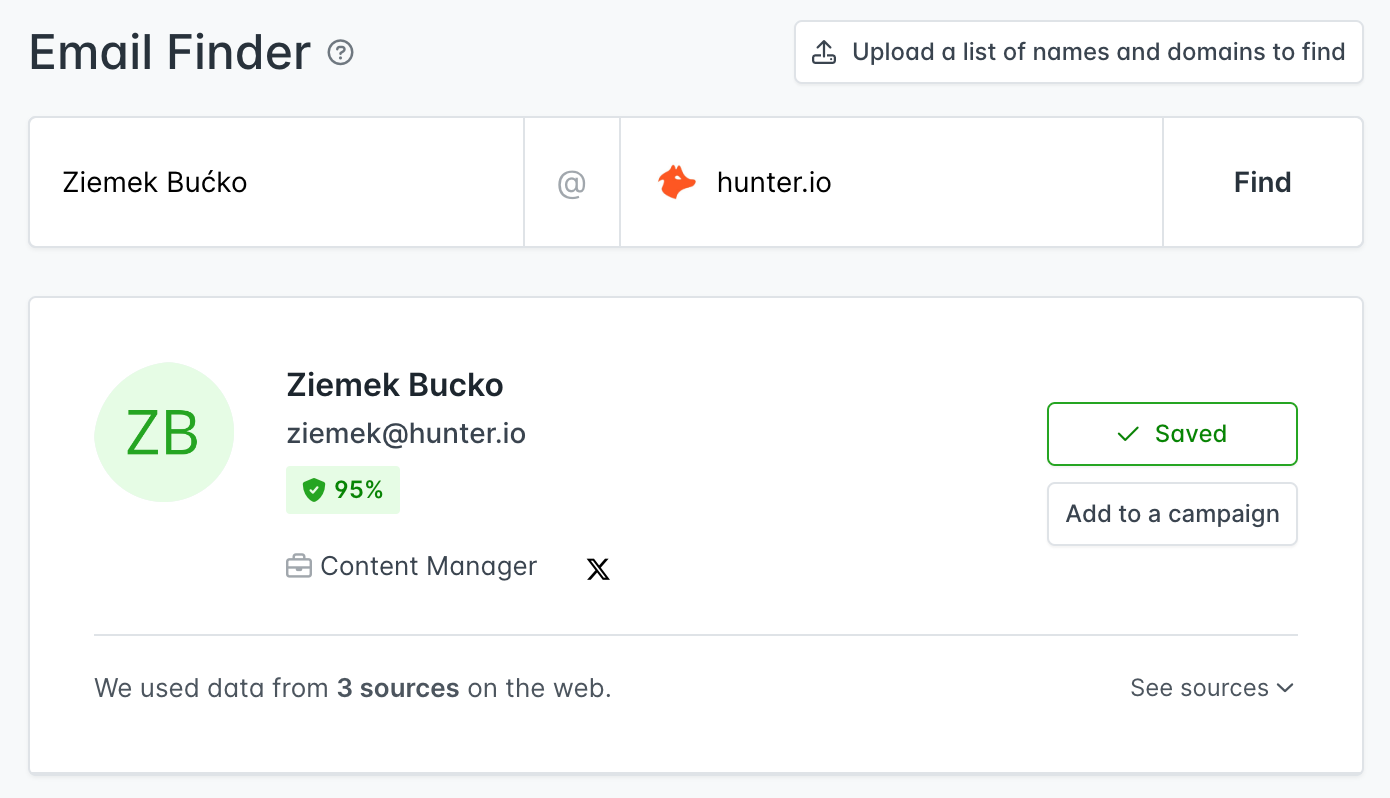
Your best bet if you’re looking for anyone’s business email address is to use an email-finding tool like Hunter’s Email Finder. It’s free to use, and it will help you find many email addresses in no time.
Once there, enter the person’s name and website address (or company name) in the input box and click “Find.”
Here’s what’s happening under the hood:
The Email Finder checks Hunter’s database of email addresses found publicly on the web. If the company website you provided contains the address of a person you’re looking for, the Email Finder will surface it.
If we didn’t find the right address or haven’t discovered that website yet, the Email Finder will attempt to guess the email address.
2. Guess their email address, then verify it.
If the Email Finder doesn’t find the email address you’re looking for, you can try guessing the address yourself. This involves looking for possible patterns firstname@example.com or firstlast@example.com, and verifying their existence with an email verifier.
According to a study we conducted at Hunter, 49.9% of the companies use the {first}@example.com email pattern.
3. Look on the company website.
A company website is a great source of information when you need to find company decision-makers and their email addresses.
Contact Us page
On the “Contact Us” page, you may often see generic contact forms, but some companies add the team members’ contact information who can help with specific requests.
Author page
Since most companies have blogs, another effective way to find email addresses is to visit each author’s individual author page.
Usually, you need to click on the image of the blog post author (or their name), and you’ll be able to get the author’s personal information. In some cases, you can find all the information under the blog post in the author’s bio box.
4. Use Google.
If you didn’t find any useful information on the company website, it doesn’t mean the email address you’re looking for isn’t listed elsewhere on the web.
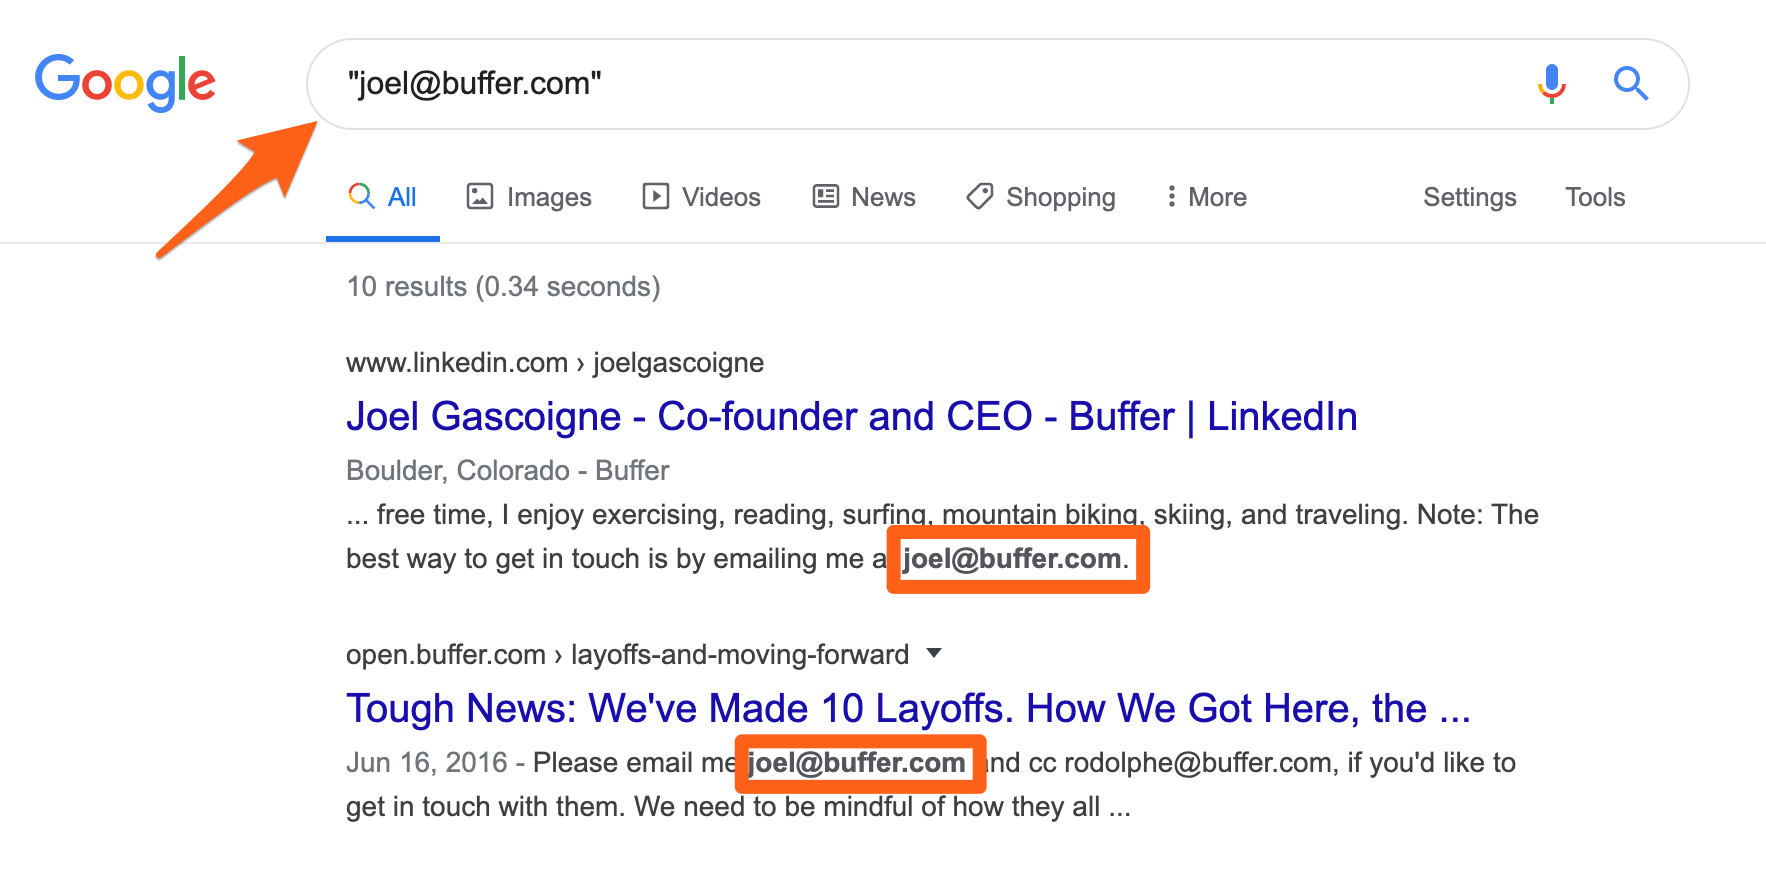
That is where Google comes in handy. If you have a couple of email addresses you think are correct, search for them on Google.
Below is an example of how easy it is to find the email address of Buffer’s founder, Joel Gascoigne. I’m using quotations so that Google only returns the results that contain the exact string I’m looking for.
You can also experiment with adding other personal information to the queries, such as position, previous companies, city, etc.
5. Check social media profiles.
If you can find someone’s social media profile, you’ll probably be able to find their email address there.
Here are some tips on how to do it with Facebook, LinkedIn, and Twitter.
Facebook
When trying to find bloggers or general company email addresses, Facebook can be an excellent source to check.
Head to your target’s page and open the “About” section.
Most bloggers and small businesses include their contact details in this section. However, you can also often see the info@, hello@, and contact@ email addresses, which are not very useful if you’re looking to do personalized outreach.
LinkedIn
For LinkedIn, you may need to connect with the prospect to see their email address and other personal information.
Once you’re connected, open the prospect’s LinkedIn profile, click Contact Info, and the chances are that you’ll find what you’re looking for there.
You can also check the About section on a person’s LinkedIn profile. People often share their email addresses or those of those who work with them there.
Finally, you can try exporting your LinkedIn connections. Note that this will only work if the person doesn’t hide their email address from their LinkedIn connections.
Here’s how to do it:
Log in to LinkedIn, click the drop-down menu that has your profile photo on it, and then click on Settings & Privacy.
On the next page, click on Get a copy of your data, select the “Want something in particular? Select the data files you’re most interested in.” option, and then check the Connections box.
Finally, click the Request archive button.
LinkedIn will email you once your export is ready. It usually takes about ten minutes.
You’ll receive an email to download a .csv file containing a list of all your connections and their email addresses (where available). With some luck, the email address you’re looking for should be there.
Twitter
The most obvious way you may think of is to check the prospect’s bio on Twitter.
But since the bio is very limited in space, most people put other essential links and information here. Moreover, having a publicly listed email address on Twitter (that could be easily scraped) increases the chances of getting a lot of spam emails.
Since sometimes people tweet their email addresses, you can search past tweets to see if your prospect has ever done it.
You can check this using Twitter’s advanced search, which allows you to search for very specific information in selected Twitter accounts.
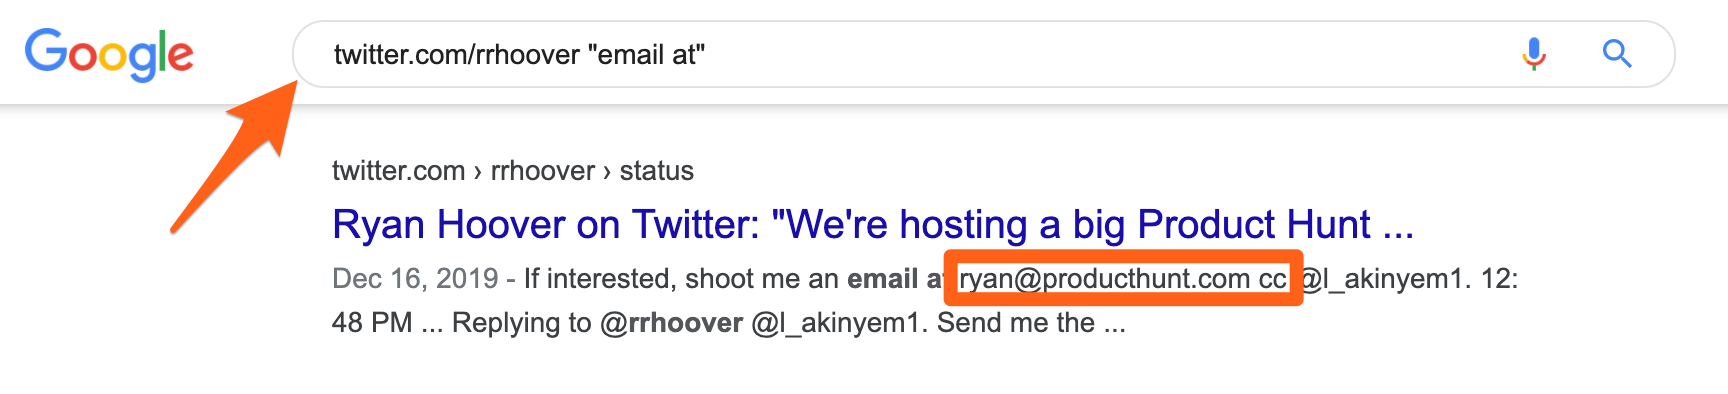
Search Twitter with Google
This technique is as simple as typing the following into Google Search:
twitter.com/username + “keyword”
Note that for “username,” you must have the person’s current Twitter handle. For “keyword,” you can experiment with other relevant keywords such as “contact,” “email,” “email at,” etc.
6. Just reach out.
If you couldn’t find someone’s email address with any of the techniques mentioned above, try reaching out on social media, asking for a more specific email address, contacting info@ or hello@ email addresses, or even connecting with the company’s support via chat.
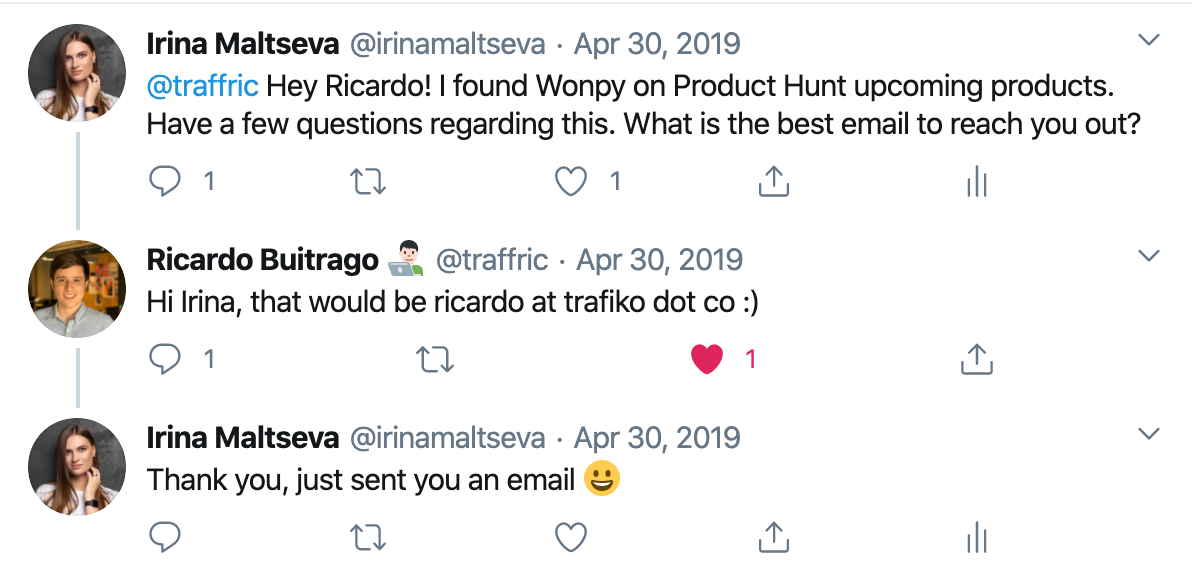
Reach out on Twitter
Don’t hesitate to find your prospects on Twitter and ask directly for their email address. You can quickly describe why you want to contact them or where you found their social media profile.
Ask for a referral via a generic email address
Usually, it’s effortless to find a generic email on a company website. It usually starts with “info” or “contact” + @domain.com.
If you write a short email describing who you are, who you need to contact, and why, the chances are that someone behind the generic email address will provide you with a personal email address you can contact.
It doesn’t hurt to ask.
💡
If you can’t find a generic email address, you can send your message via the contact form on the company website.
Use the support chat
There is always a human behind the company’s support chat. The communication happens in real-time, so the chances to get a reply fast are high.
7. Subscribe to the prospect’s newsletter.
Many companies and bloggers send newsletters using their personal email addresses. This is an excellent way to build relationships and show that there’s a real human behind the emails.
You can leverage this to find an address they’re likely to use regularly.
Step 1: Find the opt-in form & subscribe
Step 2: Check your inbox
Check your inbox in a few minutes, and you’ll find a welcome email or the first part of the newsletter (or, in some cases, an opt-in confirmation email).
Also, you’ll get the email address you were looking for.
Don’t hesitate to hit “Reply” and start a conversation. The chances that your prospect replies are much higher than in the case of sending a completely cold email.
8. Check WHOIS records.
If you’re trying to find the email address of someone who owns a website or blog, you can do it with WHOISWHOIS.
WHOIS is a query and response protocol that is widely used for querying databases that store basic information about a registered domain, such as domain owner contact information, domain availability status, and company details.
All you need is perform a WHOIS search of the prospect’s domain on one of many websites that provide access to the WHOIS database. For example, WHO.IS, Namecheap, or GoDaddy.
💡
WHOIS offers an option to hide the contact information from the public, so this method might not always work.
9. Ask for an introduction.
Think about whether you have a mutual acquaintance with your prospect. If so, it doesn’t hurt to ask for an introduction.
You can easily determine whether you have any shared connections on social media.
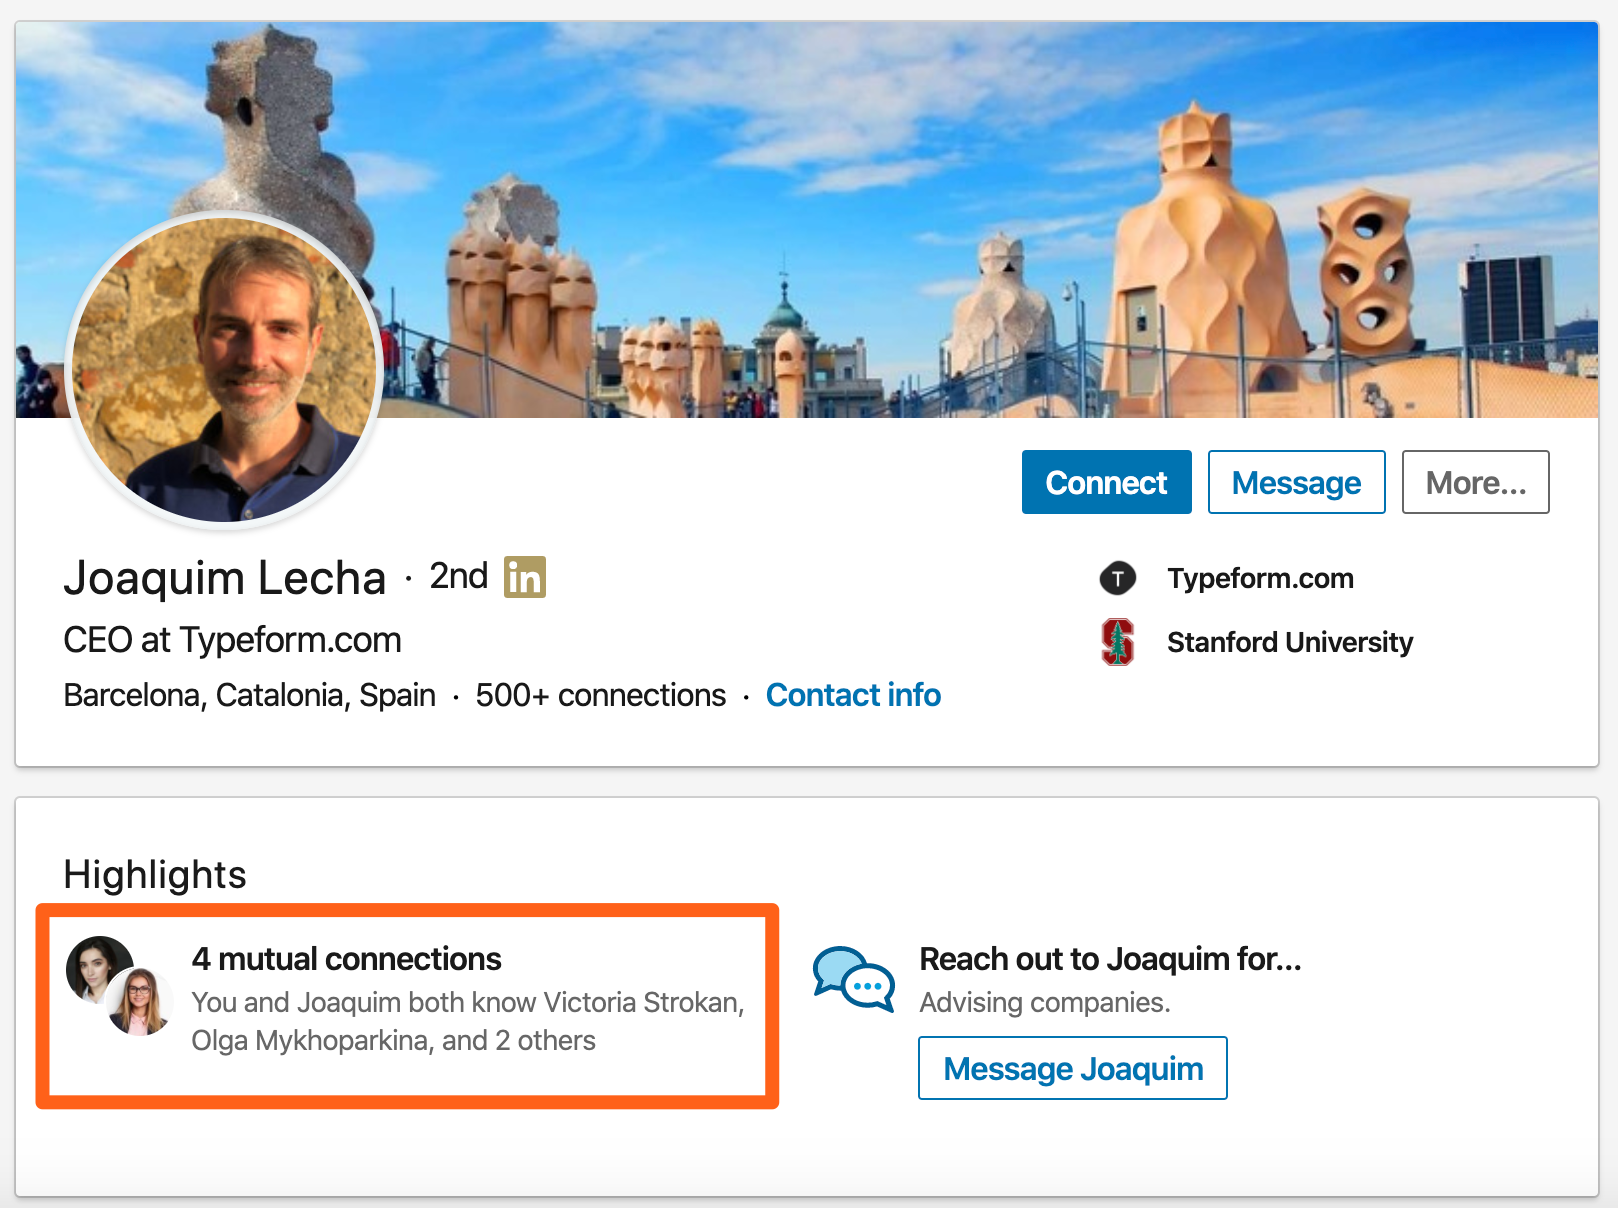
Let’s take a look at this example: I want to connect with Typeform’s CEO, Joaquim Lecha, and all I have is his LinkedIn profile.
I can easily check if we have any mutual connections, and if someone I know is well-connected to Joaquim (like my friend or colleague), I can quickly reach out to them and ask if they can make an introduction.
You can ask for an introduction using this short and straight-to-the-point message:
“Hey [name], I saw you are connected to [target person]. Mind making an introduction so I can [1-2 sentences maximum about the reason you want to connect]?”
Or you can just simply ask for the right email address to contact your prospect, and when contacting, mention the person who provided you with it.
Just drop a few lines, and that’s it.
10. Check your own email list.
If you have a big email list, you might already have the person’s email address stored there.
Reviews on sites like Google, Yelp, or Facebook matter. 76% of customers “always” or “regularly” read online reviews to research local businesses, according to brightlocal.
Negative feedback affects customers’ decisions, particularly for home services, automotive services, and healthcare.
If you’re not sure how to respond to negative feedback or if you should respond at all, keep reading.
We’ll cover why you should respond to bad reviews, 10 tips for good responses, three ways not to respond, and examples of responses to bad reviews.
Table of Contents
Why Negative Feedback Matters
10 Ways to Respond to Negative Feedback
Bonus: How Not to Respond to Bad Feedback
Examples of Responses to Negative Feedback
Why Negative Feedback Matters
Negative feedback allows you to improve your products and services and show that you care about your customers.
When you receive a bad review online, it’s visible for all your current and prospective customers to see. Your response, or lack thereof, is equally visible.
Responding to negative feedback is an opportunity to show your character and create positive connections with customers.
10 Ways to Respond to Negative Feedback
Negative feedback can take all forms: thoughtful critiques, unhinged rants, or even personal attacks.
Before you respond, take a deep breath and try not to let the bad review upset you. Negative feedback is part of business, and it can make you stronger if you listen and respond well.
1. Be timely.
A survey found that most consumers expect companies to respond to a review within a week.
They also found that companies with the best reputations have faster responses.
We recommend responding to negative feedback within 48 hours and on the same day if possible.
Make sure you claim your listings on sites like Google and Yelp, so you’ll be notified immediately when a bad review appears.
Writing a playbook of pre-scripted responses can help you respond to complaints quickly so you aren’t writing from scratch each time. However, it’s very important to personalize each one.
2. Personalize your message.
The easiest way to personalize your response is by saying the person’s name to start your response.
This simple trick shows that you’ve taken care to read and understand their message and that you see them as a person.
You can also personalize a message by restating their issue or company name in your response.
3. Acknowledge and empathize.
The best way to defuse a tense situation is by acknowledging any hurt or frustration your brand may have caused.
This can be as simple as “I’m sorry you are experiencing this issue” or “I’m sorry we didn’t meet your expectations.”
4. Ask for more information.
When you receive a bad review, it can be blunt or lack detail.
Ask the customer for more information about their negative experience so you can appropriately follow up.
Often, brands direct brands to a customer survey or ticketing system to collect feedback. This also directs the conversation out of the public forum.
Just remember to start your message with personalization and empathy, or your request will seem templated and stale.
5. Humanize the brand.
Another subtle shift you can make to defuse negative comments is with the pronoun you use to respond.
Shifting from “We” or your company name to “I” frames you as human instead of a bot or faceless corporation.
Some brands even respond to online feedback by identifying the person responding as the owner or with a first name or initials.
Another way to humanize your company is simply saying, “I’m sorry, we made a mistake.” People make mistakes, and owning up to them with a mea culpa builds trust.
6. Show your values.
Imagine you’re a services company, and one of your values is integrity. How should you respond to feedback accusing an employee of lying?
While that’s a complex situation that can’t be solved in a single response, you can demonstrate that you’re concerned because the complaint contradicts your values.
Here’s an example: Integrity is one of our top values here at [company name]. I’m concerned by your report and would like to learn more so we can investigate. Can you share more details at this link?
7. Acknowledge the positive.
Reviewers sometimes give negative feedback sandwiched between positive comments or hidden in a 4-star review. “Nice property, but…”
Mixed reviews can be your best customers to pay attention to because they’re a fan of your product or service but want to see improvement because they’re likely to return.
When you get a mixed review, even one that’s mostly positive, it’s still important to respond. Show the customer appreciation for their business and praise, and acknowledge their pain point and how you plan to fix it.
8. Surprise and delight.
Have some freebies ready to show your customers how much you care and encourage them to try your business again despite a negative experience.
You can offer a significant discount or credit for a future visit, a free item, or even a refund.
9. Share an action plan.
To build sustainable relationships with customers, you can’t just collect endless feedback. You need to show that you’re listening and taking action.
If there’s a quick fix to the customer’s complaint, like a broken link or downtime on your website, respond to the customer by thanking them for bringing this to your attention and letting them know that it’s been resolved.
For larger issues, like feature requests on a software program, a solution may take some time. By tracking customer feedback, you can categorize your feedback and prioritize which to implement.
Once you make changes, you can follow up with the customers to let them know about the change and that you were listening. This is called the A.C.A.F Customer Feedback Loop: Ask, Categorize, Act, and Follow-up.
10. Redirect.
Companies may receive reviews from someone who’s not in their target audience or hasn’t actually tried the product or service.
Customericare calls this the “Not Your Target Audience” type of feedback.
You can spot this if the feedback goes against your core value or unique selling point.
For example, the suggestion might change your entire business model, or the feedback may attack something irrelevant, like the color you painted your storefront.
Carefully read it, then reply by explaining your vision, inviting them to try the product or service, or suggesting an alternative business if relevant.
Bonus: How Not to Respond to Bad Feedback
Now that we’ve covered how to respond to reviews, let’s reiterate a few ways you shouldn’t react as a business. You can learn a lot from others’ mistakes.
No Response
Not responding or only responding to positive reviews doesn’t build trust.
88% of customers are likely to use a business owner who responds to all reviews, while just 42% of people are willing to use a business that doesn’t respond to reviews.
Only 50% of customers would try a business that only responds to positive reviews.
The Rambling Response
A review website is not the place for a diatribe about how hard it is to be a small business owner, supply chain issues, or the state of the world. Keep your review short and focused.
The Insult Response
When you receive a negative review, particularly one that’s nonsensical or unfair, you might be tempted to attack the reviewer back. Don’t take the bait. Give a short response inviting the customer to come and try the business again.
Need more inspiration? Let’s look at some examples of companies responding to bad reviews.
Examples of Responses to Negative Feedback
Watch and learn how these three businesses responded to bad reviews online and turned a detractor into a potential promoter.
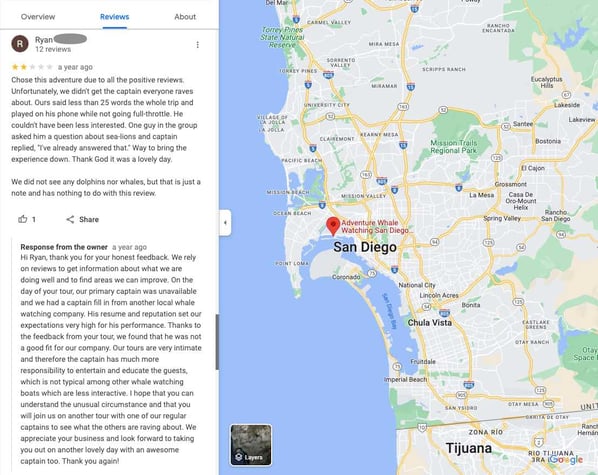
Adventure Whale Watching San Diego on Google Maps
When tourists left a bad review for Adventure Whale Watching in San Diego, the company responded with empathy and action.
They greeted the person by name and thanked them for their feedback, stated their values, explained that this wasn’t a regular staff person, and said they wouldn’t use that person again.
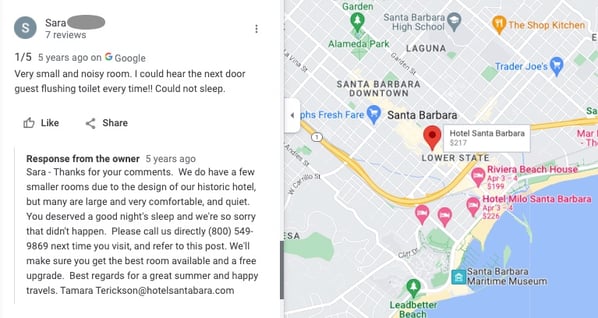
Hotel Santa Barbara on Google Maps
A guest at the beautiful, 4.5-star rated Hotel Santa Barbara was surprised to find that the room in their hotel was, well, historic. The hotel addressed her by name, apologized, and offered her a free upgrade to a larger room on her next stay.
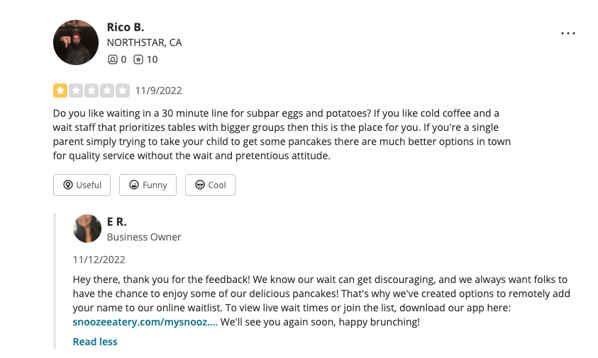
Snooze, an A.M. Eatery on Yelp
At the popular brunch spot Snooze, an A.M. Eatery, getting in can be a pain point.
When a customer left a 1-star review, mostly due to the wait, the owner responded with a brief, upbeat comment. They apologized for the wait and gave some recent solutions they’ve added, like their online waitlist.
You can’t escape negative feedback, but you can embrace it and respond with empathy and transparency. There’s also a way you can prevent bad reviews from happening: by asking for more feedback.
Making the Most of Feedback
Regularly asking for feedback will mitigate problems sooner and give customers a productive way to share negative feedback before it lands on social media or online review sites.
When you build a system for measuring customer satisfaction, you can create feedback loops that foster customer dialogue.
So, you’ve put your offer out to the world on Facebook, Pinterest, LinkedIn even… what about Instagram?
Maybe you’ve already tried but you just aren’t seeing the results you’d like. A platform that just hit one billion monthly users, you’d expect to make some sales, right?
Well, you’re half-right.
The thing about Instagram is you have to know how to work it so that it, in turn, works for you. Instagram’s algorithms change every day, so while it can be difficult keeping up with all of the newest updates, there are still some tried-and-true steps you can take the next time you’re ready to put your offer on Instagram.
Using these selling methods paired with your newly optimized business account will allow you to k-i-l-l it so that you can finally start seeing the results you want.
Get a Few Things in Check First
If you haven’t checked out our blog post about how to use Instagram for business, we highly encourage you to go check that out. Everything we talked about will come into play here, but for the sake of ease, we’ll briefly go over the absolute most important steps you cannot miss out on.
SWITCH YOUR ACCOUNT TO A BUSINESS PROFILE
Do this now if you haven’t yet. Converting your Instagram account to a business profile will unlock all the insights you need to guide your posts. You’ll be able to know your audience’s demographics– what age and gender they are, where they live, when they’re online– as well as how often your profile is visited, how many link and button clicks you get, and how many interactions you get on your posts on what days. We can’t stress enough how key all of this, especially when you’re ready to start paying for ads.
All you have to do is go to Settings > Account > Switch to Personal Account, and all you’re all set! Your insights will appear once you make your first post upon switching.
HASHTAG, HASHTAG, HASHTAG!
Hashtags are the biggest way to start seeing organic leads on Instagram. We know the term “hashtag research” may seem daunting, but it’s super valuable and not as hard as it seems. Browse around on other pages in the same or similar industry as you and make a list of hashtags you see them using. Add to that list some keywords that relate to your industry, and put yourself in your customers’ shoes to add some things they would also search. Then, search your hashtags and throw out any that have more than 500k or less than 100k posts using them. When you search your keywords, hashtags that include that word will start to pop up. Filter through those just the same as the others. You want to make sure you’re choosing hashtags that aren’t oversaturated with posts but that are still being used enough that you’re likely to be seen.
Not only do you get overall page insights, but you also get insights for each individual post. Part of that includes showing you where your followers who viewed the post are coming from. (I think you know where we’re going with this.) How many views are coming via hashtags is also included in that list, which is perfect for getting an idea of how your hashtags are performing so that you can start testing which ones are doing the trick.
Get Intentional with Ads
That pretty “Promote This Post” button sure does look tempting, but we beg you to resist the urge. The options are very limited, and you won’t able to target a specific audience. Linking your Instagram account with your Facebook business page will allow you to use their Ads Manager and give you tons of different options. You can choose to only run your ads on Instagram, or you can have them run on both platforms. This is where your profile insights will come into play. Instagram basically already tells you who you should be targeting, and you can play around with the other options to target those users with certain interests as well.
THEN, TEST THEM!
Don’t feel like you need a humongous budget for this. A small budget can work, as long as you’re intentional with your targeting and testing your ads. You can do this by setting up 3 campaigns that are all pretty much the same, but just tweak a few things between them. So, the second ad may have a different picture but the same copy, and the third may have the same picture but different copy. Once you see which one performed the best over a period of time– say, 3-5 days– you can then go on to use that ad, but switch up the targeting and so forth.
Use the Shopping Feature
If you sell physical products, Instagram’s shopping feature is a must. You know how when you tag a friend in a post and when you tap on the post, their username pops up? Think of your products as that friend. When users tap on your post, the product name and price will pop up. Once clicking on that, they’re taken to product details page, which has the description, a button to view the item on your website, and more products that you’ve added. You can even add other items to the page that might go with that product. It’s a win-win and such a huge opportunity for physical product-based businesses to see some sales increases.
Don’t Be Afraid to Reach Out
Physical product sellers can, of course, reach out to influencers or celebrities to pay for product promotion or send free products in exchange, but service-based businesses can do something like this as well.
Remember your free work stage when you just wanted to gather a few testimonials to help get your feet off the ground? It’s time to use them, babe. Post them everywhere. Have a dedicated Story Highlight on your profile just for testimonials, post about them in your feed, remind everyone that not only do you think you’re the shit, but others do, too.
If you haven’t already, get a testimonial from past clients as well as your current ones. It can also be worth it to ask if they could even make a post promoting you and your services. The worst they could say is no, and if they say yes, that’s even more exposure you’d be getting.
Showcase Your Offer in Stories
Last but not least, post to your Stories regularly about your offer– every day, at least. Once that 24-hour timeframe has passed, up goes another one! Add CTAs and engagement stickers (we went over those in this blog post, too!) to encourage your followers to engage, click, swipe, etc. Create a sequence with your Stories. One to show the offer, one to tell what it’s about, another for testimonials, etc. You want it to flow seamlessly so your followers can easily tap and read.
OKAY, BUT HOW DO YOU CREATE IT?
Create your social media posts quickly and easily with the help of the Creative Template Shop! Check out our Instagram Stories Sales Sequence templates that were made specifically to help you. Showcase your amazing offers via stories and start seeing leads!
Yes, it’s not a secret anymore that Pinterest will bring you the most traffic to your blog, website, or any other place. And not only that, your sales will grow significantly if you do it right.
Why do most bloggers, entrepreneurs, and marketers see an increase in sales? Well, it’s because over 80% of Pinterest users are BUYERS!
You won’t find that many on Facebook or Instagram.
That’s why it’s so important to use Pinterest for business. And there is another great news you should know – you can get MASSIVE Traffic for FREE!
1.) Why you should use Pinterest for business:
Reason #1: Most Pinterest users are buyers:
As I said before, the first reason is that over 80% of Pinterest users are buyers. You can reach out to a lot of people without struggling and wasting a ton of your time in front of your computer.
Reason #2: You won’t waste too much time reaching more people:
To be honest with you, I spent at least 4 hours more in front of a computer when I was using Facebook. There is nothing wrong with Facebook (I still use it), but if you want to reach out to more people, you will have to invest in ads. I can say that I’m not a Social Media slave anymore just because I started using Pinterest.
Reason #3: Pinterest ads are way cheaper and more powerful:
Another reason you should use Pinterest for business is that you can use its ads. You will invest way less money than with Facebook ads. The only problem that I see here is that Pinterest ads are not global.
2.) How to set up a Pinterest account for your business:
STEP #1:
You have two options here. If you already have a Pinterest personal profile, you can simply convert it to a business account.
OPTION 1: Convert a personal account to a business account:
Log in to your Pinterest profile account
Go to pinterest.com/business/convert/
Fill out your business name and website, then select a business type
Click Create account
OPTION 2: Create a new business account:
If you have a personal account but don’t want to convert it, go to pinterest.com/logout to log out
Go to pinterest.com/business/create/
Fill out your email, password, and business name, then select a business type
Click Create account
STEP #2:
Complete your Pinterest for a business account:
First, upload your headshot photo (smile on the photo)
Choose your username (it should be the name of your brand or just your name if you are branding yourself) – Include some keywords (for example, Pinterest for Business Tips, Ideas for Weight Loss…)
Complete your bio (include keywords – SEO optimized so that your business account will get ranked higher up and you will get in front of your targeted audience)
Also, you can add your location
And don’t forget to add your website
STEP #3:
How to verify your website on Pinterest:
Log in to Pinterest from a web browser and click the arrow in your top right corner to open your menu.
Select Settings
Click “Claim” and enter your website URL, then click Claim.
Select “Add HTML tag”
Then copy the tag and click Next
Go to the index.html file of your website and add the tag to the <head> section before the <body> section
Then go back to Pinterest and click Submit
STEP #4:
Your next step is to set up Pinterest rich pins:
You will need to add metadata to the content on your website.
Then you will have to verify your Rich Pins before you go to Pinterest
Then go to Rich Pins Validator:
If you read all the steps from the Pinterest help site, then you know you have to go to Rich Pins Validator. There you will see which steps to take next. This is how the site will look like:
You only need to do this once from any link on your website. Then you will enable Rich Pins for your whole domain.
3.) How to automate your Pinterest with their scheduler:
You can schedule your static or video pins inside Pinterest. Click ‘Create’ in the top left corner, then choose ‘Create Pin’.
There you can upload your graphics or videos, fill out the title, description, alt text, add a link, and choose the most relevant board.
At the bottom, you will see two options:
Publish immediately
Publish at a later date
Click ‘Publish at a later date’ and choose the date and time when you want your pin to be published.
4.) Create Pins for Pinterest:
Pinterest is a visual search engine, which means you have to create attractive pins. The pin images have to be vertical .
The ratio should be 2:3 – for example, 1000 x 1500 pixels. Here are other 2:3 ratio sizes:
I mostly use the size 1000 x 1500 px for static pins, and 1080 x 1920 px for idea pins.
Before you start making pins, you should know what they will look like. I’m talking about colors and fonts. Your brand is not just you, your products, or your services. It’s also the looks of your visuals.
Besides the high-quality images, you should always include the same colors and fonts.
5.) How to grow your Pinterest account:
The number of followers is not that important but you should still grow it. The more followers you have, the more people see your pins. So here is what you should do:
At the end of each blog post, ask people to follow you on Pinterest
When sending an email to your audience, including the call to action to follow you on Pinterest
Add a pin widget to your blog
Add a Pinterest share button to your blog
When making a video, you can include a call to action at the end
6.) Know your targeted audience:
You have to know who your targeted audience is. Not everyone is interested in what you have, so if you don’t want to waste your time, you have to figure out who are they, where they hang out (online or offline), and more.
You can create detailed customer personas and tailor your marketing efforts to your target audience by answering these questions.
This can help you better connect with your potential customers, create more compelling content, and ultimately grow your business.
7.) Check your analytics:
And here we go with the boring part – at least it used to be boring to me. And that’s why I made the biggest mistake – NOT CHECKING THE ANALYTICS.
That’s why I wasted a ton of time doing stuff that didn’t work at all. I don’t want you to repeat my mistake. If you want to do Pinterest for business, then analyzing how your pins are doing is a must!
You can find the analytics in the top left corner of your Pinterest account. Click on overview and check all the stats. But I suggest you focus on your blog analytics more because Pinterest analytics are not that accurate.
If you are reading this, chances are Instagram has disabled your account for no reason and you would like to get it back. We have a few free steps that have helped over 9,000 people and counting get back their social media accounts…
Do you have these problems on Instagram?
Instagram disabled my account for no reason.
Instagram banned my account.
Instagram deleted my account.
I am having trouble recovering my Instagram account.
Someone hacked my Instagram account.
Trying to access Instagram without an email address.
If you are reading this, chances are Instagram has disabled your account for no reason and or falls in one of the categories of problems listed above.
We have a few detailed steps to help you… Now just to save you time, if your account was deleted, there is a very slight chance that you will get it back. However, there may be a good chance to recover your social media account’s information.
We have seen all of the above problems happen before so rest assured there may be some sort of solution. Just make sure to take action as soon as possible! The longer you wait the less chance of a successful social media account recovery.
Also, if you are looking for a customer support phone number that will be very hard to come by or impossible. If you are looking for a fast pay-to-play way to get your Instagram account after it has been banned or disabled some companies may assist.
If you want to do this all yourself and want a few free insights on how to get your Instagram account back not to worry, we have this option for you.
Just read down below and you will browse some methods that can help you get back your Instagram account (Great news, some of these steps help with Facebook accounts)!
1. Report Your Instagram Account as Hacked
If you believe your Instagram account has been hacked, this is a surefire way to get it back in a few easy steps.
#1. Head to Instagram Support Center and select Privacy & Safety Center.
#2. Make your way to the Instagram Help Center page.
#3. Click on Privacy & Safety Center
#4. Once you’ve selected Privacy & Safety you’ll be taken to a menu where you’ll select “Report Something”.
#5. Find where it says “What can I do if someone is impersonating me on Instagram.” Click this and you will see a link that says “Fill out this form”. Or click this link. (this will take you directly to the form).
#6. Just fill out the form accordingly and make sure everything is accurate. Once filled IG will send you information for the next steps. (send them your ID and relevant information).
#7. After sending your ID and other information required, keep an eye on your email as Instagram may reach out to you for additional information to verify your identity and ownership of the account.
It’s important to remember that it might take some time for Instagram to investigate and recover your account. Be patient and follow any instructions they provide.
2. Recover a Personal Instagram Account
Many people face this dilemma, and we think it is the easiest to solve. Luckily for you, it is only 3 steps, to initiate the recovery process.
#1. Go to the Instagram Help Center and look for the option for “Deactivated Account”.
#2. Select whether you have a valid government-issued photo ID (ex: passport, driver’s license, etc.).
#3. Fill out the form and provide the appropriate information needed & Press send.
We found out that you can do this method without sending any ID, we highly recommend that you send your ID to Facebook/Instagram to get yourself a higher chance of taking back your account. It will take around 24-48 hours to respond, usually.
3. Recovering a Business Account
If you are trying to recover your Facebook or Instagram Business account, this way will make sure you get it back. It is as quick as recovering a personal account, but you will need more vital information.
#1. Go to the Instagram Help Center and look for the option for the Business Deactivated Account.
#2. Select whether you have a valid government-issued photo ID (ex: passport, driver’s license, etc.).
#3. Fill out the form and provide the appropriate documents and press send.
For a social media business account, you will need documents such as proof of business ownership and a government ID with the appropriate individual that is in the documents provided. Make sure to have an email in the documentation as well, for them to put that email as an admin.
4. Utilizing a Legitimate Social Media Recovery Agency
There are tons of companies out there claiming they can assist you with your social media account. Chances are more than 75% of these companies are scams or are run by one guy in a different country who can easily disappear with your hard-earned money if the job is not done. We would know since we have been a victim of this!
Hiring a social media recovery agency can provide numerous benefits for businesses and individuals. These agencies specialize in rectifying issues that arise on social media platforms, from negative reviews and most importantly recovering social media accounts. By entrusting a legitimate social media recovery agency, you may effectively address issues quickly and proactively, preventing any long-term damage to public image and reputation.
Moreover, social media recovery agencies are equipped with the latest tools and techniques to combat many issues a social media account may be facing. In short, hiring a social media recovery agency is a smart investment for any business or individual looking to gain back their account or just do not have the time or patience to deal with this issue themselves.
5. Recover Your Instagram Account without an Email or Facebook
This option to recover your IG account with an email or Facebook is available only for the latest versions of the application so it will be necessary that you update the Instagram app on your phone.
This method may be the easiest out of them all, which is how to recover your Instagram password without an email or Facebook.
What you can do is just put your phone number on the password recovery screen. Once you have entered your phone number, you will receive an SMS with a link to recover your password.
However, it is important that, when you create your profile on Instagram, you have put a real phone number to which you have access. Once you get that text from IG, make sure you follow the simple instructions and you will have your account recovered!
6. Contact Facebook Support to Recover Account – FB Chat
Please note that not all accounts are equipped with this feature. There are no specific prerequisites for running a Facebook Business Support chat. Depending on the number of available agents, the option is assigned to accounts gradually.
Chats with consultants can only be arranged by customers who are running active campaigns on Facebook. Non-advertisers must fill out a contact form instead.
7. Browse Questions About Instagram Accounts Being Hacked or Banned
The Facebook community forum is another way for users without business accounts to get help with questions about Facebook and Instagram (Since Facebook owns Instagram).
Signing in with your Facebook account will redirect you to the forum. Browse by category or topic to find queries. There are already countless answers in the forums and can find the answer you are looking for. Click the gray button in the upper right corner of each forum page to ask a question, then select its topic and subtopic.
Publish a question and wait for answers from other Facebook users. You might be surprised at how quickly answers can come in!
2 New Bonus Tips:
Recovering your Instagram Account The Hard Way
Still having trouble recovering your disabled Instagram account after all the methods listed?
Here’s another method that seems to work for those already having trouble recovering their Instagram accounts. It should work even for you that had your account disabled for the second time.
Put a working email address (any will do, preferably one that has not been used to bombard customer service).
Receive a verification code in your email after form completion.
Take a selfie or visit Fiverr and buy it from someone.
Wait for your account to be reactivated (Should be 1-4 weeks for a response).
Recovering Your Deleted Instagram Profile
There can be various reasons why people end up accidentally deleting their Instagram profiles. One of the most common reasons is accidentally clicking on the “delete my account” option while scrolling through the app. Often people confuse this option for logging out or switching accounts.
Another reason could be the result of a hacked or compromised account. Hackers can gain access to users’ accounts and delete them without their knowledge. There could also be technical glitches, such as the Instagram app crashing or malfunctioning, which can lead to accidental deletion.
Lastly, some users may accidentally delete their accounts while trying to delete specific posts, videos, or photos from their feeds. Regardless of the reason, losing an Instagram account can be a frustrating and upsetting experience for users.
Recovering a deleted Instagram profile can be challenging, but it is possible if you take the necessary steps. To begin with, you must have a backup of your profile through a third-party application or by downloading your data from Instagram.
If you do not have a backup, you may still be able to recover your profile through Instagram’s help center. However, you must provide them with information such as your email, phone number, and username associated with your account. Then, they will review your request and provide you with further instructions. If you have come this far, chances are you know how to navigate the IG help center to send over all the necessary information for Meta to review your account.
It is crucial to act quickly and follow any instructions carefully to increase your chances of recovering your profile. Keep in mind that even if you do recover your profile, all of your data, including posts and messages, may not be restored. Therefore, it is advisable to back up and protect your profile routinely to avoid any loss.
What can I do if my Instagram account has been disabled? (from Instagram)
If your Instagram account was disabled for no reason or accidentally, you’ll see a message telling you when you try to log in. Accounts that don’t follow Instagram’s Community Guidelines or Terms of Use may be disabled without warning.
Even if your account is retrieved, you could never find out why it was deactivated. Some examples of why your account was disabled may include:
You have multiple intellectual property violations.
You repeatedly shared fraudulent or misleading content.
You bought likes or fake followers.
You used violent or offensive language.
You used a third-party tool to automatically follow users or leave likes and comments.
You were automatically banned by accident.
You used a third-party application that disabled your Instagram account.
We suggest that you review the Community Guidelines thoroughly along with the posts on all accounts you’ve created. Keep in mind, IG may permanently remove an account that repeatedly violates the Community Guidelines or Terms of Use.
If you think your account was disabled by error, you may be able to appeal the decision by opening the app, entering your username and password, and following the on-screen instructions.
If you don’t see a disabled message, you may be encountering a login problem. If your account was removed by you or someone with your password, there’s no way to restore it. You can create a new account with the same email address you used before, but you may not be able to get an identical username.
Having trouble boosting Instagram posts and Reels? These are the top 10 reasons why you might not be able to use the boost feature.
10 reasons you can’t boost a post or Reel on Instagram
1. You’re not using a professional account.
2. You’re not a Page Admin
3. Your ad has been rejected
4. Your account hasn’t existed for 30 days
5. Your account has been restricted
6. Copyright issues
7. You need to adjust your spending limits
8. Your video resolution is wrong
9. GIFs are not supported
10: Your post or Reel contains tappable elements
You’ve put time and thought into creating your post or Reel. You have the budget set aside to help it go viral. But, for some reason, you cannot boost on Instagram, a.k.a. turn an organic piece of content into a promoted post.
Don’t worry — there’s only a handful of reasons why you can’t boost a post or Reel on Instagram, and they all have easy fixes. Keep reading to find out how to make that Boost button work and get the most out of your Instagram content.
Why can’t I boost my Instagram post? (10 reasons)
Here are the 10 most common reasons why your Instagram post or Reel can’t be boosted, along with simple solutions.
Let the troubleshooting begin!
1. You’re not using a professional account.
Solution: Covert your personal account to a Creator or Business account.
Reels can only be boosted from professional accounts. The good news is that switching to one is easy and free. Simply follow the steps below.
Step 1: Select your Profile and tap the menu icon in the top right corner.
Step 2: Tap the Settings gear icon.
Step 3: Tap Account.
Step 4: Tap Switch to Professional Account, then tap Continue.
Step 5: Select a category for your account/business, then tap Done to confirm.
Step 6: Tap Business, then tap Next.
Step 7: (Optional) Add Contact details.
Step 8: (Optional) Connect your new professional account to a Facebook Page.
And that’s it! Now you can boost your posts and Reels, and you get access to extra features only available to professional accounts.
2. You’re not a Page Admin
Solution: Get Admin access to the Facebook page associated with your Instagram account
This problem only occurs when there is a Facebook Business Page linked to your professional Instagram account and you do not have admin privileges.
To correct this, either request admin status from the owner of the Facebook Page, or sign in to Facebook and give your account Admin permissions.
3. Your ad has been rejected
Solution: Check your email for a notification from Meta and follow the provided instructions
If your ad or promoted post is rejected, Meta will almost immediately notify you which of Instagram’s Advertising Standards your content is not complying with.
Once you know the problem, simply edit your post or Reel to correct the issue. Then, republish it.
Keep in mind that your content will go through the approval process again before being published.
Alternatively, you can also request an additional manual review of your post if you think it has been rejected in error. Here’s how to do it:
Step 1: Visit Meta’s Account Quality center and select your account. Here you’ll see a dashboard overview of your account and any rejected, under-review, reversed and/or unchanged ads.
Step 2: Select your rejected ad, ad sets, or ad campaigns.
Step 3: Click Request review,then click Submit.
Keep in mind that these manual reviews can take some time, but you can check on the progress of your review in the Account Quality center.
4. Your account hasn’t existed for 30 days
Solution: Wait until the 30-day minimum has been reached
There’s no way around this one. Instagram, like most social media platforms, places restrictions on brand-new accounts to discourage account spamming and other malicious activities.
5. Your account has been restricted
Solution: Visit Meta’s Account Quality page and resolve the restriction in the “What You Can Do” section.
Meta will restrict an account in any of the following situations:
The account violates the Community Standards, Advertising Standards, Commerce Policies
Under suspicion that the account has be compromosed/hacked
The account fails to meet Meta’s wo-factor authentication requirements
To see exactly why an account was suspended and how to resolve the issue, follow these steps:
Step 1: Visit the Account Quality page.
Step 2: Click on Account status overview.
Step 3: Select the restricted account.
Step 4: Select the What you can do option.
Step 5: Follow the recommended steps to un-restrict your account.
There are 4 possible recommendations:
Confirming your identity
Completing your account verification
Securing your account
Requesting a manual review
6. Copyright issues
Solution: Remove the copyrighted material from your promoted post
If Instagram has detected copyrighted material in your content, you won’t be allowed to boost it.
Usually, music is the culprit, but any copyrighted material will need to be removed to resolve this issue.
7. You need to adjust your spending limits
Solution: Adjust spending limits in the Ads Manager
If you’ve already reached the spending limit set for your account but want to keep boosting your posts or Reels, here’s how to adjust your spending settings:
Step 1: Log in to Meta’s Ad Manager.
Step 2: Go to the Account Billing section.
Step 3: Click on Account Spending Limit, then click the 3-dots icon.
Step 4: Select Change.
Step 5: Enter your new spending limit and click Save.
Step 6: Click Done to apply your changes.
8. Your video resolution is wrong
Solution: Correct your video resolution to fit Instagram Reels specifications
All Instagram Reels must be 1080 pixels wide and 1920 pixels tall, adhering to the 9:16 aspect ratio.
9. GIFs are not supported
Solution: Convert your GIF into a supported video format (MP4 or MOV)
Most video editing software can convert GIFs into MP4 or MOV files, however if you’re looking for an free tool that can do that job, we recommend VLC Meida Player.
No editing required, simply follow these steps:
Step 1: Download and install VLC media player.
Step 2: Launch VLC and click on the Media menu in the top left corner of the screen.
Step 3: Click Convert / Save, then click the + Add button.
Step 4: Select your GIF and click Open.
Step 5: Click the Convert / Save button.
Step 6: Select the video format you want to convert to from the dropdown options in the Profile section. Select any MP4 or MOV option.
Step 7: Click the Start button.
Voila! Your GIF will be converted to a usable video file that you can upload to Instagram. Just make sure the video still adheres to the resolution requirements we covered above.
10: Your post or Reel contains tappable elements
Solution: Remove all location stickers, hashtag stickers, @mention stickers and tappable text
The only tappable elements Instagram allows on boosted Instagram Reels are the polling sticker and swipe-up CTA. Remove all other interactive/tappable elements and boost away!
Instagram Reels have become a popular way to create and share short videos with friends, family, and followers. But if you’re looking to expand your reach and share your Reels with a wider audience, consider posting them on Facebook as well.
Sharing your Instagram Reels on Facebook is a simple process that can help you reach new viewers and grow your following. In this article, we’ll walk you through the easy steps on how to share Instagram Reel to Facebook posts.
Whether new to the platform or a seasoned user, you’ll find this guide helpful and informative. So, let’s dive in!
How to Share Instagram Reel to Facebook
However, you can only share IG Reel to Facebook if your accounts are connected. This means that you need to sync your Instagram profile to your Facebook account first.
If you’ve been sharing your Instagram posts on Facebook before, you don’t have to go to the Accounts Center anymore. Is this your first time posting your Instagram content on Facebook?
Here’s how you can connect your Instagram and Facebook accounts:
1. To get started, go to your Instagram Profile page.
2. Next, tap the menu icon on the upper right side of the screen. Then, select Settings.
3.Go to Accounts Centre.
4. Next, click Profiles.
5. Then, select Add Accounts so that you can enter your Facebook details.
Once your Facebook and Instagram accounts are synced, you can easily share any of your Instagram posts on your Facebook, including Reels.
Here’s how to post Instagram Reel to Facebook at the same time:
First, create a Reel. Then, once you’re done editing, tap Next.
Scroll down and look for Recommend on Facebook.
Turn the toggle handle on. Select if you’d like to turn sharing on to Facebook for all reels or only for this reel you just edited.
After that, tap the back icon and hit the Share button once your post is ready. Your Instagram Reel will then be automatically shared on Facebook.
How to Share an Instagram Reel on Facebook Story
You now know how to share Instagram Reel to Facebook feed, but there are other ways you can share your IG Reel on Facebook.
Can you share your reels to Facebook Stories? Yes! It’s a smart idea because more people on Facebook will likely view your reel. Short-form videos are also becoming more appealing, even on Facebook, so your reel shouldn’t be caged in your Instagram account.
Now, you can’t directly share your Instagram Reel to your Facebook Story, as you can only post it on your Facebook feed. But don’t worry. There’s a workaround for this. All you need to do is to save your Reel as a clip on your phone instead.
Here’s a quick step-by-step guide on how to post a reel from Instagram to Facebook Story:
1. First, open the reel you’d like to share on your Facebook. Then, tap the three buttons on the side.
2.Select Save to your device so your Instagram Reel will be saved to your phone’s gallery.
3.Now, open your Facebook App and tap Create Story with the blue plus icon.
4.Then, choose your saved Instagram Reel under Gallery.
5.At this point, you can add texts, sounds, music, effects, and stickers if you’d like to. If you don’t want to change anything, just hit the Share button, and you’re done!
how to share Instagram reel to Facebook feed
How to Share Instagram Reel to Facebook Business Page
Can you share reels to Facebook Pages?
For sure!!
Facebook’s Business Pages are also great platforms where you can share your Reels, especially if you have a bigger following on an official page.
All you have to do is save your Instagram Reel as a clip and upload the video to your Facebook Page. But if you want your Facebook followers to be linked to your Instagram account, you can post your IG reels directly to your Facebook page instead.
Here’s how to automatically share your IG Reels to your Facebook page:
To get started, tap the menu icon on the upper-right side of your Instagram profile screen. Then, select Settings.
Next, click Account.
Then, tap on Sharing to other apps.
Select Facebook.
After that, you’ll see the Facebook accounts you have synced to your IG account. Select the account you need.
Choose the Facebook page where you want your IG reels to be posted. Then, keep pressing the back icon until you see that your Facebook page is the default page where your IG reels will be shared.
After you create an Instagram Reel, tap Share to Facebook and turn on the Facebook Page share button.
Once you’re ready to post with the right caption, hashtags, topic, etc., hit the Share button, and you’re good to go!
Over the last few years, video has become king of content. Everywhere you turn companies are finding new ways to make their products pop, including alluring product videos.
Remember way back when – you know, like two years ago – when products just had a bunch of pictures? Those days are history. Using videos to market your product and brand is a great move. People engage with video easily and it evokes powerful responses. Think about how many times a sweet YouTube video has made you tear up or a TV ad has convinced you to buy a product.
An survey found that 96 percent of consumers find video helpful when making purchases, with 73 percent saying they’re more likely to buy an item after watching a video explaining the product. Pretty compelling stuff.
Product videos can be used in advertising, across social media channels, on your product pages, and linked to from emails. They’re an opportunity to grab the attention of potential buyers and give them another reason to trust and choose your product over others. Videos used to be difficult to make without a skilled team and specialist equipment. Today we have access to all the tools we need thanks to smartphones and free video editing programs. These tools, combined with some time and effort, can produce amazing results that will elevate your store and brand to the next level.
Making product videos can feel daunting, so to help you take your first steps I’ve prepared this guide to take you through the process of making short, simple, and snappy videos that will capture attention.
Let’s get started.
Choose a Format and Approach for Your Product Video
Before you start yelling “action” there are a few things you should think about to help you get the most from your videos
Where is this Product Video Going? What is its Purpose?
Where do imagine you’re going to use the video you’re making and who is going to be watching? You might have multiple uses for your product video, but picking the most important place or platform will help shape how it’s constructed.
Think about where in the customer journey your viewer will be. If they’re watching a video on Facebook or Instagram they probably don’t know your brand. However, if they’re watching on your website they’re likely interested in your product and are considering whether or not to buy it. So, rather than using the same video for ads and product page, make different ones that appeal to the different stages.
Do you want to make a video specifically for advertising and awareness? Highlight your brand and products, and be captivating. Will it appear on a product page? Be sure to show off all your item’s features and how useful it is.
What Do You Want this Video to Look Like?
Spend some time forming a clear idea of what your final result should look like. You’ll want to keep things consistent, sticking with one theme and not overloading your video so it feels disjointed.
Find inspiration from competitors and other brands. Browse social media or check websites to see what they’ve created. Engage with the ads that appear on your Facebook or Instagram feed so the algorithms will show you more advertising – it’s all market research.
Have a sense of who would buy your product, how they might live, and where they might go. Videos that show certain environments or lifestyles can encourage people who value those things to purchase your product. For example, someone buying yoga pants might live an active lifestyle and enjoy being outdoors. Showing this in your ad will demonstrate how your yoga pants are the perfect fit for them.
What Style of Video are You Aiming For?
While shooting an all-out narrative-driven, emotional video might be above your current skill set (and mine!), decide on a style that you think you’ll be able to nail. Here are a few quick ideas:
Images stitched together into a video. A really simple concept but once you add music or text the overall effect is great. A good idea for quick ads or social posts
Short, looping videos. A lot like an Instagram Boomerang or GIF, these snappy little numbers let you capture a handful of seconds. You could even repeat the GIFs a number of times, creating a video that solely consists of the sam few seconds repeated.
A scrolling screen capture. Got a long product page? Record your screen as you scroll down your products, crop out unneeded parts of the screen, add some text and boom, your ad is done.
Demonstration video. Show off what your product looks like in the real world. Perfect for product pages, these don’t need to be long but they should give customers an idea of what your product looks like and any features it has.
Review videos. These are great for social media and building trust in your product and brand. Film yourself (or someone else) reviewing or unboxing your product. Highlight both the good and bad features (though preferably more good than bad!) – it will help make the video believable and let customers make an informed choice. Write Down the Plan for Your Product Video
Write Down the Plan for Your Product Video
The last thing you want to do is dive into filming without a game plan. Scripting, sketching, or storyboarding the plan for your video is a smart move, so you can properly prepare where and how you want the shots to look. If you don’t do this, at least have a strong idea in mind of what you want the finished product to look like.
You should also decide on a location that suits your video and product, taking into account things like lighting and ease of filming in that particular place.
A few simple ideas for first time video making could be the floor, a table, or against a wall. For a more urban look try a crosswalk, a busy street, or a metro station. And, if you’re aiming for an outdoors vibe, head to the local park, your own backyard, or a local lake or beach.
While the setting is important, avoid anything that will distract from your product. The last thing you want is that adorable dog at the park stealing the show.
Quick Tips:
Use a tripod. Keep your shots steady and looking professional with a tripod. If you don’t have one at least find a way to steady your camera so there’s no movement (I used a stack of books).
Don’t use your phone’s zoom feature. Phone cameras tend to use digital zoom which makes everything grainy. Instead, just move closer to keep your shots looking crisp.
Think before shooting vertically. Generally, you should try and film your video horizontally – you can always edit your video later but you can’t undo vertical filming. However, if vertical images or footage is what your video calls for, go for it.
Be mindful of lighting. You don’t need fancy lighting to shoot a video but be sure not to film looking directly towards the sun or a bright window, as your subject will end up a silhouette. Instead, try to film with your subjects facing the light source.
If you’re including audio, use a microphone or second phone. Rather than using one phone to both film and record audio, set up a microphone or second phone closer to your subjects to capture high quality audio (the voice memo function works well). Then, sync the audio and visual together during editing.
Choose Your Editing Software or App
So, you’ve got a bunch of pictures and videos – now you need to stitch it all into one video. Luckily there are a lot of free and easy-to-use video editing programs and apps to help you out. If you’re new to editing, try to find a program that has tutorials online so you can find help if you get stuck.
Here are a few that might work, depending on what you’re editing with:
Mobile: Quik
Made by GoPro, this free app takes videos and images in your phone’s gallery and automatically edits them into a video – perfect if you need a video quickly. It also allows you to manually edit what it created so you can be sure it matches the look you’re going for.
Mac: iMovie
Free to all mac users, iMovie keeps things simple, making it easy for beginner editors. Plus, there are plenty of iMovie tutorials online to help you if you get stuck.
Windows/Linux/Mac: OpenShot
This open source editor is available for free, regardless of operating system. It’s simple to use but still powerful enough to produce quality videos you’ll be happy to show off.
Are you wondering how to get your first sale on Etsy? Do not worry, you are not alone.
Many shop owners find it challenging to get their Etsy business off the ground. However, with a little effort and some sound advice, you can be well on your way to making money on Etsy!
In this article, you will learn all the best tips and tricks to help increase your chances of making that all-important first sale.
Please do not think you need to be a Digital Marketing Expert or a sales expert on other platforms to succeed on Etsy.
This article is designed for Etsy first-timers. So read on and get ready to learn how to get your first sale on Etsy.
Here, we will be taking a deep dive into the following tips:
1. Create A Product That Fits Search Intent
If you are wondering how to get your first sale on Etsy, look no further than fitting search intent. When creating a product for your Etsy shop, it is important to make sure that it fits the search intent of potential buyers. This means tailoring your product to what people are looking for.
You must make sure that your listings are keyword-rich and accurately reflect your product. You can use Etsy’s search bar to get an idea of what topics people are searching for, and then use those keywords in your titles, descriptions, and tags.
2. Provide Clear Product Descriptions
Your next step on how to get your first Etsy sale is to describe your product clearly so that it fits with what you are selling and matches the overall soul and style of your store. More importantly, your product descriptions will help entice your buyers to make the purchase.
Imagine going for a first date and you did the bare minimum in describing what you do and what you are like. Chances are, your date is going to run away as soon as possible and scream boring!
Here are some tips you can adopt to improve your product description:
Detailed physical description of the product since your buyers can’t touch the item, unlike at a brick and mortar store.
Use short paragraphs and bullet points as it is easy on the eye.
Check for typos. You do not want your buyers to think you can’t even handle getting your product descriptions correct.
Share the benefits and uses of the product.
Advice on how the product cannot be used or might get damaged.
Highlight the story behind creating the product. You cannot deny that personal stories sell and will increase the connection your buyer has with you.
3. Pay Attention To Search Engine Optimization (SEO)
If you want to know how to make your first sale on Etsy, it is important to pay attention to search engine optimization (SEO). By optimizing your shop and products for search engines, you can attract more buyers and boost your sales.
After doing your keyword research, you will be able to know:
What people are looking for.
What are the related keywords people are searching for.
How much search volume there is for that keyword.
How much competition there is for that keyword, meaning how easy will it be for you to appear on the first page of the search results.
Once you have your good keywords, start adding them to your shop name, title, and product description. Make sure that the keywords that you are trying to rank for are obvious and easy to spot for the buyer.
For example, if you’re selling handmade jewelry, including the keyword “jewelry” in your shop name. You can also include keywords in your title tag, which is the text that appears in the tab at the top of your browser.
However, please do not go overboard with your keyword inserts. You do not want your descriptions to sound robotic.
Ultimately, you are appealing to a human buyer and you want to make a human connection.
4. Match Title Phrases To Product Tags
If you want to know how to get sales on Etsy, you must make sure that your title phrases match your product tags.
An Etsy product title refers to the name of the product that appears above the listing image.
An Etsy product tag example is shown below under the headings, “Explore related searches” and “Explore related categories”.
It is like a category or a description of the product that you are selling.
The image above was taken from the same listing. There must be a match between the tag and titles.
That way, buyers can continue browsing until they find the product that fits exactly what they are looking for.
If a buyer stumbled upon your shop when clicking on the related searches, you would be very grateful that you ensured your product title and tags were matching.
Can you imagine if your product tag was completely unrelated to what you are selling?
For example, if you were selling handmade necklaces and in your product tag, you put it as a DIY product. It will appear as a necklace that needs to be put together by the buyer.
As such, it will be hard to rank your product unless you were intending to sell it as a DIY necklace, and not as something ready-made to be worn.
5. Analyze Your Competition
When starting an Etsy shop, you have to do your research and analyze your competition.
This will help you to understand what types of products are most popular on Etsy. It will also give you ideas for products to sell yourself and where you can improve.
Besides that, you can also use the Etsy search bar and just have a look at how your competitors are presenting themselves.
If the shops that you identified as your competitors are:
Not organizing their listings well.
Not quick to respond to customer queries.
Not having clear product descriptions but still ranking for those keywords.
Not having regular listings.
Listing products that appear to be low in quality
You can start jumping for joy. This is because you have found immediate areas you can stand out in to entice buyers to pick your product instead.
Do not worry, you will learn more about how to improve in these areas as you keep reading.
6. Adding Good Quality Photographs
When it comes to selling online, photographs are essential. This is especially true for shops on Etsy, where buyers can scroll through pages and pages of items before making a purchase.
If your photographs are not high quality, your chances of making a sale are slim to none.
Here are some easy ways you can improve your photo quality.
Use Natural Light Whenever Possible
Sunlight gives the best results, and it is free! If you can take your photographs outdoors, that’s ideal. If you must take them indoors, try to use a window as your source of light.
If that is still not possible, yellow lighting that is attached to a camera stand is another highly recommended option.
Use A Tripod
A tripod will help to keep your photographs steady and will result in sharper images. Tripods used to be a very fancy and expensive object to own in the past.
But now, most influencers and e-commerce sellers own some form of a camera stand as it does help to enhance the quality of their videos and photos.
Avoid Distractions In The Photo
Please let your product shine in your photo. Just like a photo shoot, you want the center of attention to be your product.
If you took the picture of your item on top of a fancy car or beside your cat, it could distract your buyer.
However, there are exceptions to when your product is recommended to appear with a related object or character, such as when it is in use. Please keep reading to learn more.
Show The Use Of The Product
Your chance of making your first Etsy sale will be greatly improved if your product features and uses are showcased in the photos.
For example, a picture of a handmade massage roller on its own may look nice. But pictures of the roller massaging your feet and showing your relief may sell more.
7. Doing Social Media Marketing
When it comes to promoting your Etsy shop, social media is one of the When it comes to promoting your Etsy shop, social media is one of the most effective channels out there.
Platforms like Twitter, Instagram, Pinterest, and Facebook allow you to connect with a massive audience of potential buyers.
Here is a step-by-step guide on how you can start your social media marketing.
You can start by creating a profile on these social media platforms using the same name as your Etsy Shop.
Invite family and friends to like and share your profile.
Use high-quality images of your products on your social media accounts. Make sure to showcase your products in the best light possible and use attractive hashtags to draw attention to your posts.
Write interesting and engaging captions for your photos. Do not just write a plain description of what the product is.
Social media platforms love stories and that is what makes them go viral. So do give your followers a sneak peek into what it is like to use the product or how it makes you feel.
As much as social media marketing helps, it requires plenty of effort on your part to continue promoting as it does not have much to do with SEO.
SEO on the other hand, if done correctly, generates more passive income.
8. Have Clear Policies Written In Your Store And Product Description
If you want to make money on Etsy, you MUST have clear policies written in your Etsy store and Etsy product description. This will help protect both you and your customers, and will also make your business seem more professional.
People are much more likely to buy from a shop that has clearly outlined policies, rather than one that is vague or unclear. Make sure to state things such as your return policy, shipping information, license to operate, and more.
Your return policy is one of the most important aspects of your shop. You want to be clear about what items can and cannot be returned, as well as the conditions for a refund.
If you are not clear about your policies, then you may end up with unhappy customers who are not sure if they are eligible for a refund.
This will help ensure that both you and your customers know what to expect from each other, which will lead to fewer misunderstandings down the road.
Learn from Etsy on how to set up and manage your shop policies. You can also download some free templates on Etsy Shop Policies here.
9. Get Personal!
When a customer visits an Etsy store, they want to be able to find information about the store owner. This helps build trust and credibility with the customer.
By having information about the store owner on the Etsy store information page, you can help make your shop stand out from the competition.
Some things that you may want to include on this page are:
Your name and contact information
A biography or introduction about yourself
Links to your social media profiles
A photo of yourself
Why did you set up this Etsy shop
Having all of this information readily available for customers will help them feel more connected to you and your shop, which can lead to more sales in the long run.
10. Utilize The Promoted Listings Option On Etsy
When you have a shop on Etsy, there are a few different ways that you can promote it to make sales. One of those methods is through the use of the promoted listings option which is effectively paid advertising on Etsy.
The promoted listings option is a great way to get your shop in front of more people, and it can result in more sales for your business.
The first benefit of using the promoted listings option is that it allows you to reach a larger audience. When you promote your shop, it will be shown to more people who are looking for items like yours.
This means that you will have a greater chance of making a sale than you would if you were not using the promoted listings option.
Another benefit of using the promoted listings option is that it can help you to increase your visibility on Etsy. When people search for items on Etsy, they will be more likely to see your shop if you’ve chosen to promote it.
This means that you will have a better chance of being found.
11. Reach Out To Family And Friends For Support
For most people, asking their friends and family to support their business might make them sweat. However, asking for support does not mean asking for loans, money or to buy your product.
Most times, what we need is just some nice words from them and to share to their networks about our business. You can demonstrate your product to them, and if they can see the value of it, sharing your product should definitely come easy!
If they still do not help you out, well, you and your business are better off without them.
12. Utilize Facebook Ads
If you have the cash to spare and want to make your sales quickly, you can try navigating Facebook Ads. It is a quick way to get access to a huge audience.
First, you need to create a Facebook Ads campaign. When creating your campaign, be sure to target people who live in the geographic area where you sell your products. You can also target people who have previously visited your Etsy shop or website.
Next, create a Facebook ad that promotes your product. The ad should include a photo of the product and a brief description of what it is. You should also include a link to your Etsy shop or website so that people can learn more about your products.
Finally, test different versions of the ad to see which one performs the best. You can test things like the text of the ad, the photo, and the target audience. By testing different versions of the ad, you can find out which version generates the most sales.
By using Facebook Ads to promote your Etsy shop, you can make your first sale within a few weeks. Try it out and see how successful you can be!
13. Utilize Pinterest
Pinterest is a social media platform that can be used to help promote your Etsy shop. When you create a Pinterest board for your Etsy shop, make sure to include pictures of the items you are selling, as well as pictures of the process of making the items.
You can also include pictures of people using your products. This will help potential customers see what your products look like and how they can be used.
Make sure to use keywords in your board titles and descriptions so that your pins will show up in Pinterest search results. For example, if you are selling handmade jewelry, you could use keywords like “handmade jewelry”, “unique jewelry”, and “artisan jewelry”.
Pinterest is a solid tool to use to support your Etsy business because it is a visual search engine. The more photographs or videos you have about your product, the easier it will be to direct visitors to your Etsy store from Pinterest.
Another huge advantage of using Pinterest over Facebook Ads? It is FREE.
14. Treat Your Etsy Shop As A Legitimate Business
When you’re running an Etsy shop, it is important to remember that you are running a business. Just like any other business, there are several benefits to treating your Etsy shop as a legitimate operation.
Here are a few of the most important benefits:
Increased Credibility
When you treat your Etsy shop as a business, you increase your credibility with customers and potential customers.
By acting professionally and putting in the effort to grow your business, you show that you’re serious about what you’re doing and that you care about your customers.
This can lead to more sales and more repeat customers.
Improved Customer Service
When you run your Etsy shop as a business, you also improve your customer service. This is because you are taking the time to learn about your customers and what they want.
You’re also more likely to go above and beyond for your customers to make sure that they’re happy with their purchase.
15. Organize Your Etsy Shop Professionally
When you organize your Etsy shop professionally, you can make a good impression on potential customers. They will be able to see that you are a serious business owner who takes their work seriously.
This can result in more sales and more customers. Additionally, organizing your shop can help you become more efficient and organized in your work. This can lead to more productivity and less stress.
Just like going to a grocery store, a restaurant, or a book shop. If you see that the store is neat, professionally arranged and things are easy to find and purchase, you will go there again, right?
Compared to entering a dodgy store that smells bad where nothing can be found easily. It is doubtful that they will be making sales.
16. Keep Listing New Products
When you list a new product on Etsy, you are increasing the chances that someone will find and buy your product.
Additionally, you can go back and update your product listings for your old items. Perhaps you found an area that could be enhanced such as the type of photo you uploaded, or the description you wrote.
You are simply polishing up your Etsy shop by doing this and making it more appealing to your customer.
17. Write Personalized Thank You Notes
It’s always a good idea to show your appreciation to your customers, and what better way to do that than by sending personalized thank you notes?
Thanking your customers for their purchase not only shows that you appreciate their business but also helps to build customer loyalty. Here are some ways you can write thank you notes to your customer.
It is an excellent way to get repeat business, especially when customers see that your shop provides not only quality products but also quality customer service.
Customers love getting personalized thank you notes because it shows them that their business is valued.
When sending a thank you note, be sure to personalize it as much as possible. Use the customer’s name and mention something about their order. You could also include a coupon or discount code for future purchases.
Whatever you do, make sure that your thank you notes are handwritten – this will set your shop apart.
You may wonder how you can write thank you notes to customers when you are still searching for that elusive first sale? Consider adding these thank you notes as part of your after-sales service in your product description.
18. Be Clear About Shipping Policies And Pricing
Have you felt frustrated when you placed orders for items and suddenly surprise charges appeared at the end when you are making payment? It has happened to most people.
Please DO NOT do this to your customers.
When it comes to pricing your items on Etsy, you must be clear about your shipping policies and pricing. If you want to know how to get more sales on Etsy, having clear policies is one way.
You do not want customers to be surprised by additional charges after they have made a purchase or at the checkout counter.
Make sure that the cost of shipping is included in the price of the item, and clearly state any extra fees that may apply in your product descriptions.
For example: if you are shipping outside of your country, customers should know that they may be charged extra fees by customs.
The old trick of hiding costs and slipping them in was from the previous century. Nobody will accept this now so please be upfront.
19. Be Friendly And Professional
It is important to make a good impression on potential buyers. One way to do this is by being friendly and professional in your shop descriptions, titles, and conversations with buyers.
Make sure that all of your content is well-written and error-free. Typos can make you look unprofessional, and no one wants to do business with someone who cannot even spell correctly.
Be sure to also be humble, polite, and respectful in your conversations with buyers.
Affiliate links are key tools in your affiliate strategy that can either make or break your campaigns. That’s why it’s vital to know how to include affiliate links into the text in the most effective way in order to optimize them for success. This post will teach you how to properly harness affiliate links and make the most of them.
How to place affiliate links efficiently
Before we delve more deeply into the art of using affiliate links to drive tons of conversions and revenue, let’s have a quick look at how they work.
So, what is an affiliate link and how do affiliate links work?
Affiliate links are special URLs containing the ID or username of the affiliate. They are used for tracking affiliate performance and giving them credit for affiliate sales. While some marketers say that affiliate links are their most powerful money-making tool, others complain that all their efforts go waste because these links are useless.
You may ask: How do I put affiliate links on my website to optimize my campaigns and drive better results? Here’re some tried-and-tested strategies on how to use affiliate links to bring out their full potential.
1. Integrate links logically
Don’t use affiliate links to hard sell. Make sure they are relevant to the ideas in the post and serve as a logical extension to them. Your links should come across as a useful personal recommendation.
It’s also vital to create a logical lead to all your affiliate links by explaining how your readers will benefit from clicking them.
For example, My friend, an avid traveler and , created an overview of the best backpacks for various types of travelers and embedded affiliate links to the backpacks he considers worth buying. This type of post is a win-win. Readers get expert advice that help them with a purchasing decision, while enjoys the affiliate commissions rolling in.
It’s also crucial to maintain balance and use the right number of affiliate links in your content. Sometimes, affiliates go to extremes and overload their content with affiliate links. This makes content looks spams and may put some readers off. However, if you use affiliate links too sparingly, your audience might not pay attention to them and you’ll leave money on the table.
So, what do you need to do to strike the right balance? The best practice is to write content that provides value to your audience and solves some of their pain points. By employing this strategy, affiliate links appear natural and create a seamless user experience.
For example , if you ask me a deal from amazon which i like on top because thats useful to me on day to day basis that is a clothes draying stand . Im using this stand last from 6 months and trust me its a perfect option for person who do not have big open space for drying clothes.
If you promote several affiliate products in one post, you can also save readers the trouble of scrolling up and down by presenting all your affiliate links in one block at the end of the post.
For example, today itself when im writing this post i have ordered some product from amazon , which i need for my upcoming days and there is no doubt this all are very useful things to single living person who is alone managing is house singly .
Affiliate links must also be attention-grabbing and click-enticing. So, make sure your affiliate links stand out. Use bright colors or bold fonts to highlight your links and garner more attention.
5. Link to the offer, not the homepage
When promoting a product/service or giving recommendations, make sure you create deep links and direct users to the page for that specific offer. This will save your readers a lot of time and boost the conversion rate.
Like as above i showed link , where you can make choice as per your need but sometime when its about dresses which i think i should buy, i prefer product which is best . The product which have good review and in budget too where i have to make less effort.
As my niece send me direct link to buy this dress for her outing and when she select it than i dont have to make any effort . The direct link work best in some situation.
6. Use CTA buttons
To drive more conversions, remember to encourage your readers to take a specific action. To do so, craft many different attention-grabbing CTAs and incorporate them into your content. These can be CTA buttons, text-only CTAs, CTA images, or a combination to achieve the best possible results.
It’s also important that your CTAs align with your goals and post content. For example, if you need more traffic, you can incentivize your readers to share your posts on social media.
7. Cloak your links
As a rule, affiliate links are quite long and not extremely pleasing to the eye. This is why it’s better to use affiliate link cloaking to make your links appear cleaner, shorter, and more visually appealing. However, this is not the only benefit to reap from link cloaking. Here are some other advantages:
Cloaking can protect links from being stolen.
A short, good-looking link is easier to share.
Link cloakers can make link management a piece of cake.
The web offers loads of software for link cloaking, such as the Pretty Links Plugin, Thirsty Affiliates, WooCommerce, etc.
8. Add links to your most effective posts
As a blogger, you know which posts and content types perform best with your audience. If you don’t, make sure to track your statistics and identify which posts garner a lot of attention. Then, add affiliate links to the most popular.
Why should I add affiliate links to my website’s top-ranking posts? The reason is simple. The more eyes you get on your content and tools, the higher your conversion rate will be. Embedding affiliate links in top-performing posts guarantees a steady flow of traffic to those links, which will lead to increased revenue.
9. Diversify link placement
Blog posts are not the only place to post your affiliate links. So, what are some other choices?
Within images in blog posts. Images are extremely click-enticing, so don’t miss the chance to drive more clicks by adding clickable visuals to your posts.
Within digital products or inside your courses. When creating a digital product, such as an eBook, guide, or course, think about which products and services can best make your readers’ life easier and add affiliate links to them.
In the comments. Communicate with your audience and offer affiliate links as an effective way to tackle their problems.
In reviews. Reviews are a place to promote affiliate links. You can review and compare one or several products
On social media. Using social media for your affiliate campaigns can skyrocket their performance, as social media helps you engage directly with your audience. Though you can do affiliate marketing on almost every social media platform, some are more suitable than others. Discover the best tips for promoting affiliate links on Facebook, Instagram, Pinterest, Twitter, Telegram, Snapchat, YouTube, etc.
Within tables. Tables are a great way to compare and highlight the pros and cons of different products. Tables help readers make purchasing decisions and allow you to promote multiple affiliate links.
10. Make sure you disclose affiliate links
Audience trust is one of the underlying factors determining the success of your affiliate campaigns. To build rapport, it’s vital to be crystal clear that you’re involved in affiliate relationships.
Besides, link disclosure is a legal requirement. To steer clear of any legal or reputational trouble, make sure you are open about your affiliate relationships and disclose all affiliate links. This post teaches you how to properly disclose affiliate links.
11. Place other tools as well
When choosing promo tools, it’s best to keep your options open and leverage a wide range of tools in your affiliate campaigns. People perceive information differently. While some of us are likely to click affiliate links within a block of text, others pay more attention to compelling banners or interactive widgets. Thus, it’s vital to combine different tools and techniques to identify which approaches perform best with your audience.