Counterfeit – a word that conjures up a sense of fear in the minds of every brand. It means that there’s someone out there selling cheap copies of your items, decreasing the credibility of our brand and stealing your profits.
Counterfeits have been a serious problem for as long as brands existed, and Amazon does not take this issue lightly. Fake products on Amazon incur the e-commerce giant a loss of about $323 billion every year.
There were several instances where manufacturers have shipped fake products under the radar on Amazon, thanks to its policy of first-sale doctrine that allows third-party sellers to resell a branded item in an unchanged state legally.
Selling low-quality, fake products not only leads to poor customer experience but also hampers both Amazon and the brand’s reputation.
Hence, to better protect brands on its site and ensure that customers receive real products, Amazon introduced the Amazon Transparency Program. Here’s a quick walkthrough over what all you need to know about this program –
What is the Amazon Transparency program?
How does the Amazon Transparency Program work?
How does the Amazon Transparency Program work for FBM sellers?
How much does the Amazon Transparency program cost?
How to enroll in the Amazon Transparency Program?
Benefits of the Amazon Transparency Program
What is the Amazon Transparency program?
Amazon Transparency Program is a product serialization service that is used to verify products before they are shipped.
Introduced in 2017, the program is crafted to detect and prevent counterfeit products from being delivered to customers.
Amazon launched the transparency program and tried it on its line of products as a pilot. When it saw some success there, it made it available for third-party sellers gradually.
Currently, the Amazon Transparency program is available in several countries including the United States, Germany, Canada, France, India, Australia, Spain, Italy, and the United Kingdom. The company plans to introduce the concept in other marks in the future.
The program is meant for third-party sellers and brand owners. For instance, if a third-party seller tries to “hijack” a product and sell counterfeit items, their products will be blacklisted and won’t be delivered to the customer.
How does the Amazon Transparency Program work?
Transparency uses a complex product labeling system to systematically eradicate the threat of counterfeit products reaching customers.
Whenever a brand signs up for the Amazon Transparency program, they are given a series of unique T-shaped 2D barcodes. These codes are then attached to the product’s packaging. Unlike UPCs or GTINs, which are specific to brands and usually deemed not very effective, the Transparency code is unique to the individual items.
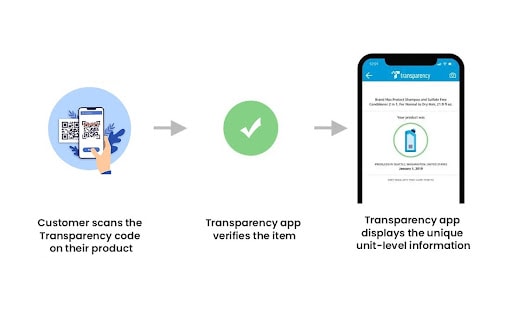
Before sending any item to a shopper, Amazon will scan the barcode to verify its authenticity. Any item without the barcode or a failed authenticity test will be scrutinized and be marked as a potential counterfeit.
Amazon also provides a Transparency mobile app that buyers can use to easily cross-reference and verify Transparency-protected products purchased online. Once they scan the product QR code, the app will display a green checkmark if the code is valid and a red cross if it’s not.
Brands can also provide important unit-level information such as manufacturing date, manufacturing place, and other detailed product information with customers through the Transparency app.
According to the official FAQ, Transparency ensures a complete centralization generating unique barcodes that can be scanned by customers to verify the product’s authenticity. This process prevents codes from being manipulated by dishonest third parties.
Also, the Transparency program keeps track of every code generated along with the products, so that the codes can be easily cross-referenced and verified for later use.
How does the Amazon Transparency Program work for FBM sellers?
Amazon offers two selling options to merchants for fulfilling their orders: Fulfillment by Amazon (FBA) or self-order-fulfillment through Fulfillment by Merchant (FBM). When sellers use FBA, they can hoard their products at Amazon’s inventory. When a customer purchases their FBA-fulfilled product, it’s Amazon that will pack and ship the item for them.
If you are an FBM seller leveraging the Amazon Transparency program, Amazon will ask you for a unique Transparency code for every transparency-enabled item you sell.
This way, Amazon can make sure that only authentic units are delivered to customers. Although Amazon will generate the codes for you, you must provide them with the codes that you are using for your FBM products.
Remember that each FBM item shipped will require a unique transparency code to be applied to the product packaging.
How much does the Amazon Transparency program cost?
Although Amazon does not disclose its pricing policy for the Amazon Transparency program, brands can expect to pay anywhere from $0.01 to $0.05 per barcode, depending on the number of transparency-enabled units.
Suppose you have 1,000 units of your product, then the maximum amount you have to pay for your products to get authenticated would be approx $50.
It’s recommended to sign up for this program if you are selling highly-priced, luxury items to prevent any losses incurred due to counterfeits. Gradually, you may expand the transparency program for your other products as per your budget and need.
Another expenditure you must consider while using the Transparency program is your labeling cost. Transparency codes can be applied to units/items using sticker labels. Although you can simplify the process by getting the labeling done by your supplier during manufacturing, they usually cost more to apply during the manufacturing process.
Pro Tip: A good idea is to apply Transparency barcodes on your own using printers that implement those codes during the packaging process.
How to enroll in the Amazon Transparency Program?
To enroll in the Amazon Transparency program, sellers need to meet certain criteria set forth by Amazon. These requirements include:
You must be the legitimate owner of the brand and you must be able to prove the same,
You’ll be required to display a Global Trade Item Number (GTIN), such as a UPC or EAN barcode, applied on your items.
You must be able to apply unique Transparency codes on every item you produce.
If you can meet all the aforementioned criteria, go to Amazon’s Transparency page and click on the “Get Started” button to begin.
Here, you have to fill up a short form. Once you complete, click on “Request more information.” to gather more information about your enrollment from Amazon.
If your application is accepted, you can select the products you’d like to authenticate using Transparency codes.
It is recommended to choose your high-priced products first, instead of enrolling all of your items altogether.
Benefits of the Amazon Transparency Program
The program is beneficial for both brands and customers. Here are some of the reasons why you should consider it:
Make more Profits
Counterfeit goods are goods, often of inferior quality, made under other companies’ brands and sold to the unsuspecting public. Counterfeit goods are a big problem . According to the Department of Security, over $7 billion worth of counterfeit goods were seized by federal authorities in 2020. This is a major problem for companies that deal in branded merchandise. Counterfeiters steal sales from legitimate companies and, as such, are direct competitors.
Transparency prevents hijackers from selling your items, as they do not possess the unique codes generated by Amazon for transparency-enabled units. If another seller tries to sell your product and cannot provide the unique transparency code, that item will be marked as fake and will not be delivered to customers.
Therefore, by identifying and eliminating such counterfeit sellers, you can increase your sales as shoppers will have nowhere to go but to come to you.
Reduce Damage Caused by Counterfeiters
Counterfeiters are scammers who seek to disrupt online businesses. They create listings for products that they do not manufacture, and they try to get money from customers by selling these products. They usually earn profits by selling those imitations at reduced prices, or by selling the imitations to distributors who then sell the goods to end consumers.
This is hazardous to your business because these counterfeiters undercut you on your price, and take away all your potential customers. In addition, they also damage your brand’s reputation as customers assume it’s your brand selling duplicate products. Not to mention, this can even cause your business to shut down for further investigation.
Prevents bad reviews
It is obvious that customers will be unhappy if they receive fake products. The last thing you’d want them to do is to write a negative review on your social media handle or the product page. This could highly ruin your brand image as 84 percent of users trust online reviews. The Transparency program can protect you from all such mishaps and safeguard your brand’s reputation for a streamlined Amazon business.
Final Thoughts: Protect your Brand
Counterfeiters are the bane of the e-commerce industry. They damage your brand’s image, undercut on price, and lead to lost revenue on each sale. One of the best ways to protect yourself from getting caught in counterfeit traps is to enroll your items in the Amazon Transparency program. This way, you can keep your customers happy by making sure they receive the authentic products they expect.
If you’re a brand-registered seller, go through the requirements to enroll in the Transparency program, and start protecting your brand reputation against counterfeiters.
Undeniably, high-quality images play a crucial role in the eCommerce world.Talking about professional Amazon product photography, it is all about alluring the customers and making them make a purchase. A few researchers claim that the human brain can process pictures 60,000 times quicker than text.
So, the proverb – “A picture speaks a thousand words” – is true.
Therefore, a product’s image is the first big opportunity to generate a sale, simply because it’s the first impression of your entire product listing.
On that note, let’s comprehend the idea behind professional Amazon product photography guidelines and how to optimize so that it also accomplished higher organic rankings on the Amazon SERPs.
Quick Guide:
What Is Product Photography?
How Does Photography Increases Conversion Rates?
Amazon Product Photography Tips
How To Take Product Pictures For Amazon?
Amazon Product Image Requirements
How To Add Photos To Amazon Product Listing?
Amazon Image Aspect Ratio
Amazon Product Image Optimization
So, let’s get started.
What Is Product Photography?
Well, product photography utilizes certain techniques to showcase the products in a striking way to entice potential shoppers to make a purchase. It is an important part of both offline and online advertising – be it catalogs, magazine ads, brochures, online ads, company websites, or billboards, specifically while selling products directly to the consumers.
Now, let’s further understand why pictures are so important while selling online.
How Does Photography Increase Conversion Rates?
We are in the era of visual information, a time where visual data plays a significant role in each stage of life.
When you perceive how much amount of data has been expanded, it is quite alarming. Say, for instance, Google receives over 2 million searches per minute. Now, on a bigger scale, human beings generate about 2.5 quintillion bytes of data each day.From a human’s perspective, visualization works because he or she responds to it and processes the visual data much better than other data types.
You will be fascinated by reading the fact that a human brain can process pictures 60,000 times quicker than text. (Source) About 90% of the information communicated to a brain is through visuals. Every human being is a visual creature. This makes it great for big to implement creative solutions to leverage data visualization and unveil their true perspective to meet the business goals.
Talking about online shoppers, they are first attracted to the visual elements and not the written copy.
Now, the product’s photo quality reflects the brand image, building the first impression. This is a great opportunity for sellers. Every image should be appealing, polished, and professional enough to evoke maximum engagement.
The right photography of a product can call for greater conversions. Wonder how?
Well, here are a few aspects to note.
Images Serve As A Key Element To Branding
When it comes to “branding,” product photography is one of the best ways to strengthen it. It also ties it across a strong web presence. It is vital to your product’s photography consistent in terms of style. This makes sure that your brand has its digital persona.
Quality Images Can Attract People To Buy
Undeniably, many product listings on Amazon have low-quality images and the probability of those listings generating sales is much lower than the ones with better quality pictures. Now, the whole idea of taking pictures perfectly is that you do not have to explain them in words.
Amazon Product Photography Tips
It is true when they say, we purchase with our eyes, meaning only if we like it, we get it. Often this decision-making process – whether to buy a product or not – solely depends on if the product is visually appealing.
No wonder nailing your product images should be your top priority! Product pictures serve a key purpose – to grab a buyer’s attention while searching for your product. Your listing should try to invoke affirmative emotions, and if you manage to get this done, there are higher chances of converting those shoppers into customers.
Your product can speak a lot about your brand, and the kind of buyer you are marketing it to is a sign of the price of your product. When it comes to Amazon product photography, sellers are frequently overwhelmed with that list of priorities. It all starts by spending hours taking multiple shots of the product from different angles just to get that ideal shot.
And that’s not over yet. Further, you have to spend hours picking and editing the best photos, to accomplish a consistent feel in every product photo.
So, how could you cut the lengthiest portion, and then, streamline the entire product photography process?
Sounds interesting?
Well, that’s exactly what the idea of this guide is. It is all about how you come up with fantastic photos of your product and yet keep the process simplified. For sellers who do not have a knack for photography, it is probably wise to hire an amazon product photography service / Product Retouching service or a company to get the job done perfectly for you. On the other hand, for sellers who prefer taking this task into their own hands, there are a few important tips to remember in order to achieve attractive and professional product photography.
1. Begin with a consistent plan
Now, if you are selling just one product on Amazon, it is pretty easy. However, if you have a whole catalog of items that you sell at the Amazon Marketplace, it will take some time. You can start with branding. Plan on how your product pictures should look and how they can relate to your online presence. Be it a logo, settings, or color scheme. Since potential shoppers are navigating to your listing, no photo should appear as if it belongs to some other website. You have to keep them consistent.
2. The magic of white background
Not only Amazon but most eCommerce websites have their items displayed on a plain, white background. Ever wondered why? Well, this is because of three simple reasons:
It minimizes unwanted distractions
It makes the product the center of attraction
It creates a consistent feel
From an aesthetic perspective, plain, white background gives a more professional, and much cleaner finish. It also helps colorful products pop up. Using a photography shooting tent or curved backdrop helps in eliminating the shadows, and cancels the sharp angles that might leave a picture look a little harsh.
There is most definitely a dispute for in-context product photography. While some products look the best in the natural environment, others might not. If you are unsure what option can drive in more sales, it is best to experiment to see what is the effective option.
3. Set the right lighting
If you have been taking selfies, you would know how the right “lighting” can change everything. This also applies while taking products. The right light setting can transform even the dullest-looking product into its best form. This, in turn, also helps in converting sales.
Most items look better when shot in natural light, preferably a soft setting that is distributed evenly across the product. While this may not be an option always, you can try using artificial lighting with the help of umbrellas/reflectors or a DIY light-box. This is to check what option gives the perfect results.
4. Keep the image resolution high
When you click photos of your product, make sure that they are taken using a good camera with a high-resolution lens. Every photo that you upload must be of incredible quality and never be blurry.
Every image must convey product details upon viewing. On the other hand, the lighting at the time of shooting the product should neither be too dull nor too bright. Keep it mediocre, as it enables the buyers in making a proper make a buying decision.
5. Pay attention to the product size
This is something every seller must pay attention to – the product’s size. It shouldn’t be shot in a way that it looks too small or too big. If you click the product in a way that its size appears very small, you will observe plenty of white space surrounding it and chances are that a few important details might be missed out. On the other hand, if you click it in a way that the product’s size appears very big, then a few of its features might be out of focus.
These problems will eventually lead to a poor shopping experience and can affect your ratings as well. Hence, it is important to remember the amazon image aspect ratio guidelines before planning to shoot.
6. Show different angles of the product
It is always good to have a few photos of your product than just one or two. This is because the people whom you are selling it to might not have experienced the product physically yet. They have no idea what your product looks like or feels like. Therefore, it is vital to give them an ample amount of pictures shot from different angles.
Talking about Amazon, the first image, which is shown on the product & search page is known as the “main image.” Keep in mind that this so-called main image always displays the product’s front view. Therefore, showing the product’s back view doesn’t make sense. However, the rest of the photos must cover the product’s every possible angle to help a buyer understand how the product will actually be when they receive it.
7. Use a tripod or a steady surface
You shouldn’t make your potential buyers suddenly think that they need glasses to view your product. Instead, eliminate the chances of camera shakes. This can be best avoided by using a quality tripod or perhaps, anything that has a steady surface – it could be even a box or a book for that matter.
Your product will look crisp and sharp, just the way you want it to be.
8. Avoid placing additional items with the product
When it comes to online selling, maintaining “transparency” with your buyers is one of the key aspects. Photographing additional items along with the product might confuse the shopper and might cause disappointments when they don’t get those accessories they had seen while purchasing.
Hence, it is important to show only what you are selling to the customers and not anything that they will not get at the time of delivery.
9. Do Not Put Immodest Content
As far as amazon’s reputation is considered, it is one of the best when compared to other platforms. It paves the way for selling to different customers across the globe. Hence, the sensibilities of every buyer should be considered prior to upload any product image.
It is important to focus on your product rather than the mannequins or models while shooting, especially intimate apparel. Also, uploading indecent images isn’t allowed. It will only cause rejections from Amazon.
Amazon Product Photography – Useful Tips & Tricks That You Should Know
How To Take Product Pictures For Amazon?
When it comes to eCommerce, every product photo is a deal clincher. Hence, if that look and feel are missing, you will be losing out on sales. The experience that a customer gets when he or she is in a physical store is something that you cannot bring in the virtual world. But you can certainly use high-quality pictures of the product to bring about as real an experience as possible. In fact, this plays an equivalent role.
The only way to accomplish this is by hiring a professional photographer. However, if you are tight on your budget, then renting a studio or hiring professional photography can turn out to be expensive. The best thing is that you can even do this at home. Although you can employ a lightbox for shooting small products, the tips given below focuses on taking photography with natural light. This technique is called the “Window Lighting Technique.”
Now, you will be fascinated at how effortlessly you could turn your spare bedroom, garage, or living room into your photography studio and how you can consistently shoot quality images of your product.
Once you identify a spot to shoot, start equipping it. Even you know that the list of equipment used by professional photographers is long. However, you do not need too many tools.
At home, just make sure that you have the following things:
1. A good camera
These days, a majority of people have a good camera. However, if you don’t, purchase it from a reputed brand that has manual exposure settings besides the auto functions. To create those fantastic pictures, you do not necessarily need a costly camera. Note that a camera is not “the” but “one of the” factors that affect your final outcome. The other factors include product styling, studio setup, the right amount of lighting, and post-production practices.
2. A nice tripod
Tripod is essentially one of the important pieces of equipment you need to invest in because it helps in stabilizing your camera at the time of the shooting. Since you are setting up a studio-like feel at your home, you should take shots at a spot where the lighting isn’t optimal.
This is because low lighting requires longer camera exposure, which in turn, increases the possibility of camera shakes when you breathe. When using a tripod, ensure that your photos aren’t hazy or blurred due to camera shakes.
3. A memory card
So, the next thing that is crucial for product photography is certainly the SD card. Your memory card lets you store all your photos and further, transfer them to a laptop from your camera for post-production works and archiving.
These are inexpensive and hence, it is good to keep a few handy.
4. A white paper roll
Since amazon’s photo requirements call for a “white background,” it is important to invest in a quality white paper roll. This gives a smooth background for all your photos and minimizes the post-production tasks. So, a roll of 10 – 15 feet is necessary because you will need the long, white sheet positioned behind the product. This gives a seamless background. Make sure that the roll’s width is about 50 inches in order to accommodate or cover the majority of the product.
5. White foam boards
A white foam board comes in handy. It helps in reflecting and increasing the available light. Buy a few of them and utilize them in order to reflect light to the product from the window.
Doing this will also help in reducing the product’s shadow and provide that “fill light” aspect for a complete, clean, even look.
6. A folding table
A good folding table helps you in laying the white paper roll as the paper background while prepping for the product shoot. This table can have a normal height to help you adjust the tripod’s height and shoot from the angle and height you want.
7. Clamps & Duct Tape
Besides the above things listed, you will also need a few clamps and duct tape rolls in order to secure the white background roll onto the table and walls where you place your product. This prevents the product from moving at the time of the shoot.
You can even use clamps if possible to make it easy. It becomes convenient to clean after the shoot.
8. Window with enough natural light
Lastly, your window is the best light source. However, you require access to big windows close to the shooting spot. All you need is to clear the area around the windows to have an adequate place to keep your background, table, and move around at the time of the shooting.
Keep in mind, larger windows give a better shot, as they emit higher natural light and help the product to be shot more evenly. On the other hand, light from small windows can be a little directional.
If your product size is small, you can manage it with the help of small windows. However, a big product definitely needs a larger light source.
Are all things ready? So, what to do next?
If you have all the equipment ready, the next step is to start setting them up. Follow the instructions given below:
Step 1: Keep the table close to the window.
Step 2: Spread the plain, white paper roll from the table’s bottom, stretching all the way to the wall, creating a smooth curve.
Step 3: Secure the paper roll with the wall and table using the duct tape or clamps.
Step 4: Keep the foam core board in an angle that the natural light from your windows reflect on the product.
Step 5: Use the tripod and set it to a proper height.
Step 6: Fix the camera on the tripod.
Step 7: Start taking photos and experiment at different angles to see what gives the best results.
Amazon Product Image Requirements
The product image that you submit to Amazon should meet the technical specifications mentioned below:
The image file should be in any of these formats: TIFF (.tiff or .tif), GIF (.gif), PNG (.png), or JPEG (.jpg or .jpeg).
The image dimension of every image should be at least 1000 pixels or larger in either width or height preferred.
The color mode of the image should be either in CMYK or RGB.
Every file name should contain the product’s identifier (13-digit ISBN, Amazon ASIN, JAN, UPC, or EAN) followed by a period and the file extension (e.g. C000163789.jpeg or 455678967845.tif).
Note: Using special characters like dashes, spaces, or any other character in the filename prevents the image from being published online.
For images that are named by the product identifier without any variant code or perhaps, named with the MAIN variant, Amazon has a few image standards, which include:
For Main Image:
Any kind of illustration or drawing for the product is not allowed.
The image should be the product’s professional photo or cover art that is being sold.
The image should not contain confusing or gratuitous additional objects.
Every image should be professionally lit, scanned/photographed, and be shot in proper focus with smooth edges and realistic color.
The images of music, DVD/video, and books must be as the front cover, and should occupy 100% of the image’s frame.
Promotional stickers, cellophane, and jewel cases aren’t permitted.
All the other products must occupy 85+% of the image’s frame.
Note that the entire product should be in the frame.
The background should be completely white (or RGB: 255,255,255).
No image should have additional graphics, inset images, or text.
Offensive or pornographic material is not allowed.
For Additional Images (apart from the main image):
Every image should pertain to or be of, the product that is being sold.
Every image should be professionally lit, scanned/photographed, and be shot in proper focus with smooth edges and realistic color.
Other objects or products are permitted only to help express the way how your product can be used.
Backgrounds and other environments can be used for 1-2 images.
The props and product together must occupy 85+% of the image frame.
Any image that is in close-up or cropped state, will not be allowed.
Demonstrative graphics or text are allowed.
Offensive or pornographic material is not allowed.
Before submitting your product photos, ensure that the following specifications are met:
Note: Every photo submitted to Seller Central will be modified to 500 x 500 pixels regardless of the photo’s dimension and size provided. A photo that doesn’t have a dimension ratio of 1:1 is padded with some white space at the shorter sides.
How To Add Photos To Amazon Product Listing?
There are two ways to add a product to your product listing.
Method 1:
With this option, you can add the products using a “product tool.”
Method 2:
If you want to change or add any images that you have uploaded, use the “Manage Inventory Tool.”
Amazon Image Aspect Ratio
As far as we have researched on the Amazon website, there weren’t any mentions on the technical requirements of the aspect ratio, or how many pixels should the longest side have in order to enable the zoom-in feature. It only said that it can be either height or width, whichever is preferred.
However, when we went through a few forum answers and checked one of the help pages of Amazon Seller Central, we found about the aspect ratio. Here are the details:
Image Requirement Aspect Ratio Preferable
Dimension Ratio (maximum) 5 – 1 1:1 or 2:1 is preferred
Amazon Product Image Optimization
Besides clicking high-quality photos of the product, it is important to keep them optimized as well. Amazon incorporates CTR (Click-Through Rates) as well as CR (Conversion Rates) in their algorithm.
Only if your product is frequently clicked and purchased by the buyers, Amazon’s A9 algorithm lifts the product’s position higher in their organic search results.
Now, this means that both your CR and CTR have a direct impact on the product’s ranking. However, it is vital to understand that just quality images won’t guarantee higher rankings.
This is where “Optimization” comes in.
Keep the following factors in mind in order to have an optimized image:
Use all the images on your product listing
Keep the image quality high
Images must be 1000 x 1000 pixels minimum
1. Use all the image space allotted for your listing
So, this is something everyone is doing and seems obvious. But there are even listings that don’t include many pictures of the product. It is either 2 or 3.This is an opportunity to enhance conversions. The photo gallery shows your product’s value or worth to the shoppers.
Therefore, include as many images as possible in the available slots (amazon gives you 9 slots). Try to include the product pictures shot in various angles, show its details, close-up views, and how it is used.
Amazon ranks the products that have a higher number of images. However, your main image must be with a front view without packaging. Keep the shot clearer and bigger to help the customer get an idea of what he or she is going to receive after making a purchase. On the other hand, with secondary images, it is permissible to display photos that add value or aid the buyers in their buying process. The product’s intended use and action shots make a great addition here.
Infographics are yet another incredible way to utilize that extra image spot. But ensure that they are 100 percent about the product and its quality is outstanding.
2. Keep the image quality high
The reason we are stressing to keep the image quality high, again and again, is because it is vital to increase conversions and is required to let amazon zoom in on your pictures. Ensure that every image is attractive. Your main image must be on a white background and should occupy 85% of the image frame. On the other hand, secondary photos are okay to be with backgrounds and action shots (how to use your product).
3. Images must be 1000 x 1000 pixels minimum
Make sure that your main image is capable of zooming, and you will give people better reasons to learn about your product. As said earlier, the preferred file format is .jpg. However, .gif and .png can also be used. In addition, digital graphics that look like your product – 3D rendering with your label are accepted. Once uploaded, make sure to see how your photos look on your listing page.
Being one of the most renowned eCommerce retailers with a massive seller and customer base at its marketplace, Amazon is indeed the best place to highlight your unique value proposition. Yes, of course, you can become a seller anytime there, but learning how to create an Amazon Store and set up your products there helps you to take your business to the next level.
Besides Enhanced Brand Content (EBC) & Amazon A+ Content being the norm (which you should have already implemented), your business can reach greater positions with Amazon Stores.
Through Amazon Stores, customers can unveil and learn about more brands as well as their product selections. A “Store” enables a brand to create a dedicated & rich shopping experience and increases engagement.
A brand can enhance its customer experience by enhancing its business-related metrics like traffic, sales, and engagement over time.
So, what exactly is Amazon Store, and how can it help you increase sales?
Let’s understand them in detail.
Quick Guide:
Why Should You Create An Amazon Store?
What Are The Key Features Of the Amazon Store?
How Do Stores Work?
How Do Amazon Stores Look Like?
How To Create An Amazon Store?
How To Get The Most Out Of An Amazon Store?
Other Frequently Asked Questions (FAQs)
Conclusion
Amazon Store
Amazon’s in-store is one of the key features for brands to drive sales and increase shopper loyalty.
Amazon Stores is the new DIY (Do-It-Yourself) solution, which allows sellers & vendors to set up their own brand stores on Amazon.com. The feature is exclusively designed to provide customers with an immersive and rich virtual shopping experience.
In short, it is a free self-service product, which enables a brand owner to create and design multi-page stores to highlight their products, value proposition, and brands on Amazon.
Why Should You Create An Amazon Store?
The main purpose of creating an Amazon Store is to drive shopper engagement. Since it is a created destination for buyers to learn about different brands and shop different products in one place, it makes it ideal as all as convenient for them to shop.
A “Store” provides an excellent brand-centric shopping experience on both Mobile and Desktop platforms.
Amazon Store elevates the experience of shoppers by:
Giving an enhanced mobile experience.
Capitalizing on both internal and external sources of traffic.
Boosting organic rankings on Amazon SERPs (Search Engine Page Results) and thereby, increasing the sales volume.
Providing an opportunity to popularize your brand to newer audiences.
Promoting your products to all the preexisting customers.
Amazon Stores is a perfect way to build customizable pages by showcasing a small or single group of items. You can include a slideshow containing photos, texts, videos, and other types of content. This makes it great for new product launches.
Why Are The Key Features Of Amazon Store?
Key features:
Unique Design: With Stores, you can pick your design from a wide range of templates with different store layouts as well as customizable features just to ensure that your brand looks its “best” to the shoppers.
Custom Curation: You can feature or highlight a handpicked/dynamic collection of products with optional and impressive multimedia content to improve the shopping experience of your customers.
Integrated Promotions: You are free to use its inbuilt social features such as social sharing buttons, connected with various promotional extensions like Headline Search Ads. This drives store awareness & traffic.
Multi-Pages: Amazon Stores lets you create multiple pages (3 levels maximum) for showcasing your brand as well as products. You can customize the shopping experience depending on what your business needs.
Self-service Builder: With Stores, you get a simple and intuitive builder, which inspires you to set up as engaging as it can be. The templates are simple and easy to use. They are available for free and can be simplified to create an extraordinary experience.
Rich Media: It helps in elevating the shopping experience by including rich media & content like images and text. A vendor can create his or her Amazon Store just by logging in to his or her Amazon Marketing Service account and select the Stores tab.
No coding required: Since it has a set of templates to choose from, you don’t have to know coding or programming to create one. You can use text, images, and videos to promote your brand and items for free on Amazon without writing a line of code.
How Do Stores Work?
The way Amazon Stores work is not rocket science. It is simple and easily understandable.
1. Showcase your products and brand story.
You can help shoppers to locate your product portfolio and its related items on Amazon easily.
Here is a good example of it:
2. Design your brand store the way you want. No coding skills are required.
With the help of pre-designed templates or drag-and-drop tiles, you can create a fully customized, enriched, and multi-page store, without coding skills.
3. Get your own web address on amazon.com.
You can drive shoppers to visit your Amazon Store via ads and other marketing activities outside Amazon by using an easy-to-remember and unique Amazon URL.
4. Utilize Store Insights for optimizing your ad campaigns.
Amazon Store Optimization
Insights give you a clear understanding of your Amazon Store’s traffic sources and sales. When you have these metrics, you will know how to perform better and excel in them.
How Do Amazon Stores Look Like?
Amazon Store has multiple pages and every page comprises a header & footer surrounded by different content tiles.
The picture shown below is an example of how your products can look on the Amazon Store.
Amazon Store Basics
Every Amazon Store can have up to 3 levels with various pages at every level.
Note: When you drive traffic to any new storefront page through Headline Search Ads, you can easily send shoppers to your home tab or any other category directly. Every page includes a unique link or URL.
Amazon Store enables you to select from 3 different templates (which are default tiles):
Product Grid
Highlight
Marquee
Amazon Store Manager involves 4 sections:
Page Manager: This allows you to select, move, create, and delete the pages from Amazon Store.
Tile Manager: This allows you to add, move, edit, and delete the tiles from Amazon Store.
Preview Window: This shows how your current page looks like when it is life.
Status Bar: Gives the Amazon Store’s current moderation status and shows the error messages.
How To Create An Amazon Store?
Creating an Amazon Storefront is not a simple task but also free, given that you are had enrolled with the Amazon Brand Registry program.
Here is the step-by-step process to set up an Amazon Store:
Step 1: Create a professional seller account
Everything begins by signing up for a professional seller account. Once you give your basic details like name, password, email address, payment information, and business contact details, Amazon allows you to pick the web store items and buy your online store.
To ensure that you are a real or legitimate business, Amazon will verify by calling you on the business contact number that you have provided. Therefore, always double-check if you have typed everything correctly.
Amazon is selective when it comes to the approval process and letting you sell on its marketplace. It has strict documentation and verification requirements. This protects the sellers and the customers by removing counterfeiters as well as sellers who try to manipulate organic rankings with several accounts.
To create a professional seller account, these details are required:
Your name (as per the income tax return)
Your full address
Your contact number
Your email address
Your business structure type (LLC partnership, sole proprietor, corporation)
Registration state
Your FTI (Federal Tax Identification) number
For identity verification, you need to keep these handy:
First & last name
DOB (Date of Birth)
Government-issued ID like driving license number
Country of issue
A high-quality image of the front and back part of your ID
Your bank account statement
For fee:
You need to give your credit card details so that Amazon uses it to charge your monthly fee, which is $39.99.
For payment:
You need a U.S. bank account number
Step 2: Register with Amazon Brand Registry
Now, once Amazon approves your professional selling account, the next step to create an Amazon Store is to apply for ABR (Amazon Brand Registry) program.
The ABR program offers different tools to guard and improve your brand on Amazon. This also includes:
Professional presentations
Access to even the “gated or restricted” selling categories
Enhanced marketing & advertising features
Note: Brand Registry tools aren’t accessible to resellers.
So, once you register your brand, you can create enhanced content for every product page like lifestyle images, brand messaging, and many other assets.
Remember that only a registered brand can control all its product pages. The Brand Services of Amazon will help eliminate counterfeit sellers/sellers who disobey your brand’s trademark.
Though a tool like Brand Analytics provides detailed insights and metrics on Amazon’s shoppers, one of the primary benefits of Brand Registry is its ability to create a branded storefront.
To apply for the ABR program, you need to provide these details:
Your brand name, as registered with the United States Patent & Trademark Office
Your brand’s serial number (USPTO registered)
List of countries where your products are manufactured as well as distributed
Your brand name’s image on your product
Your product label image
Your product image(s)
Step 3: Create your store’s homepage with an appropriate template
Once your brand is registered with ABR (Amazon Brand Registry), login to your Seller Central account or from Ad Console, go to Stores > Manage Stores.
managing amazon store
Managing Amazon Store
Once you do this, you will be shown a list of your brands that qualify for a Store creation.
Choose from the list and follow the additional steps that Amazon prompts you to do. This mainly includes designing your homepage by choosing a template.
Amazon Store Product Themes
Amazon will show you four different themes to choose from. Pick the right one based on your business needs.
Step 4: Build your store pages
After you establish your store’s homepage, it is time to create additional pages depending on your best-selling products, catalog categories, deals, discounts, and more.
Amazon Store Settings
You should build your store pages much similar to the one if you had your own eCommerce website.
Pay attention to even the tiniest detail while building the page. Ensure that the navigation is easy enough for shoppers to find exactly what they are looking for without much effort. A convenient shopping experience is key here. So, make sure that your pages are designed that way.
Step 5: Add the content tiles to every page
Once you have established a proper hierarchy of your pages (keep in mind that they should be customer-friendly with easy navigation), the next step is to add content tiles to every page.
So, content tiles are basically the content that a customer can interact with on every page of your store. These include:
Images
Titles
Product grids (example: bestsellers)
Galleries
Video
Navigation
Step 7: Upload your products
Once you have the design layout of various pages ready, it is time to add your products. In each store, there is a product inventory, a wide collection of items for buyers to pick from.
So, your store is no exception. You will also have to stock your store with items that you want to sell.
However, unlike other stores, the perk over here is that you can upload your entire product inventory in one go.
You just have to assign ASINs (Amazon Standard Identification Number) or UPC Codes to every product. Then, it is only a matter of copy and paste.
Amazon makes this task straightforward because you can easily search the ASINs that you are selling on their Marketplace already.
Amazon Product Grid
Step 8: Submit your created store pages for review and then, publish
After you have designed all your pages properly, you do a quick review of them so that there aren’t mistakes. Click on the Store Preview option to check how your designed page is like.
Check for:
Grammatical errors
Spelling mistakes
Branding or image inconsistencies
Issues with navigation, product images, and content tiles
Now, submit the created pages to Amazon so that they can review them.
What metrics can you see through “Amazon’s Store Insights”?
Amazon Store Insights offers clear metrics related to your products, which include:
Daily visitors: This is the total number of unique devices or users who viewed your store page(s) in a day.
Views: This is the number of views that a page received during a specific time period. However, this also includes repeated views.
Views or Visitor: This is the number of unique pages (on average) viewed by a visitor on a daily basis.
Sales: This is the total estimated sales that your products received from the visitors within 14 days of their last visit.
Units sold: This is the total estimated units that store visitors bought within 14 days of their last visit.
Tip: Use the brand analytics tool from your Store’s main page.
Apart from the metrics mentioned above, there are 4 other sources of traffic that Amazon also measures, which include:
Organic Traffic: This refers to the traffic that you get within Amazon such as the brand’s detailed page links or search results (by ranking on page #1 of Amazon results page).
Traffic from Headline Search Ads: This is the traffic that your store pages receive through headline ads.
Tagged Sources: This is the traffic that is tracked via custom source tags. You can create your own source tags for multiple traffic channels.
Others: Other sources of traffic that aren’t categorized.
Additional Tips:
1. Use the Brand Analytics tool to measure your sales performance
Once you have published your branded storefront, you can start using the Brand Analytics tool to measure your performance.
Many resellers & brands tend to buy third-party tools to gain insights into Amazon’s conversions, sales, search terms, and other different metrics.
But the problem with those tools is that besides paying so much, they fail to give you the exact data. They are rather “estimates,” and not actual data.
On the other hand, Brand Analytics is a tool from Amazon, which is exclusively designed to provide real data to all registered brands. It shows the information on:
Top keywords or search terms that can help you get more conversions for respective products & categories.
Keywords of your competitors’ products.
Also, you can see the metrics of the top-performing keywords along with the top 3 items, which have converted to sales for every search term. Now, this is an important piece of information, which no third-party tool will be able to give.
It enables brands to know the exact keywords that customers are searching for and which can convert into more sales.
Brands can leverage this information to optimize their product pages as well as build better and creative ads.
Besides this, Brand Analytics provides data for product comparisons. It also shows the items that potential buyers compared to yours, and further shows if a compared product made a conversion.
This is brilliant information to build targeted ads and analyze your competitor’s ads. Undeniably, customer demographics (gender, income, age, education level, etc.) is one of the most vital data because it gives a 360° view of your product’s performance.
These details help brands to comprehend their customers better, which is important for targeting ads both on & off Amazon.
2. Target Amazon Ads to increase your product sales
Ads are one of the ideal ways to enhance your product sales. With an enhanced ad platform, anyone can give an ad on Amazon but the question is how optimized the ad is, to create better sales?
3. Highlight your products and reflect your brand’s story
It is important to follow a few best practices educating, helping, and inspiring potential shoppers to locate your brand as well as your products.
When it comes to your Store’s messaging, visual identity, and tone – be consistent.
Use engaging and rich content to highlight brand differentiators.
Make sure that your Store’s navigation can be easily explored and discovered.
If you’re stuck, in this video you’ll learn 6 Strategies to Build your Brand on Amazon:
How To Get The Most Out Of An Amazon Store?
These are a few tips that are important to make the most out of Amazon Stores:
Customize your store’s space
Just like no individuals are the same, no two stores can be the same— so, design yours creatively and make sure that the layout you design suits your brand.
Once you have set up your branded storefront, it is time to share it with your customers through a unique store URL (which is: https://www.amazon.com/your-brand).
Note that Amazon’s Store Builder tool helps brand owners to build their stores in a few minutes and get them live in 72 hours.
While designing, make sure that the design is simple and has easy navigation.
Use various templates for product categories, featured products such as new releases or top sellers, and sub-brands. Include impressive multimedia content to add colors to your brand.